
WAV and M4A are the most commonly used audio formats in different devices and programs. WAV files contain the best quality sound but are relatively big and occupy more space. On the other hand, the M4A provides good sound quality in a smaller file size. This makes it a more efficient choice for storage. This is why many people prefer to convert WAV to M4A.
In this guide, we will show you four different methods to easily convert your WAV files to M4A, giving you more options for your audio needs!
Part 1: The Best Way to Convert WAV to M4A in Seconds
Do you want to convert your WAV to M4A as quickly as possible? Tipard Video Converter Ultimate is the perfect program for the job. It provides a lightning-fast 120x conversion speed, making it one of the quickest ways to convert your files.
But that is not all; Tipard Video Converter Ultimate supports more than M4A. You can also convert your WAV files into other commonly used audio formats such as MP3, FLAC, AAC, etc. If you wish to make some adjustments to the audio, you can adjust the encoder, sample rate, channel, and bitrate according to your preference.
The best part? The Tipard Video Converter Ultimate lets you load several WAV files simultaneously and convert them into batches. This means that you can have all your conversions done in one place and at one time, hence saving you time.
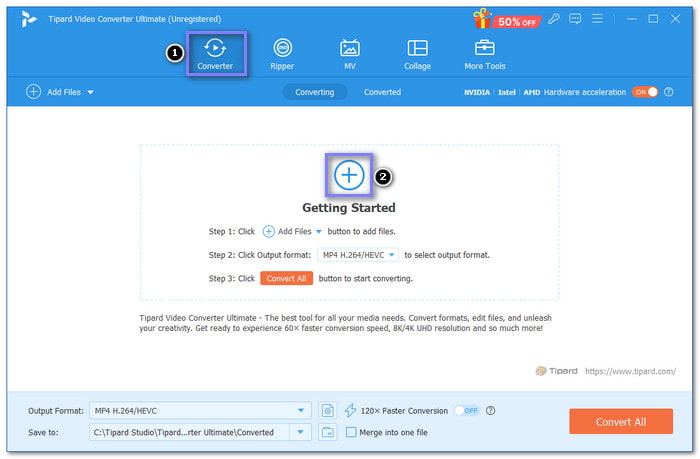
Step 1 To begin, you need to download and install the Tipard Video Converter Ultimate on your Mac or Windows computer. Once it is installed, open the program to begin the process.
Step 2 You are already directed to the Converter tab. Hit the (+) button to add the WAV file to the program.
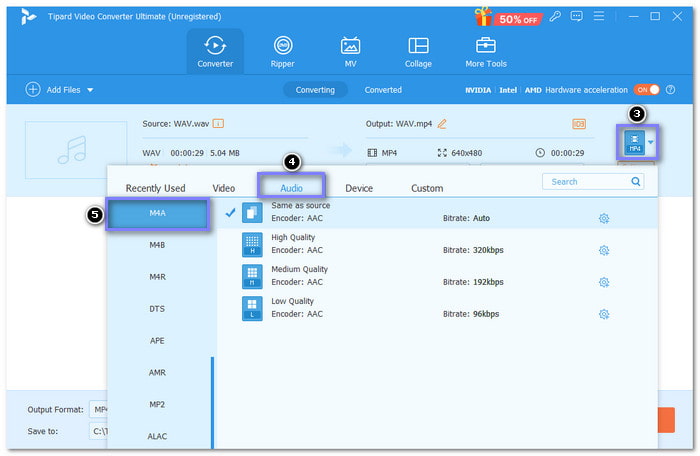
Step 3 Head to the Format drop-down menu on the right corner of your imported file. Click it, and select Audio. Please scroll down until you see the M4A format. Once found, click it, and your imported file will be converted into this format.
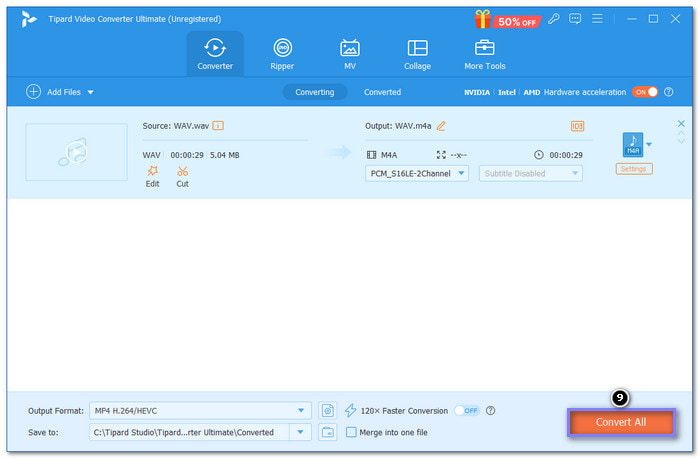
Step 4 In case you want to customize the audio settings, click the Cogwheel button. You can change the Encoder, Sample Rate, Channel, and Bitrate here. Once settled, click the Create New button. It will save the changes you made.

Step 5 For the last step, hit the Convert All button to convert your WAV file to M4A format. You can have your M4A file in your local folder in seconds!
Part 2: How to Convert WAV File to M4A in iTunes
A reliable file conversion program, iTunes, allows you to change formats without extra programs. The conversion process is straightforward and fast. It makes it a great option for anyone who needs to convert files on the go.
To convert WAV to M4A, you can use the AAC Encoder, which is perfect for creating M4A files. You can choose from other options like MP3 Encoder or WAV Encoder, depending on your needs. The best part is that once the conversion is done, your new M4A file will be saved alongside the original file in your library.
Step 1 Open the iTunes application on your system.
Step 2 From the menu, click on iTunes and pick Preferences. Then, go to the General tab and click on Import Settings.
Step 3 In the Import Using tab, select AAC Encoder. It is the format used for M4A files. Then, click OK to confirm your choice.
Step 4 Find the WAV file you want to convert. Go to File, Convert from the menu bar and select Create AAC Version. This will convert the WAV file to M4A.

Part 3: Easily Convert WAV to M4A with Audacity
Audacity is a free and popular audio recording and editing program for Mac and Windows. It provides many features for improving audio clarity and adding effects. However, by default, Audacity does not support exporting to the M4A format. It can only export to audio formats like MP3, WAV, FLAC, AIFF, OGG, and MP2.
To convert WAV files to M4A in Audacity, you must install a plug-in called FFmpeg. FFmpeg expands the audio format options. It allows Audacity to import and export various formats, including M4A. If you use Audacity 2.0.6 or higher, FFmpeg version 2.2.2 will work for you. For Audacity versions earlier than 2.0.6, you will need a newer version of FFmpeg.
Step 1 Install FFmpeg on Audacity to enable support for M4A (AAC) files.
Step 2 Drag and drop the WAV files into Audacity. You can import a single file or many files, depending on your needs.
Step 3 Once your WAV files are loaded, select Export Audio from the File menu. If you want to export multiple files, click on Export Multiple.
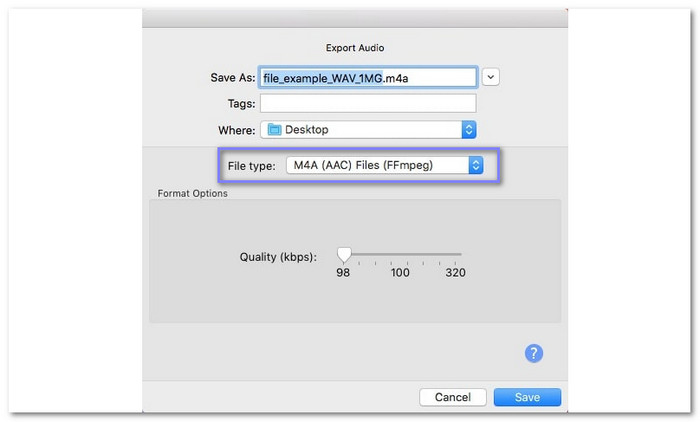
Step 4 In the Export Audio settings, choose M4A (AAC) Files (FFmpeg) as the file type. Then, select where you want to save your new M4A file and click Save.
Step 5 Before finishing, you can edit the metadata tags, like the artist or album name. Once you are happy with everything, click OK. Your WAV files will be converted and saved in M4A format, ready to use!
Part 4: How to Change WAV to M4A Online
If you prefer converting WAV to M4A online without creating an account, CloudConvert is a great choice. This platform will help you easily convert WAV files to M4A format. The process is straightforward: upload your WAV file, choose M4A as the output format, and click the convert button. You can also set up audio options such as codec, bitrate, channels, volume and sample rate. In this way, you can obtain the exact quality you need without overpaying for a professional's services.
Step 1 Visit CloudConvert - WAV to M4A Converter's official website using your web browser to access it.
Step 2 Click the + Select File button. It will open your local folder. Find and open the WAV files you desire to change to M4A format.
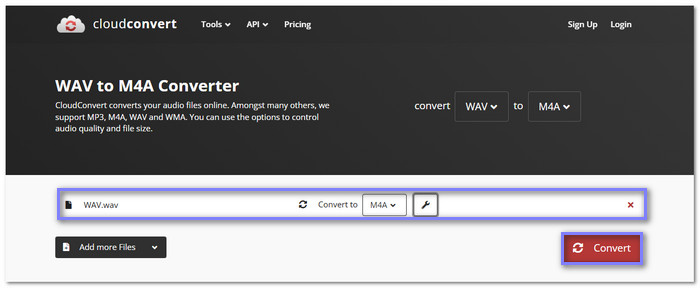
Step 3 The Convert to option is already set to M4A, so there is nothing to change here. If you want to fine-tune the audio settings, click the Wrench button. You can fine-tune the Audio Codec, Audio Bitrate, Channels, Volume, and Sample Rate here. You can also trim unnecessary parts from the start or end of your audio file. To save the changes, hit the Okay button.
Step 4 Finally, click the Convert to initiate the conversion process. After that, click the Download to save your converted output in your local file.
Conclusion
To sum up, converting MP3 to AIFF may dramatically improve audio quality as well as compatibility across various professional applications. The process is easy; whether it's with Tipard Video Converter Ultimate, FreeConverting, Apple Music or online tools like Podcastle and Convertio. Select the option which suits you best and enjoy having high fidelity lossless audios.
More Reading

About the Author
