
Editing audio file metadata is crucial for effective organization and retrieval of audio files. If you are looking for instructions on how to bulk edit WAV file metadata, we have covered all the best tools and techniques in this guide. The WAV file tag describes a variety of audio file components, containing such information as title, artist, album, genre, year, and cover image. It captures all the necessary information needed for proper categorization and management. Whether you prefer desktop applications or web-based services, we will demonstrate the most straightforward methods for performing accurate and fast modifications.

Part 1. How to Bulk Edit WAV File Metadata on Windows 11/10
Editing metadata for many WAV files on a single go is much harder to do as it involves a lot of clicking around. This is where TagScanner comes in to save the day. This free software lets users edit tags, rename files, and organize their audio library in a far more intuitive fashion, which makes it much easier to manage the audio files.
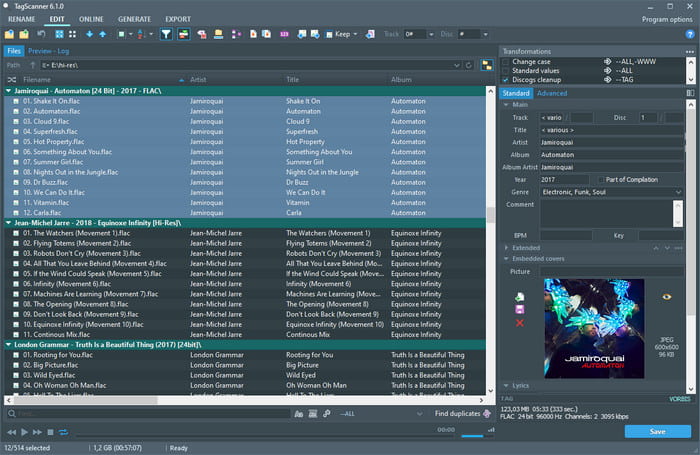
Step 1 Go to the TagScanner official web page, where you should download the latest version of the software. Once the download is done, run the installer and complete the setup steps that are laid out for you.
Step 2 Once installed, start TagScanner. Either click the Browse button to select your WAV files or drag and drop them into the software interface. Optionally, you can also load a folder that contains multiple files in it, which TagScanner will then process.
Step 3 At this point, open the Tag Editor tab and start changing the Title, Artist, Album, Genre, and other metadata fields that you wish to edit.
Step 4 To modify several files simultaneously, click Ctrl on the keyboard and use the mouse to highlight the desired files, or use Ctrl + A to select all the files from the selection.
Step 5 After the files have been picked, key in the needed metadata in the appropriate boxes. All modifications will be executed for every file which has been selected.
Step 6 Click Save to effect the change that has been made. All chosen WAV files will have their metadata modified by TagScanner straight away.
Step 7 To check your changes, right-click on a WAV, and in the window, select Properties followed by the Details tab, where metadata will be shown.
Part 2. How to Bulk Edit WAV File Metadata on Mac
Updating the metadata on several WAV files at once for Mac users is cumbersome. Thankfully, there is an MP3 tag that will assist in the bulk tag editing. This is a robust tool, Mp3tag, where users can edit files in different audio formats, such as WAV, and change file metadata for better organization and playback in a WAV player.
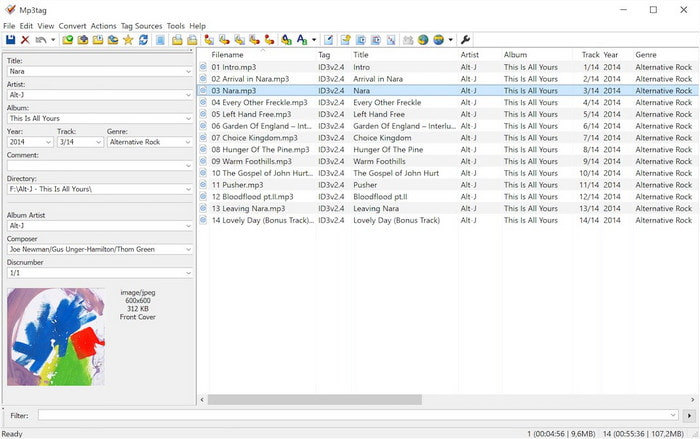
Step 1 First, download the Mp3tag from the homepage. Wait for the download to complete, and follow the instructions to install the software on your Mac.
Step 2 Launch Mp3tag, and then import your WAV files into the program by dragging and dropping them into the application window. You can select an entire folder if you wish to import numerous files at a time.
Step 3 Click on any of the files, then use Cmd(⌘) + A to select all, or use Cmd(⌘) with specific mouse clicks to select files in particular.
Step 4 To assist with tagging files on the left panel, once the required files are selected, you can enter the relevant Title, Artist, Album, Genre, and Year.
Step 5 Once any changes have been made to tagging, navigate to the corresponding file and either click Save or Command S. Instantly after altering the metadata of one WAV file, it is expected all the others tagged with it will follow suit.
Step 6 To verify the changes were made, one can plug in a WAV file into Finder, right-click select Get Info, and sink beneath the More Info section to find and check the rest of the needed metadata.
Part 3. How to Bulk Edit WAV File Metadata Online
If you prefer not to install software, Tagify offers an effective tool to edit video metadata online. The users do not need to download any applications as it works from their browser. It provides options to modify the title, artist, album, genre, and year.
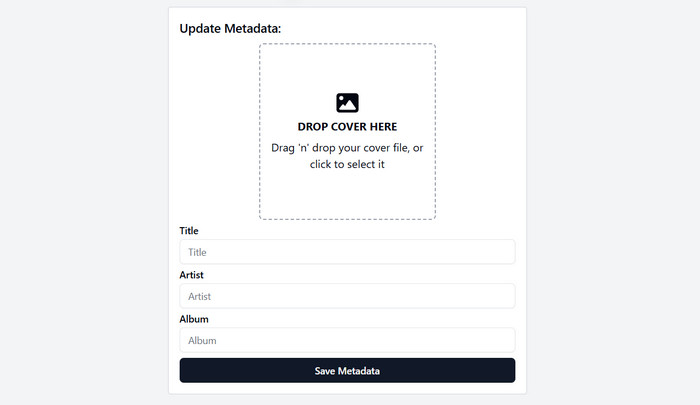
Step 1 Proceed to the official Tagify website.
Step 2 Click on the Upload button and the new screen, and select the WAV files you would like to upload. You may also drag the files to the upload region.
Step 3 After the files are uploaded, you may set metadata for each file, such as Title, Artist, Album, Genre, and Year.
Step 4 Click Save Changes to all the previously edited files to apply the metadata updates at the same time.
Step 5 Then click Download to receive the processed WAV files and the new set metadata.
Step 6 Set the updated information by right-clicking on a file and choosing Properties(Windows) or Get Info(Mac) to see the set metadata.
Part 4. Best WAV Metadata Editor for Beginners
If you need a more streamlined, straightforward method of altering metadata within a file, we recommend the Tipard Video Converter Ultimate. Its user-friendly interface allows just about anyone to alter file metadata, change the date of the file, and so much more, which makes the software genuinely multifunctional.

- Modify created, modified, and accessed dates for WAV and other media files.
- Edit essential metadata fields like title, artist, album, genre, and cover art.
- Includes video/audio editing options such as watermarking, clipping, cropping, and volume adjustment.
- It supports the conversion of video/audio files to a wide range of formats, including MP4, MP3, WAV, and more.
- Allows users to edit metadata and convert multiple files at once, saving time and effort.

Step 1 Download and Set Up
Go to the official Tipard site and get the latest version of Tipard Video Converter Ultimate. Begin the setup process by following the given instructions for Windows or Mac computers.
Step 2 Open the Metadata Editor
Go to the More Tools tab and locate the Media Metadata Editor. Choose a WAV file.
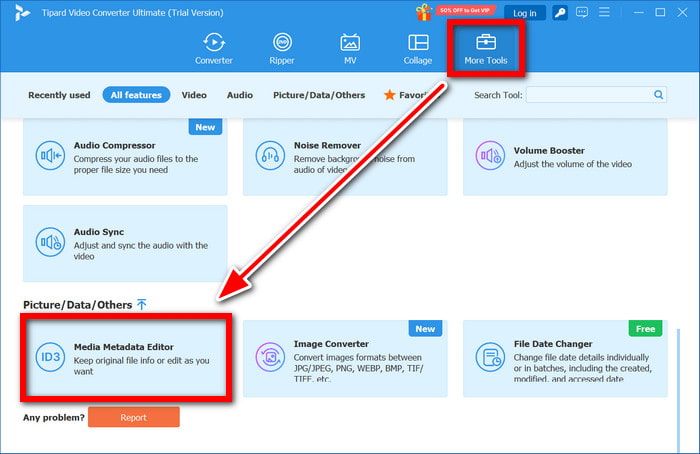
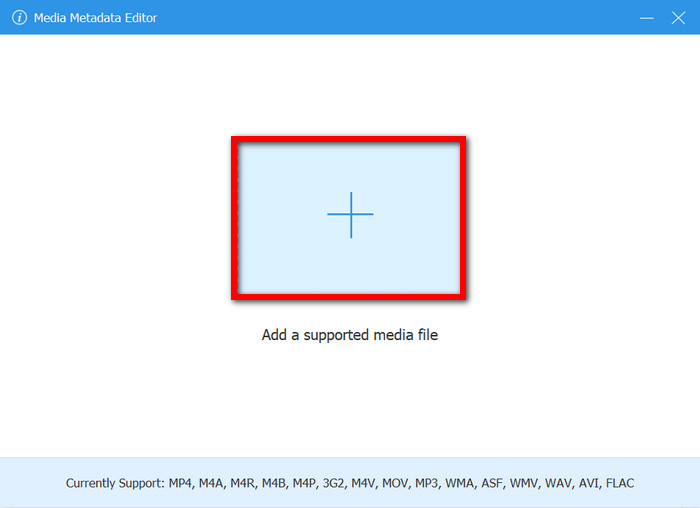
Step 3 Load a WAV File
Then, click on + Add a supported media file to load the WAV file. Alternatively, you can drag and drop the files straight to the interface.
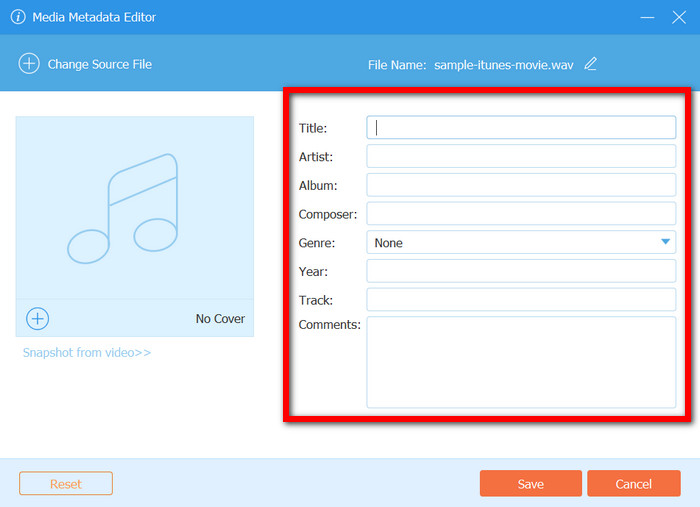
Step 4 Adjust Metadata With File Dates
In the given fields, type in the new metadata you want to replace, including Title, Artist, Album, Composer, Genre, Year, Track, and Comments, ensuring your WAV files are well-organized and adequately categorized.
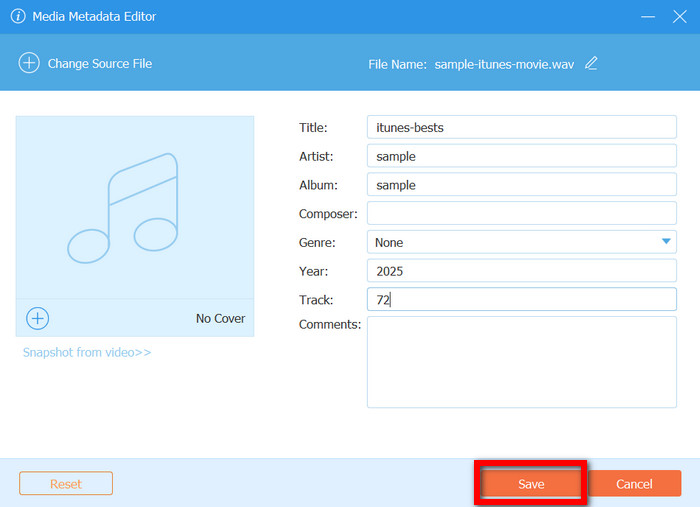
Step 5 Finalize and Edit Changes
Lastly, press the Save button for the edits so that it can be confirmed. The software edits the metadata in the WAV file immediately as per your edits.
Conclusion
To efficiently manage audio files, it is essential to edit WAV metadata in bulk. Various tools simplify the process, making it easier to modify and organize metadata. For beginners, user-friendly software provides an intuitive solution. Choosing the right tool ensures your WAV files remain well-organized with accurate metadata, improving file management and accessibility.
More Reading


About the Author
