
When working on a video project, there may come a time when you want to combine several clips but are at a loss on how to do so. How can you merge two videos in DaVinci Resolve, preserving the video quality and avoiding complex settings? Or if you are a novice, it does not matter. This article will show you the steps and other ways to proceed if DaVinci Resolve does not work. Additionally, we will give you instructions on achieving smooth transitions, perfectly synced audio, and high quality.

Part 1. How to Merge Videos with DaVinci Resolve
DaVinci Resolve is an excellent video editing app that combines editing, coloring, and graphic design. You can also mute and reverse videos in DaVinci Resolve. Whether you are a beginner or an expert video editor, Merging videos in DaVinci Resolve is simple.
Step 1 Download and install DaVinci Resolve from its official page. You may opt for the paid or unpaid versions; with the instructions provided, you can install it on your PC or even on your Mac.
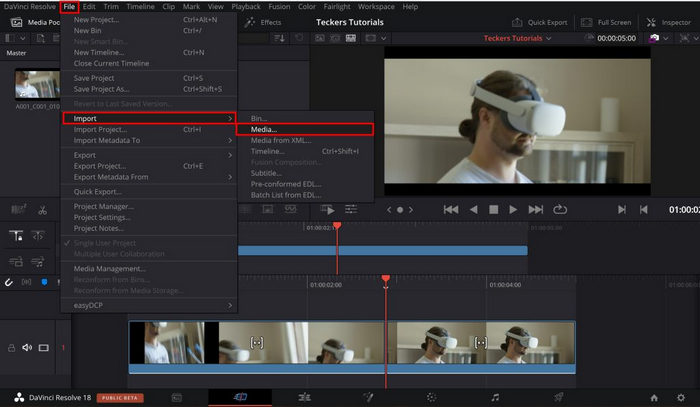
Step 2 After you install it on your device, open the app DaVinci Resolve and create a new project. Next, navigate to the Media Pool, and from there, select File > Import Media, which allows you to browse and choose the video clips you wish to upload.
Step 3 After importing your clips, shift them to the Timeline under the Edit tab. Ensure that they are placed in the correct order so that they can be seamlessly merged.
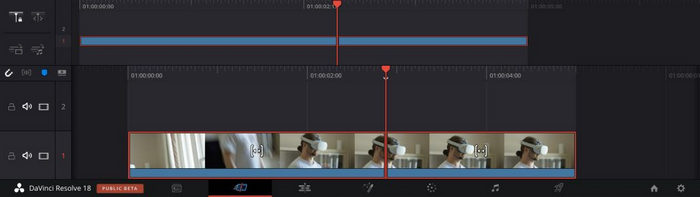
Step 4 Next, move the clips toward each other to fill the gaps. All clips need to be aligned on the same line on the timeline, so this is necessary.
Step 5 Click and drag over all the clips that you wish to combine.
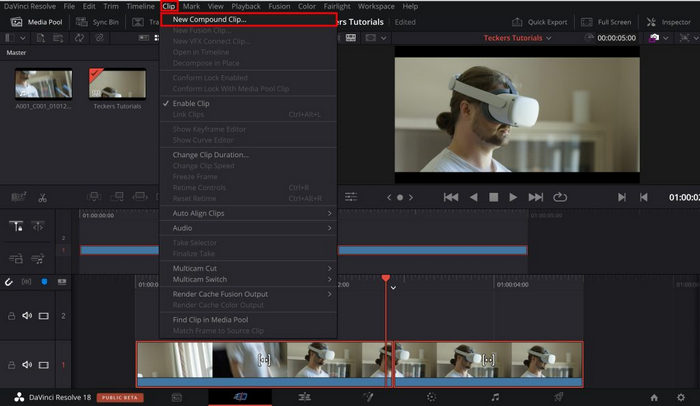
Step 6 After you have chosen your clips, you will need to right-click and select New Compound Clip. Create a name for your clip so it can easily be identified, and then proceed by clicking Create.
Step 7 Lastly, selected clips will be automatically merged into a single compound clip, meaning editing can continue unhindered.
Part 2. Not Satisfied with DaVinci Resolve? Try This Alternative
Although DaVinci Resolve is effective in video editing, it is not always suitable for everyone. For those who prefer merging videos in less time with more simplicity, Tipard Video Converter Ultimate is the best and most trusted option. This complete solution lets you edit and merge videos easily and offers much more to make video editing as easy as possible. Tipard will ensure that your video editing tasks, whether beginner or expert, are as convenient and seamless as possible.

- Combine multiple video clips into a single file in just a few clicks without losing quality.
- Merge videos of different formats, including MP4, MKV, AVI, MOV, and more.
- Crop, rotate, watermark, apply filters, and enhance your videos with built-in editing features.
- Utilize GPU acceleration for 60x faster conversion and merging speeds.
- Merge multiple video clips at once, saving time and effort.

Step 1 Download and Install
Initially, you will need to navigate to the official site of Tipard Video Converter Ultimate, download the software, and install it on Windows or Mac. After the installation is done, open the software to start.
Step 2 Launch The Software And Import The Video
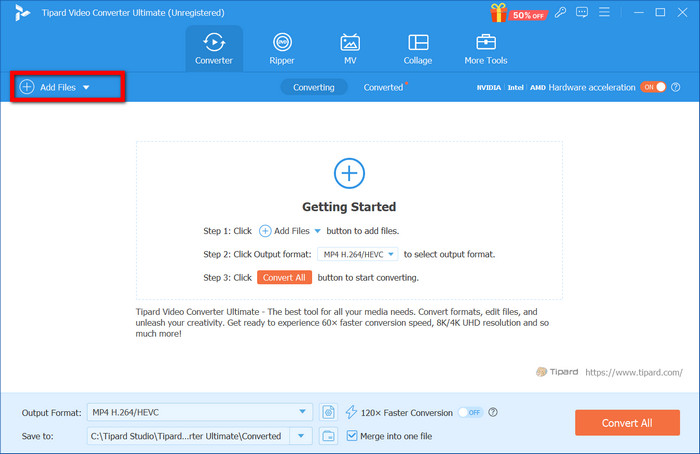
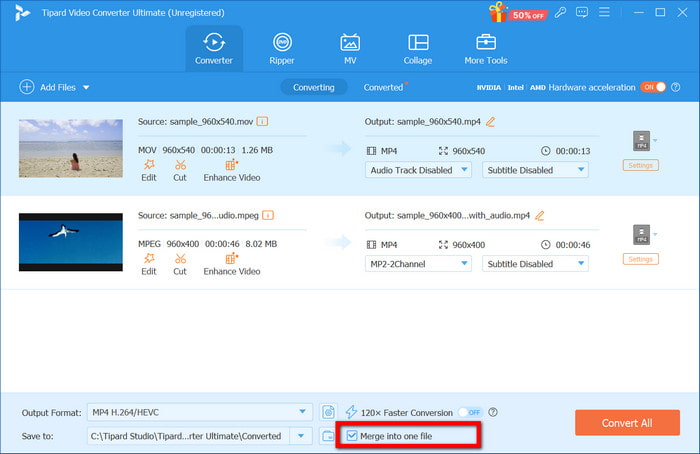
Afterward, launch the software and click Add Files to import the video clips you want to combine. To speed up the task, you can add an unlimited amount of clips.
Step 3 Set The Video Clips
After downloading your videos, arrange them according to the video editing timeline. This creates a seamless flow from one scene to another in the final cut.
Step 4 Merge Videos On the Tool
Then, select the clips that you wish to combine and click on Merge into one file. With a click of a single button, the clips will be merged into one file for convenient usage and editing.
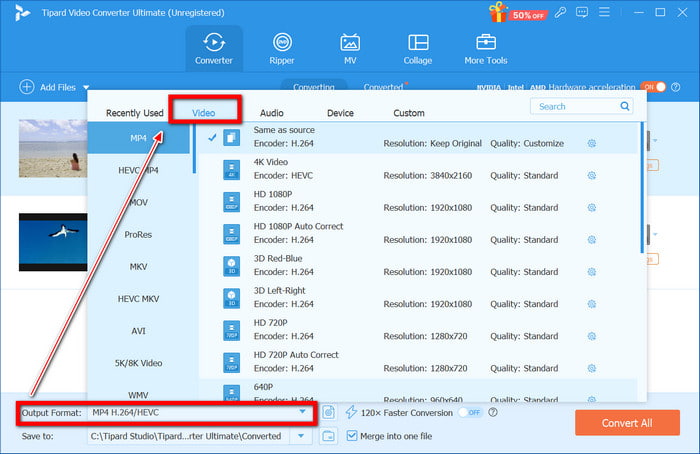
Step 5 Select Quality and Format of Output File
Next, you can choose your Output Format option from MP4, MKV, or AVI under the Video tab. To change other settings such as resolution, bitrate, and advanced parameters for the best quality output possible, click the Edit button to modify the quality settings.
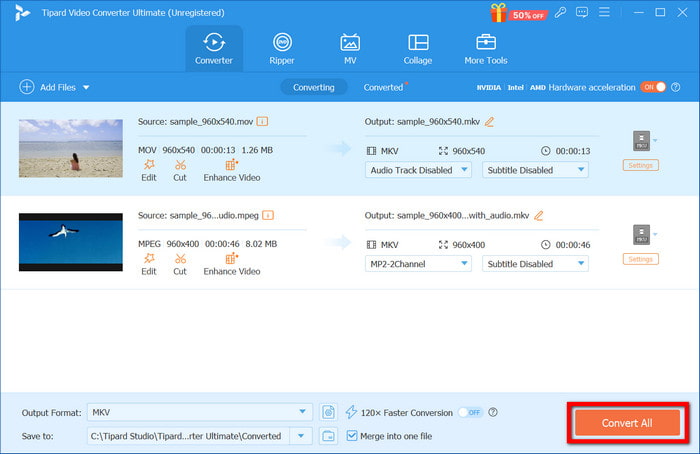
Step 6 Export the Merged Video
Finally, after doing all required edits, click Convert All, followed by the file format you wish to use for your merged video. A few moments later, your video will be ready for your following edits or to be shared.
Part 3. Tips for DaVinci Resolve Video Merging
Although combining and merging videos on DaVinci Resolve is easy, a few things can be done to simplify the work. These steps will increase efficiency, maintain quality, and avoid merging problems.
1. Merging Videos Without Audio Cuts
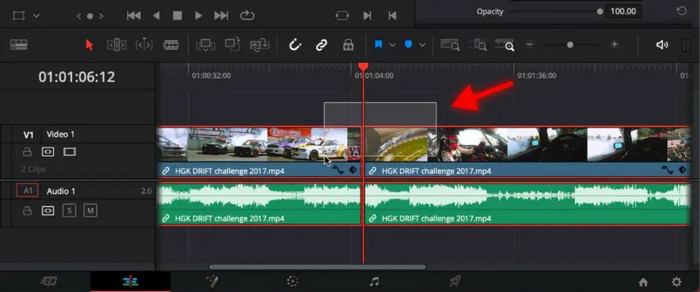
Ensure the clips are positioned correctly on the timeline to avoid hearing unpleasant audio cuts. Then, select them and create a New Compound Clip folder. This lets you put all the clips you intend to edit in one location for easier access.
2. Using Crossfade to Modify Audio Tracks During Transitions
The audience's attention can easily be lost with a sudden change in sound.
- Use the Crossfade setting in the Fairlight tab to decrease any abrupt changes when joining clips.
- Decibel changes are sudden increases or decreases in sound, which is advised to eliminate.
3. The Quality and Resolution Parameters
It is vital not to change the resolution to maintain video quality.
- Ensure the frame rate and resolution are the same as the original clips in the Project Setting (File > Project Settings ) under clips.
- To avoid re-encoding during video export, select Same as Source.
4. Use Transitions for a Professional Look
Intricate cuts between clips may look unnatural. Instead, apply smooth video transitions such as:
- Cross Dissolve (for blending two clips)
- Fade In/Fade Out (for a gradual scene transition)
- Wipe or Slide Effects (for dynamic scene changes)
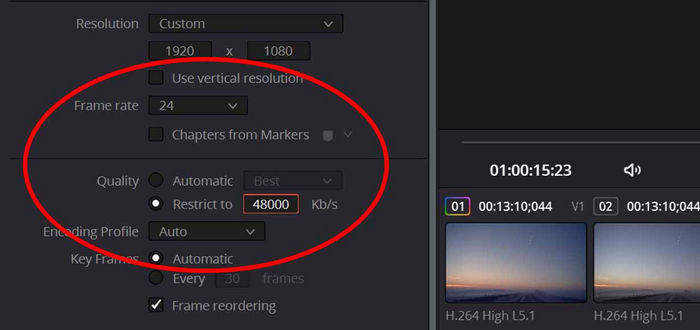
5. Export with the Best Settings
Selecting the correct export settings ensures high-quality playback. Use the Deliver tab to adjust formats, resolution, and bitrate, and remove the DaVinci Resolve watermark if needed.
| Export Use Case | Recommended Format | Frame Rate | Resolution | Bitrate |
|---|---|---|---|---|
| YouTube & Social Media | MP4 (H.264) | 30-60 FPS | 1080p-4K | 10-20 Mbps |
| High-Quality Editing | MOV (ProRes) | Same as source | Original | Lossless |
| General Viewing | MP4 (H.265) | 24-60 FPS | 1080p | 8-15 Mbps |
Conclusion
DaVinci Resolve merge clips is simple. Following the guide helps maintain professional editing standards while making video editing seamless. Using the procedure in this guide allows for hassle-free merging of videos while maintaining excellent quality. If you require something quicker, you can try Tipard Video Converter Ultimate. It is simple and effective. It is up to you what tool works best for your particular case, so go ahead and make excellent merged videos!
More Reading


About the Author
