
As we know, the internet is already saturated with different content. Putting up a good system in place and learning the basics will pave the way for great vlogs and make noise. One of the factors to consider when filming is using a good camera. We always think that a high-end camera could produce quality videos. Others also think it is because of the scenery you take from travel adventures. However, we should not forget that anyone can point a lens and talk, but crafting a vlog that speaks to an audience requires a few foundational techniques. This post will serve as your essential guide to learn how to start a vlog and make money easier than you think.

Part 1. What Is a Vlog
Before we dive into the basics and essentials of vlogging, let us unpack the word vlog first. The term vlog is a shortened combination of the words video log or video blog. It has been a long time since it was used as a dynamic digital diary that captures life in motion rather than static text. Recording a day-to-day life has also become a source of income for others who make a profit from it. These users who immerse themselves as creators of vlogs are called vloggers. They record themselves and share their personal narratives, candid thoughts, unique experiences, and daily routines in different forms. Hence, building a bridge of connection and relatability with their audience is not challenging. Ultimately, it is best combined with good vlog editing skills. However, this skill is not acquired overnight.
Suppose you are planning to make a vlog. In that case, it involves two dominant formats, including the traditional or longer-form vlog, ranging from a detailed five-minute narrative to an extensive hour-long documentary-type episode. Another is the explosively popular micro-vlog that features a condensed and snappy format perfect for social media platforms, like Reels. Furthermore, the central, empowering philosophy of vlogging is that one's perspective is inherently valuable. When it is a part of your life or relatable, it is worth sharing, effectively making everyone the director of their documentary, so long as they create within the platform rules and with a respectful awareness.
Part 2. How to Plan Vlog Content to Get More Likes
You may be curious about how the current algorithm works for all platforms. Therefore, we will share with you our observations on how platforms reward value-driven content. You can follow this plan for the success of your content in the future:
1. You first have to think about how your videos are going to translate with your viewers. A guiding question would be "Why would someone watch my vlog?" Your vlog must have an entertainment, educational, or emotional value. You could showcase your hilarious personality, someone who teaches makeup, or give your vulnerable side.
2. A good vlogger thinks of the hook that captures the attention of their viewers in the first 3 seconds of the vlog. The hook is non-negotiable and is also the most important part of your plan. If you notice, most videos published on social media platforms go straight to the exciting and intriguing clip of the video, like the final stunning makeup look, a recording of you screaming on a rollercoaster, etc. It is also best paired with a bold statement that sparks curiosity.
3. While you are planning your video, you should do the same with your thumbnail and title. It needs to be future-clear, high-contrast, and consist of bold text that complements your title. Since most video is watched on mute, your plan should include adding closed captions or dynamic text overlays to ensure your story is understood even without audio. For this tip, try to remove audio from a video.
4. Of course, your plan must keep your viewers watching until the end and even binge-watch your uploaded videos for high retention rates to signal the algorithm that your video is worthy of watching. Try changing the camera angle every 15-20 seconds, using quick zoom, adding a text graphic, or switching to a new clip. A simple day vlog should have a mini-story arc that follows the introduction (waking up or taking coffee), a challenge (gym workout), a resolution (accomplished task), and a conclusion (evening wind-down).
5. Maximize using CTA or the Call to Action. It is a must to ask for it, as people won't be compelled to unless prompted. You could place a non-intrusive CTA in the middle of the video or the segment when the viewer is most engaged. Also, tell your viewers that liking the video helps them share valuable tips or value with more people, allowing you to make more content for them.
Part 3. How to Edit a Vlog Like a Pro
Diving into video editing should not feel overwhelming when using a vlog editing software like Tipard Video Converter Ultimate. It is the perfect toolkit to get started, as it combines powerful conversion with rich editing features in a beginner-friendly interface. The app includes features that allow you to personalize your videos without needing advanced skills. Users can trim clips, apply stunning visual effects, add watermarks, and embed subtitles. For professional results, you may opt for a variety of ready-made templates and profiles optimized for different platforms. Whether you're on Mac or Windows, this software is designed for a seamless experience. Its intuitive layout guides every user from start to finish without any confusion. Before exporting your project, you can use the built-in preview window to watch your edits in real-time to check details, and the video looks perfect. Here is a step-by-step guide on how to edit a vlog like a pro:
Step 1 You should start by downloading the app. Click one of the Free Download links below to get the Windows or Mac installer and have it installed on your computer. Once done, launch it and try exploring the app's interface to get familiar.
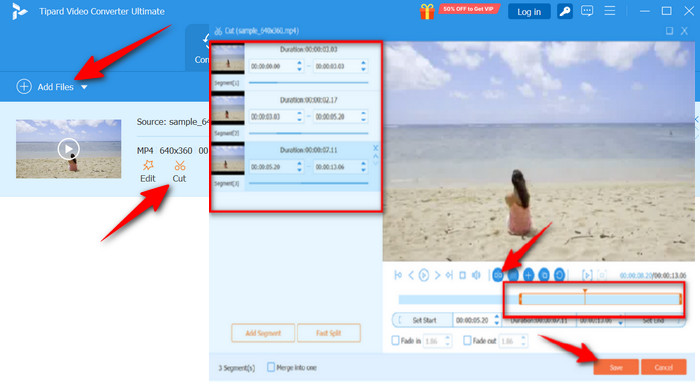
Step 2 First things first, import your video by clicking the Add Files button in the left-hand corner. Then, select the recording you wish to edit. Once imported, click the Cut button that looks like a pair of scissors under the video thumbnail. Use the Split feature to cut the clip into smaller segments. Remove the awkward pauses, mistakes, or any unnecessary content. Hit Save at the bottom right corner and keep the changes.
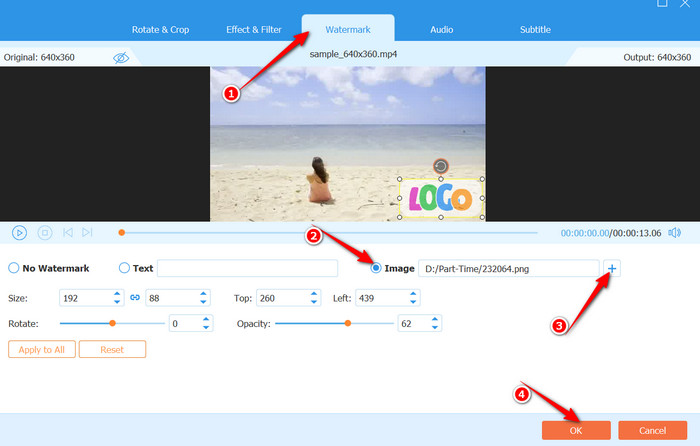
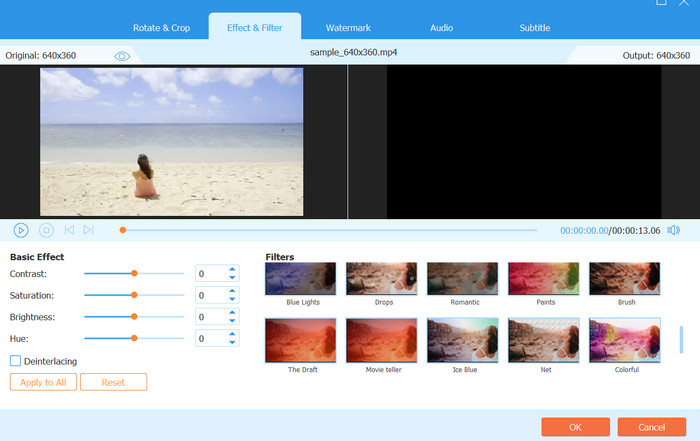
Step 3 Since quality is king, it is important to correct and enhance. This time, click the Edit button that looks like a magic wand under the video thumbnail. Add a simple, semi-transparent, non-intrusive logo or your social media handle in a corner, as it protects your content. You can do that by clicking the Watermark tab. Add a professional touch by accessing the Effect & Filter tab. Professionals always ensure perfect basic settings. You can adjust the video contrast, brightness, and saturation.
Step 4 In the Preview window, check the edited video and check for any errors. Once everything is okay, hit the OK button.
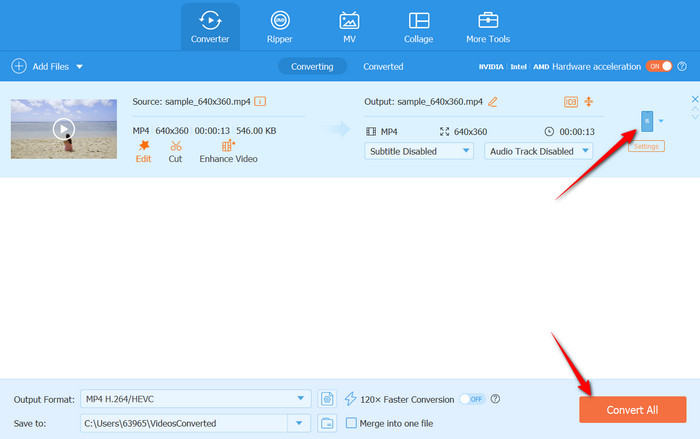
Step 5 To export, select your desired output format from the Profile option. After selecting a format, try exploring the Device tab and choosing which orientation fits most for your vlog. Finally, click the Convert All button.
Conclusion
Vlog is not all about editing. Planning what content to record and following what works for you is equally important. Aside from that, it is about using the right and best vlog editing software. When you have it, you can transform a simple daily documentary into engaging, polished vlogs. Remember that attention to detail and consistency turn good videos into excellent ones.
More Reading
About the Author
