

- Part 1. From Concept to Script: The Pre-Production Phase
- Part 2. Setting Up Your Creator's Studio
- Part 3. Capturing High-Quality Content: Recording Your Video
- Part 4. Easy Workflow to Create a Professional YouTube Video
- Part 5. Why Technical Optimization Matters: Resolution, Bitrate, and Formats
- Part 6. FAQs about How to Make a YouTube Video
Key Takeaways
- Determining the main purpose of the video is the very first step of creating videos for YouTube.
- When making videos on mobile devices, good lighting, a perfect angle, and a clean sound are necessary.
- To capture your desktop video effectively, you can access Tipard Screen Capture.
- Tipard Video Converter Ultimate is an ideal program for editing and converting videos for YouTube.
Do you want to learn how to make a YouTube video? Creating one is an ideal way to share your ideas, educate, or entertain a global audience. The procedure involves planning your content, recording using an accurate tool, and editing to ensure a good and polished output. In this guide, we will teach you how to create the best videos for YouTube. Thus, pay a visit to this article and learn all the processes you need to create an effective video for YouTube.

- Part 1. From Concept to Script: The Pre-Production Phase
- Part 2. Setting Up Your Creator's Studio
- Part 3. Capturing High-Quality Content: Recording Your Video
- Part 4. Easy Workflow to Create a Professional YouTube Video
- Part 5. Why Technical Optimization Matters: Resolution, Bitrate, and Formats
- Part 6. FAQs about How to Make a YouTube Video
Part 1. From Concept to Script: The Pre-Production Phase
Want to learn how to make YouTube videos? When creating a video for YouTube, you must start from the pre-production phase, which is all about planning. It includes developing a concept, writing a script, and preparing the tools you will utilize. Even with just a mobile device/phone, you can create and capture a high-quality video if you have set up everything properly. You must use good lighting, angles, filters, and more. For YT shorts, vertical framing, quick pacing, and clear audio output are necessary to stand out.
Pre-Production Essentials
Concept Development
- You must define the main purpose of your video; maybe it is for education, promotion, or anything. It is necessary since this will be the foundation of your content.
- You have to brainstorm ideas and refine them into a clear message or theme.
- When dealing with YouTube shorts, you have to focus on bite-sized, engaging content that offers value quickly.
Storyboarding & Scriptwriting
- You need to storyboard scenes to visualize angles and flow effectively.
- Write a script with a beginning, middle, and end to keep your viewers engaged.
- For YouTube Shorts, you can create a short list. It is to ensure a better transition and avoid unnecessary takes.
Using a Mobile Device for Filming
If you are using your mobile phone to create videos, you can check the details below to get more insights on how to use your device effectively to get an exceptional output.
Camera Setup
- To acquire a higher resolution when capturing a video, you must always use the rear camera.
- For standard video, hold the mobile phone horizontally with an aspect ratio/size of 16:9, which is the best YouTube video size for uploading. When capturing videos for shorts, hold the device vertically.
- To avoid sudden changes in video brightness, always lock the focus and exposure features on your camera.
Lighting Tips
- If you need natural light for your content, you can go near the window since it works best indoors.
- You can also use white cards or reflectors to bounce the light and create and soften shadows.
- Always remember to avoid harsh sunlight since it can only produce a poor video output. To get a balanced exposure, it would be better to shoot in shaded areas.
Sound Quality
- To get a better and more satisfying sound quality when using a mobile device, record in a quiet environment. This will help to minimize the background noise.
- During the recording process, always place the main subject close to the microphone. Using an external mic is recommended for clearer audio.
- Always turn off buzzing electronics or fans to avoid interference.
Special Tips for Creating YouTube Shorts
Use Accurate Vertical Format
When creating YouTube Shorts, always shoot vertically with an aspect ratio of 9:16. With that, viewers don't need to rotate their devices.
Quick Engagement
When making a YouTube video, always ensure that you can instantly get the attention of your viewers. You must hook them within three seconds so that they can watch the entire content.
Multi-Segment Recording
It is ideal to access Short's pre-built tools to stitch clips together. With that, there is no need for you to access separate editing tools.
Retry and Edit Videos
If you are not satisfied with the captured or recorded content, don't hesitate to redo it. You can record again or re-edit content until you get your perfect shot. Then, you can start uploading the video to YouTube.
Part 2. Setting Up Your Creator's Studio
Setting up your creator's studio doesn't mean you must have all the most expensive equipment. You can start with the basic ones as a starter. Read here and get more insights about the essentials.
Core Equipment
- Camera or Smartphone - You can use a simple camera or smartphone that is capable of HD or 4K recording for better visuals.
- Microphone - this device is necessary to capture clean audio, especially when recording sound effects.
- Lighting - You can use an LED panel, right light, or softbox to deal with shadows and balance exposure.
- Tripod - To keep your shots stable/steady, you must have a tripod. It can also let your videos look professional.
- Soundproofing Panels - When recording indoors, it is best to use soundproof panels to reduce background noise and echo.
Editing and Workflow
- Computer or Laptop - For a smoother video editing process, you must use a computer or laptop.
- Editing Software - Always use a reliable video editor, such as Adobe Premiere, DaVinci Resolve, Tipard Video Converter Ultimate, or any beginner-friendly editors.
- External Storage - When dealing with large video files, you will need an external drive, so you can save and store content without worrying about your storage space.
Part 3. Capturing High-Quality Content: Recording Your Video
Do you want to capture high-quality content for better video playback? In that case, you can try using Tipard Screen Capture. This program is ideal if you want to record desktop video with the best quality for up to 4K. You can even capture the video and adjust the frame rate for up to 40 fps. The best part here is that it supports the AV1 codec, which is optimized for YouTube. The screen recording process is also simple, thanks to its understandable interface. Aside from that, you can also access the software's Snapshot feature. It lets you capture a scene from the video during the recording process. It is perfect if you want to add an image to your content for better engagement.
To learn how to capture content on your desktop, you can follow the steps below.
Step 1 Download Tipard Screen Capture on your desktop. Then, launch it to start the recording process.
Step 2 From the UI, you can tap the Full or Custom options to record the screen based on your preferences.
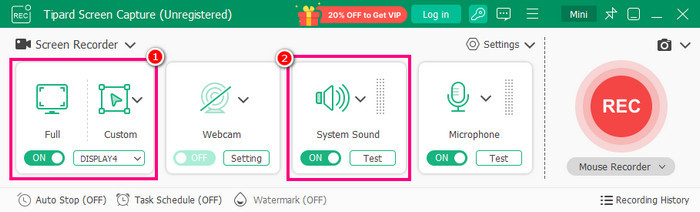
Always ensure that the System Sound feature is turned on.
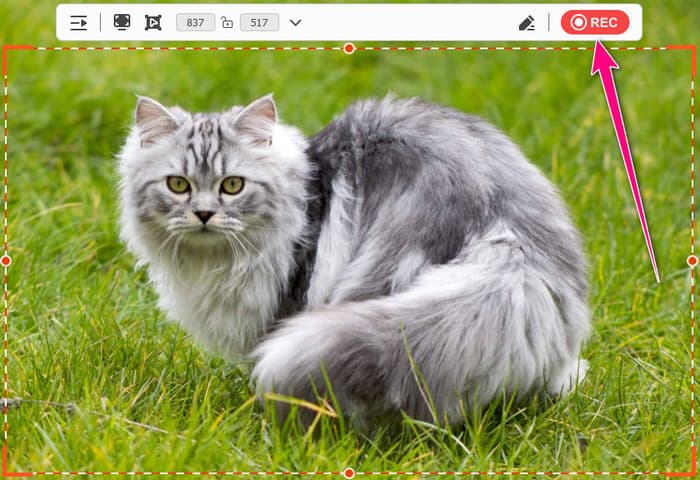
Step 3 To start the recording process, tap the REC button. To finish the recording, you can tap the Stop button.
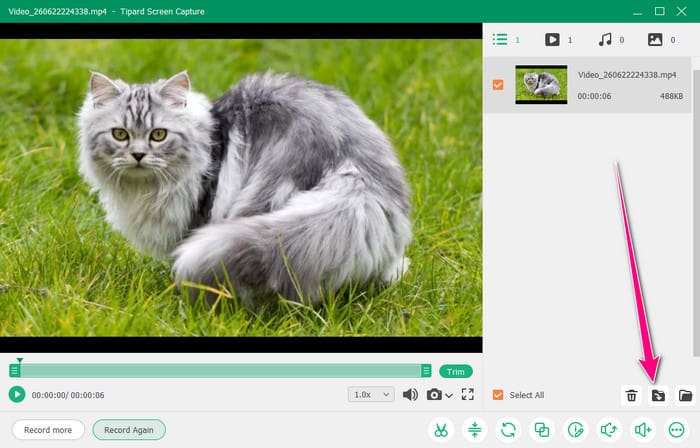
Step 4 Once the preview shows up, you can check the video by clicking the Play button. If you are satisfied with the recording, click the Export button.
Part 4. Easy Workflow to Create a Professional YouTube Video
Are you an editor who prefers an easier workflow when creating a video for YouTube? In that case, you can try using Tipard Video Converter Ultimate. When it comes to editing, there is no doubt that this program is ideal since it can offer all the editing features you need. You can access its cropper, trimmer, enhancer, noise remover, and more. You can also polish the clips by inserting audio and video effects. Additionally, it can support input video formats from any mobile device or camera. It includes MP4, MOV, M4V, AVI, WMV, MKV, and more. You can also convert your videos to any format with the best quality for up to 4K. So, if you need an exceptional editor to create a professional video for YouTube, feel free to access Tipard.
To start editing and converting your videos, you can use the instructions below.
Step 1 To easily access Tipard Video Converter Ultimate, you can hit the Free Download buttons below.
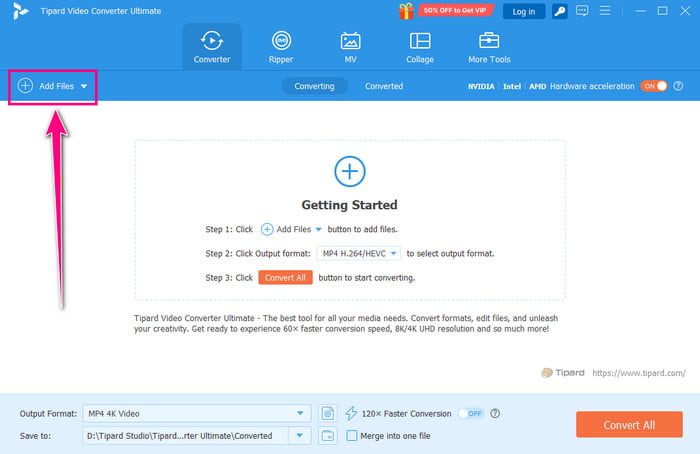
Step 2 After you run the software, start clicking the Add Files option to add the video you want to edit.
Step 3 Click the Edit option to start editing the video. You can add effects, rotate, crop, flip, insert text, attach audio, or add a watermark to the video.
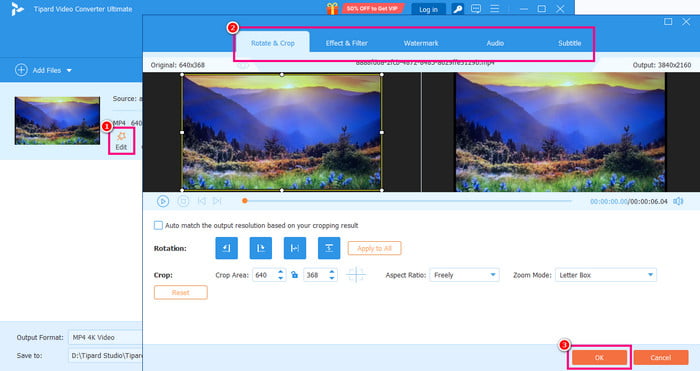
After the editing process, hit the OK button.
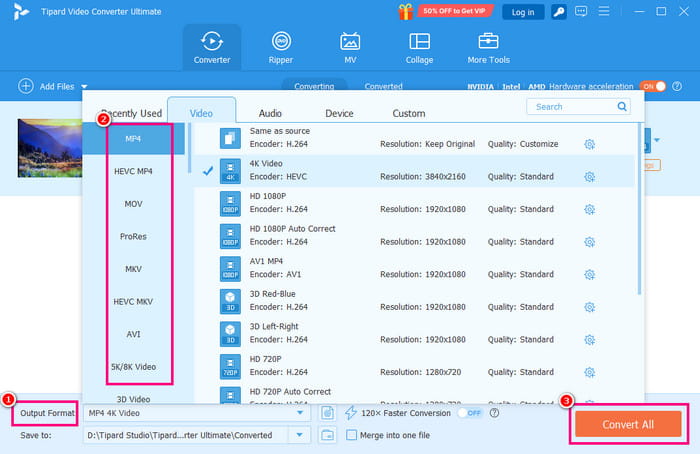
Step 4 You can also go to the Output Format to select your desired video format. For the final process, click the Convert All button below.
Part 5. Why Technical Optimization Matters: Resolution, Bitrate, and Formats
When creating professional-grade content, a technical optimization is what separates amateur uploads from polished videos. If you want to know why resolution, bitrate, and formats matter, you can check the explanation below.
Resolution
- It defines the details and clarity of the video.
- Higher resolution means sharper visuals.
- For YouTube, the highly suggested resolution is 1080p.
Bitrate
- It manages the amount of data per second in your content.
- Higher bitrate means smoother motion.
Format
- The format determines the efficiency and compatibility.
- Choosing the right format ensures a smoother video playback.
Part 6. FAQs about How to Make a YouTube Video
Do I need professional equipment to create a video for YouTube?
No. You can create and edit your video using your mobile device. If you have a decent camera and mic, you can make a video without relying on any professional-grade tools.
How can I make my video look professional?
To make your video professional and appealing, always focus on good lighting, clear audio, and clean editing. This way, you can produce an exceptional output that can result in satisfying video playback.
What format should I use for my video?
YouTube recommends MP4. This format ensures compatibility and high-quality playback. It can even offer a good file size, ideal for storing.
Conclusion
To learn how to make a video for YouTube, you can use all the steps and tips we have provided in this discussion. Plus, if you want to capture a video from your desktop, you can try accessing Tipard Screen Capture since it can give you a smoother recording process and ensure a high-quality recording. Also, you can try using Tipard Video Converter Ultimate if you want to edit your videos and save them to any format with the best quality. So, always utilize these programs to achieve your desired result.

All-in-one video toolbox: convert, edit, upscale, enhance, and compress your videos easily
100% Clean & Safe
100% Clean & Safe

More Reading

About the Author


 Tipard Video Converter Ultimate