
Ever seen clouds racing across the sky, traffic flowing like rivers, or a sunset speeding up in a few seconds? That is a time-lapse video. Do you want to learn how to make one? You can rely on our guide.
We will show you how to turn a normal video into a time-lapse, make one on your phone, and share some practical tips to keep in mind before shooting. Everything you need is ready below, so please keep reading.

Part 1. How to Turn a Normal Video into a Time-Lapse
You might be surprised, but Tipard Video Converter Ultimate can do much more than just convert videos. It also has numerous features to manage all your video and audio needs. One of the best features it offers is the built-in video speed controller.
With it, you can turn any normal video into a time-lapse video by speeding it up to 1.25×, 1.5×, 2×, 4×, or 8×. It even has a preview screen so you can see the changes while editing. You can also fine-tune output settings like format, resolution, and clarity, before exporting.
Step 1 Get and set up Tipard Video Converter Ultimate on your computer. Open the program once the installation is done.
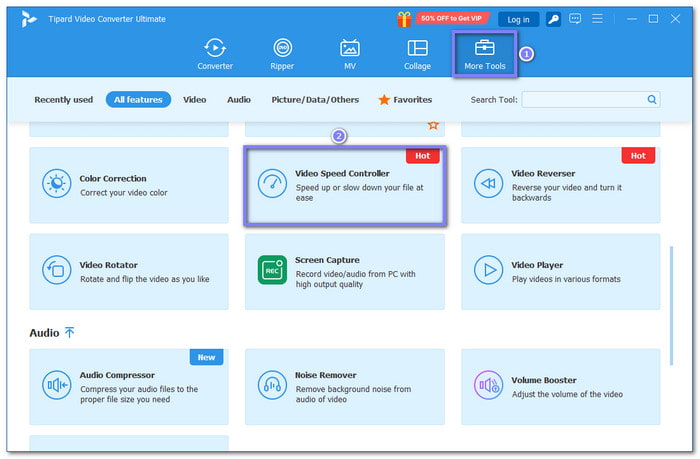
Step 2 Navigate to the More Tools tab and look for and select the Video Speed Controller.
Step 3 In the new display, click the Add button to add the normal video you want to turn into a time-lapse.

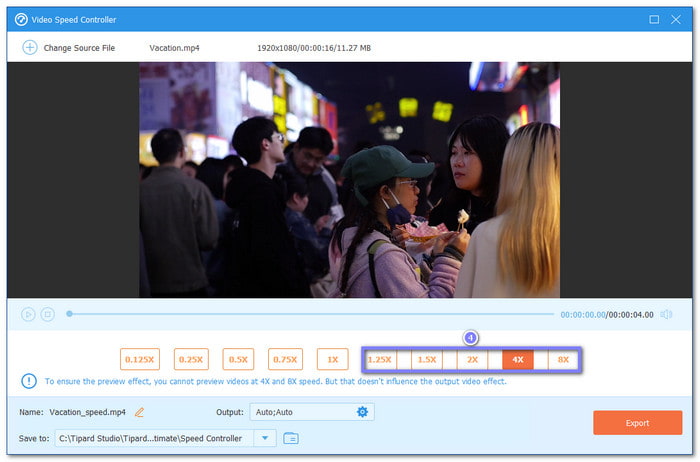
Step 4 To turn video into time-lapse, please choose 1.25×, 1.5×, 2×, 4×, or 8×, depending on how fast you want the time-lapse to be. The higher the number, the faster your video will play.
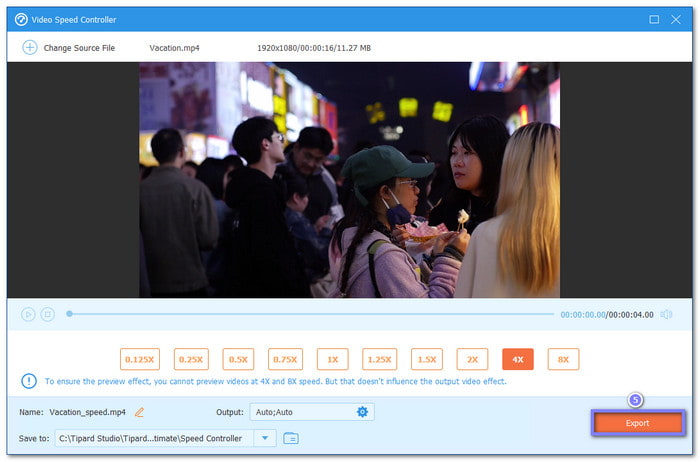
Step 5 Are you done? If yes, click the Export button to save your new time-lapse video. In a little while, your video will be ready to watch. You now have a fast-motion version of your normal video!
What if you want to make your video slow motion? That is also possible with Tipard Video Converter Ultimate. Just select 0.75×, 0.5×, 0.25×, or 0.125×, and your video will play slower instantly.
Part 2. How to Make a Time-Lapse on Your Phone
Capturing a time-lapse on your phone is easy and fun, whether you use an iPhone or an Android. Both devices have built-in tools: iPhone's Time-Lapse mode and Android's Hyperlapse feature, which automatically speed up motion. With a steady setup and a little planning, you can turn everyday scenes into smooth, fast-moving videos in no time.
1. For iPhone Users
Step 1 To time-lapse video on iPhone, launch the Camera app and swipe to find the TIME-LAPSE mode.
Step 2 Set up your iPhone in the spot where you want to film. Make sure it is steady so your video looks smooth.
Step 3 Press the Record button to start. When you finish, press it again to stop. The iPhone will automatically create a fast-motion time-lapse video.

2. For Android Users
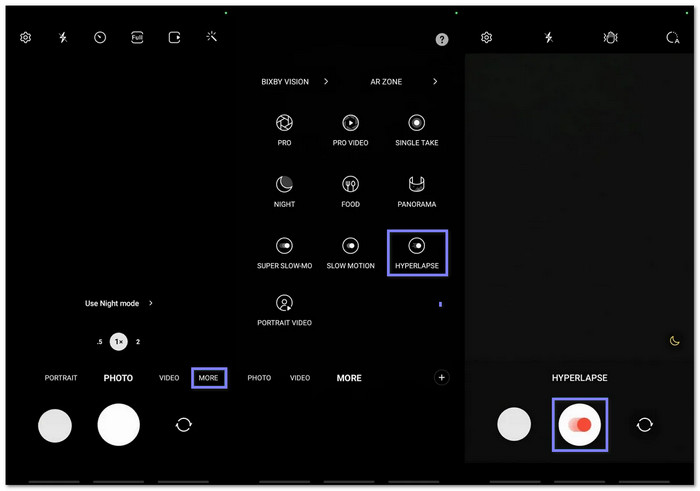
Step 1 Open the Camera app, tap More in the menu, and choose Hyperlapse. This option lets you make fast-motion videos.
Step 2 Place your phone where you want to film the moving scene. Keep it still or use a tripod for best results.
Step 3 Tap Record to start filming. Tap it again to stop. The video will automatically speed up, giving you a smooth time-lapse effect.
Part 3. How to Make a Time-Lapse with a Camera (For Higher Quality)
Learning how to make a time-lapse video with a camera using a DSLR, a prime lens, and a stable tripod lets you take sharp, consistent photos over time. Turning off automatic settings and using an intervalometer ensures each shot is steady. Later, these images can be combined into a smooth, high-quality time-lapse.
Step 1 For the best results, use a DSLR camera. While some consumer cameras can shoot time-lapse, a DSLR gives more flexibility. Pair it with a prime lens with a fixed focal length for sharp, stable images. Avoid zoom lenses, as small shifts can affect your shots.
Step 2 Use a tripod or another reliable stabilizer. Make sure all moving parts operate smoothly in case you need to adjust the camera. Even tiny shakes can ruin the smoothness of a time-lapse video.
Step 3 Turn off automatic settings, including ISO and white balance, so nothing changes between shots. Then, set your camera to JPEG mode instead of RAW to save space and avoid overwhelming your memory card, while still keeping high-quality images.
Step 4 An intervalometer helps trigger your camera automatically and set the time between shots, whether every minute or every ten minutes. Think about your scene and timing; longer intervals work well for slow changes like sunrises or moving clouds.
Step 5 Take your photos over the chosen period. Then, use software for time-lapse video editing like QuickTime, Final Cut Pro, or Adobe After Effects to arrange the images into an image sequence. Once played, your photos come together as a smooth, high-quality time-lapse video.

Part 4. Pro Tips for a Great Time-Lapse
Capturing a great time-lapse is more than pointing your camera and pressing record. Paying attention to stability, planning, and camera settings can make your video look smooth and professional.
1. Stability is Non-Negotiable
A shaky camera can ruin your time-lapse, even if every other setting is perfect. Always use a tripod or solid support and make sure your camera is firmly secured. If you need to move the camera during shooting, please check that all parts move smoothly to avoid bumps.
2. Plan Your Shot
Think carefully about what you want to capture. Choose scenes with movement that will look interesting sped up, such as clouds, crowds, or traffic. Consider angles, framing, and timing to make your final video visually appealing.
3. Shoot Longer Than You Think
Time-lapses need more images than you might expect. Capturing extra frames ensures smoother motion and gives you flexibility when editing. Do not stop too soon; longer sequences give better control over the speed and flow of your video.
4. Manual Settings on Camera
Automatic settings can change between shots, causing flickering or inconsistent exposure. Set your ISO, shutter speed, and white balance manually to keep every frame consistent. It keeps every frame consistent and makes your video look polished.
5. Charge Your Gear
Time-lapses can take a long time, and running out of power can ruin a sequence. Make sure your batteries are fully charged or have spares ready.
Part 5. FAQs of Time-Lapse Videos
1. Can you make a time-lapse a regular video?
Yes! A time-lapse is essentially a series of images or a sped-up video. You can play it at normal speed using a video editing application, or change the speed to make it appear like a regular video while keeping the motion smooth.
2. Can CapCut do time-lapse?
Yes! CapCut allows you to speed up videos, which is the basic method for creating a time-lapse. You can choose different speed options, preview your edits, and export your video easily.
3. Is a GoPro good for time-lapse?
Absolutely! GoPro cameras are compact, durable, and perfect for time-lapse. They have built-in time-lapse modes, interval settings, and wide-angle lenses. It makes them ideal for capturing action, landscapes, or outdoor scenes with smooth results.
Conclusion
It is fun to watch the movement of what you captured in a time-lapse, right? The fast motion is satisfying and perfect to share on social media. But if you already have a video and want to turn it into a time-lapse, the best time-lapse video maker is Tipard Video Converter Ultimate. It can speed up your normal video exactly how you want, fast or super fast, making your footage satisfying to watch.
More Reading


About the Author
