
Time-lapse is a video editing method that allows users to manipulate frame rate for creative outputs. A time-lapse video provides a playback of a sped-up video. With it, you can also show how a living thing, such as a flower or butter transforms into beautiful creatures. The growth or transformation takes about months, but can be appreciated in a matter of seconds using time-lapse video editing technique. Meanwhile, videos taken from high-end capturing tools like GoPro will give the natural and original quality of the environment you captured. If you wish to learn how to make a GoPro time-lapse video, then this post will demonstrate just that. Check out the methods and step-by-step process below.
Part 1. What Is a GoPro Time-Lapse
Time-lapse is a creative filming technique used to manipulate videos in terms of how the frame rate is captured. This video editing technique may also refer to how long the camera's shutter remains open to allow light to enter. A GoPro time-lapse, on the other hand, is a feature on GoPro cameras that lets you capture frames at set intervals or photos and then play them back as fast-phased video. It works by taking snapshots over time and combining them together, instead of recording continuous video. With it, you can show a long event happening quickly.
Part 2. How to Make a GoPro Time-Lapse Video from Video Clips
Learning how to make GoPro time-lapse videos from video clips is a piece of cake. Equally important, it is best that you know what GoPro is capable of. In fact, GoPro cameras come with two time-lapse modes, which both allow you to capture still images at regular intervals. It has a Time Lapse Video mode that automatically stitches still photos into a video file, making it easy to create a time-lapse video. Another mode is Time Lapse Photo, where GoPro cameras save every still image separately. Then, you can use your preferred software to stitch all the stills saved in the camera. The following are the steps to time-lapse using GoPro:
Step 1First is go to the Settings of your GoPro camera by swiping to the right of the screen. Then, it should lead you to the TIME LAPSE option.
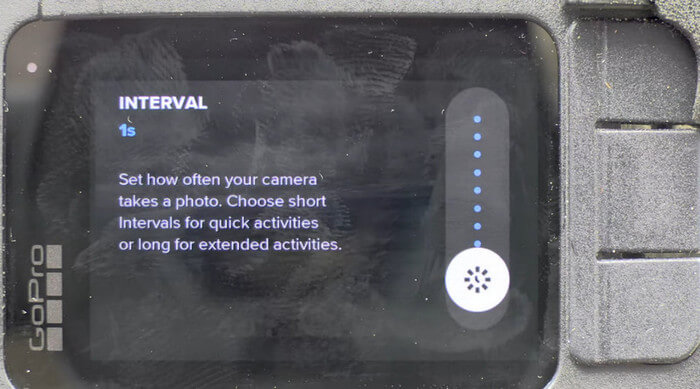
Step 2Tap the Custom option and adjust the presets for the Lens, Format, Interval, Output, Scheduled Capture, and Duration. One of the most crucial settings, though, is the interval. Try playing with it first and see which interval fits the scene you are trying to capture.

Step 3When you are recording fast-moving crows, traffic, or clouds, you can set the interval between 0.5 - 2 seconds. Sunset or sunrise may give smooth transitions without creating too many frames when set to 2-5 seconds. Also, the best conditions, like lighting, will give you the best possible results.
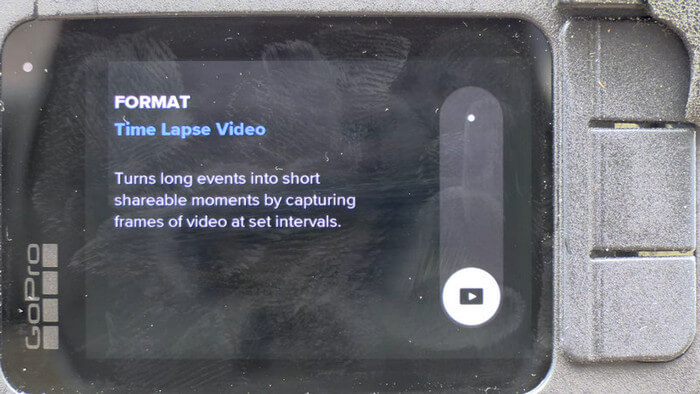
Step 4Next, tap on the Format option and choose the Time Lapse Video mode. This mode turns long events into short shareable moments by capturing frames of video at set intervals.
Step 5Finally, try recording and watching the videos you have recorded. If there are no more settings you would like to adjust, then proceed with the actual recording. Set up the camera to get the scenery you wish to capture. Get the video and see the quality. If the quality is poor, there are actually ways to improve GoPro video quality.
Part 3. How to Make a GoPro Time-Lapse Video out of Time-Lapse Photos
As mentioned, there are two ways for you to time-lapse videos with GoPro. If you are looking for some really good quality time-lapse video, you should choose the Time-Lapse Photos mode. Aside from its naturally good quality, this mode enables you to edit the photos, which gives more depth and customization. In other words, you can get the most out of it. That said, here is how to do time-lapse photography in a GoPro:
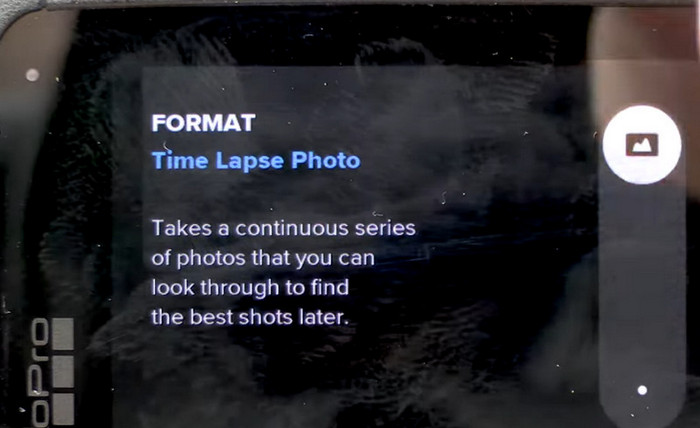
Step 1Go back to the Custom menu to adjust the preset and choose another mode, specifically the Time-Lapse Photos.
Step 2Change the Output to RAW to get the most of the details and depth. You will be able to bring out colors and bring up shadows. It will be a lot easier to edit when the output is set to RAW.
Step 3The minimum Interval for Photos, though, is 5 seconds. The duration can be set to no limit. It will only stop capturing photos when you click the stop button on the camera.
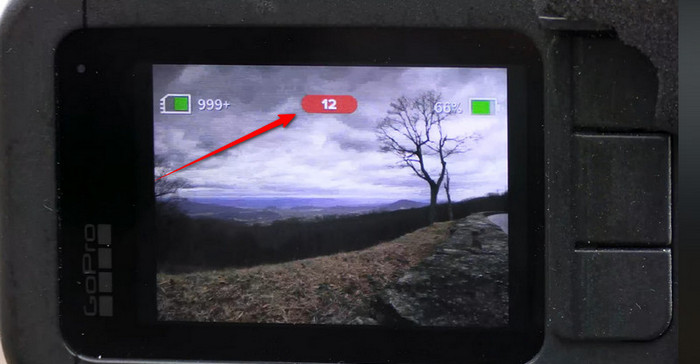
Step 4Now, start recording. From the screen of the camera, you will see the red indicator that shows the number of photos currently taken. Same drill, set the interval to another second and see if the time-lapse video turns out to fit your preference. When you are done recording, you can transfer to your computer and use another program to time-lapse the still photos.
Advanced Tips: Alternative Way to Make a Time-Lapse Video with Ease
When you are new to GoPro, chances are it can be challenging to get the balance in the settings and produce good-quality time-lapse videos. For this instance, it is best to use another program to ease the process of making a time-lapse with a GoPro. One of the recommended tools for time-lapse videos is Tipard Video Converter Ultimate. This program offers easy steps to accomplish and perform tasks such as a time-lapse video. It also caters to other video editing needs, like cutting, ripping, adding effects, converting formats, and more. Apart from that, the tool allows you to have a real-time preview of every change you apply. On top of that, it is beginner-friendly and works on both Windows and Mac operating systems. To learn how a tool can be a great alternative to GoPro time-lapse options, check out the steps below:
Step 1First, download and install the program by clicking the Free Download button provided below. Next, install and launch the program on your computer.
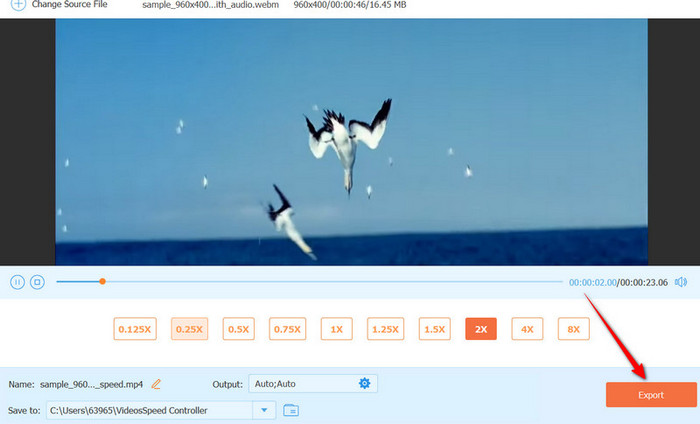
Step 2Upon launching the app, you will see the five major tabs from the main interface. Now, go to the More Tools tab and select the Video Speed Controller option from the list of options. It should show an upload interface that lets you insert your desired video into a time-lapse.

Step 3Once the video is imported, you can increase the normal speed from 1x up to 8x. Optionally, you can increase the speed gradually to see which settings work best for your specific video. Click the Play button to preview and check the changes applied.

Step 4Finally, hit the Export button at the bottom right-hand side to time-lapse the video and save it to your device. It is also best that you learn about some of the best video speed controllers for more options.
Conclusion
There you have it! You learned how to time-lapse with a GoPro. Hence, if you wish to show an epic short on your socials, this video technique is the way to go. Additionally, you may opt for a beginner-friendly alternative if you are still new to the GoPro environment. Nevertheless, both ways are effective to make time-lapse videos.
More Reading


About the Author
