
Lightroom is well known for editing photos with powerful tools for color, light, and tone. But can you edit videos in Lightroom? To know the answer, read our whole post. You will also learn its main video editing features, how to edit videos with it, and its limitations. So, please check each part for more details.

Part 1. Can You Edit Video in Lightroom
If you are wondering, can you edit videos in Lightroom?
Yes, you can edit videos in Adobe Lightroom on desktop and mobile. It has simple features for light, color, and tone. You can also use presets, color grading, and basic trimming. Your edits do not change the original file. It is best for immediate video fixes and matching the look of your photos and videos. However, it is not made for advanced timeline editing.
Part 2. Key Video Editing Features in Lightroom
Lightroom gives you simple features for quick video editing. Its Lightroom video editing capabilities focus on color, light, and a clean visual style.
- Presets and profiles: Use ready-made looks for fast styling.
- Color tools: Warmth, tint, vibrance, saturation, and color balance can all be adjusted with color tools.
- Light controls: Change exposure, contrast, highlights, shadows, whites, and blacks.
- Tone curve: Fine-tune dark and bright areas.
- Trim and crop: Cut the start or end. You can also rotate or flip the video.
- Effects: Add grain or a vignette.
- Non-destructive editing: Every change can be undone.
- Sync settings: Copy edits to other videos or photos in Adobe Lightroom.
Part 3. How to Edit Video in Lightroom
In this section, we will teach you how to edit videos in Lightroom. You will learn how to adjust colors, apply effects, and style your clips. While it is not a full video editor, this guide will show an easy way to improve your videos using Lightroom's tools.
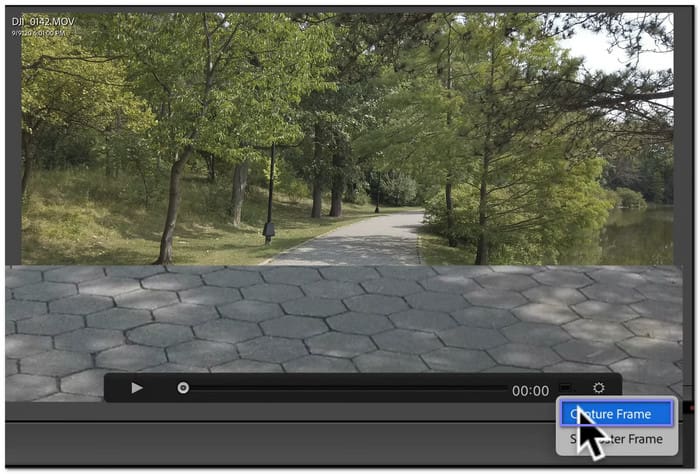
Step 1 Add the video the same way you import photos. After it loads, open it in the Library. Use the Scrub bar below the preview to move through the clip and find the frame you want to work with.
Step 2 Click the small frame symbol under the video preview. Choose Capture Frame. Lightroom saves that frame as a JPEG. You can also use Set Poster Frame if you want to change the thumbnail shown in the filmstrip.
Step 3 Open the captured frame and adjust the image like a photo. You can change exposure, contrast, white balance, whites, blacks, saturation, vibrance, tone curve, HSL, and color grading. These settings copy well to video.
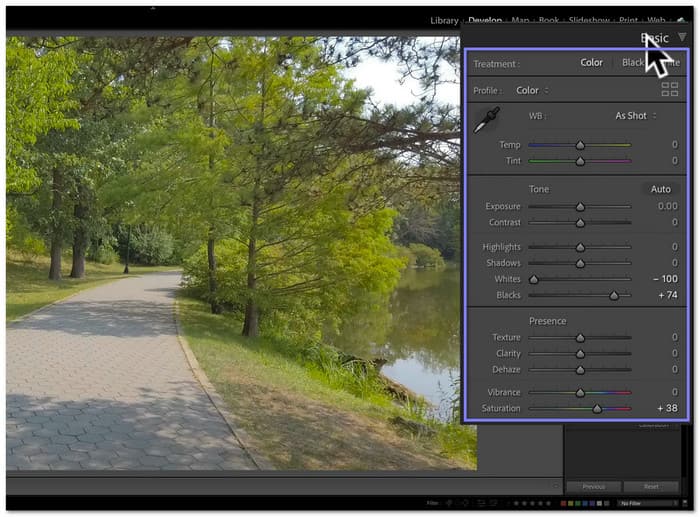
Some edits stay only on the JPEG. Highlights, shadows, clarity, dehaze, sharpening, noise reduction, lens correction, crop, and spot removal do not copy to the video. For better results, focus on basic color and tone controls.
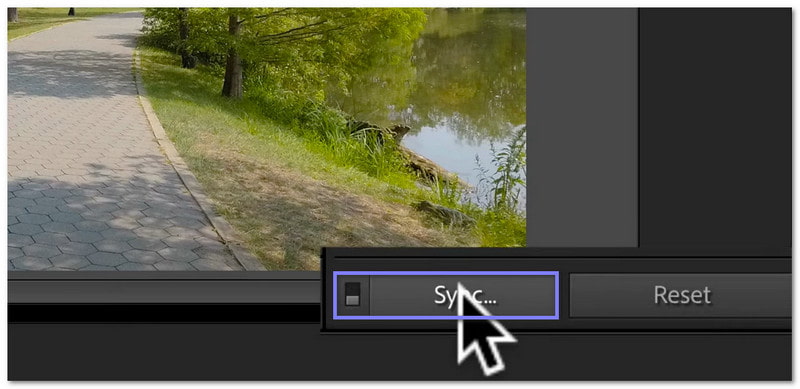
Step 4 Select the edited JPEG first. Then, hold Ctrl or Command and select the video. Click Sync to apply the supported settings. Go back to the library and play the clip. If the color looks weak, raise the saturation a little more and sync again in Adobe Lightroom.
Part 4. Limits of Using Lightroom for Video Post-Production
Video edit in Lightroom is easy for quick color and tone fixes, but Lightroom has clear limits for full video projects. It is designed more for photos than for complete video post-production.
1. No timeline editing: Only one clip can be edited at a time. You are unable to create a complete video project or join clips.
2. Limited tools: In Adobe Lightroom Classic, video edits stay in the Library module. You get basic controls like exposure, white balance, and color, but not full video tools.
3. No advanced effects: It does not offer transitions, motion effects, stabilization, or strong noise reduction.
4. Slow performance: Large video files may load slowly, and playback can feel jumpy.
5. Basic export options: Export settings are simple, and codec support is limited compared to video editors.
6. Weak workflow for pro editing: Video edits do not move smoothly into Adobe Premiere Pro, so it is not ideal for bigger projects.
Part 5. Top Alternative to Lightroom to Edit Videos
Lightroom is great for photos, but it struggles with videos. You can only edit one clip at a time, it has limited effects, and it cannot handle complex projects. Video playback can be slow, and exporting options are basic.
That is where Tipard Video Converter Ultimate comes in. It is a top alternative to Lightroom for video editing. It offers dedicated and easy-to-use video editing features. You can trim, rotate, crop, add filters, watermarks, and music with little effort.
It also supports numerous input and output formats than Lightroom, like MP4, MOV, AVI, MKV, and more. On top of that, it offers AI-driven video enhancement tools. These tools automatically improve video clarity, stabilize shaky clips, and adjust brightness and color.

- Many video, audio, and image tools in one tab.
- Provides 51 ready-to-use themes for quick styling.
- Includes a collage maker with 45 customizable templates.
- Supports many aspect ratios like 16:9, 4:3, 21:9, 1:1, and 9:16.

Now that you have learned how to edit a video in Lightroom, it is time to master video editing with Tipard Video Converter Ultimate.
Step 1 Grab and set up Tipard Video Converter Ultimate on your Windows or Mac computer. Once done, open the program to start editing your videos.
Step 2 Head to the MV tab on the menu bar. It opens a clear editing interface. It is time to click the Add button to import your video files. You can load many clips in formats like MP4, AVI, MOV, and more.

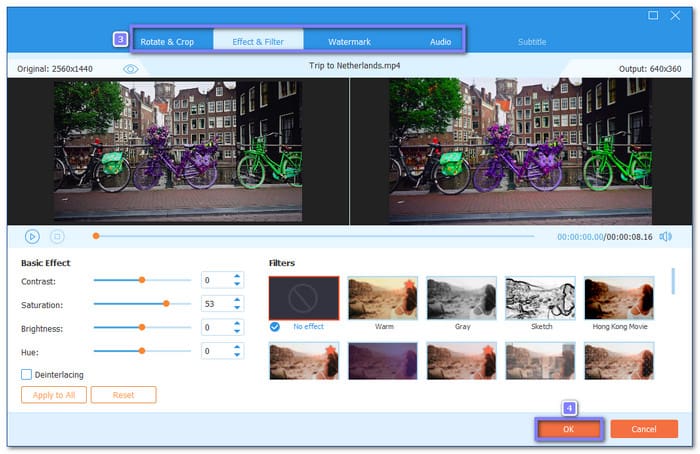
Step 3 Press the Edit option to open the editing tools. Then, use the options below:
- Rotate & Crop - Rotate your video to the left or right and flip horizontally or vertically. You can also crop the video frame directly in the preview screen, or select an aspect ratio.
- Effect & Filter - Adjust contrast, hue, brightness, and saturation. You can also apply one of 42 filters, like warm, gray, or sketch.
- 3Watermark - Add a text or image watermark, so your video has ownership.
- Audio - Adjust volume up to 200% and set a delay up to 10 seconds.
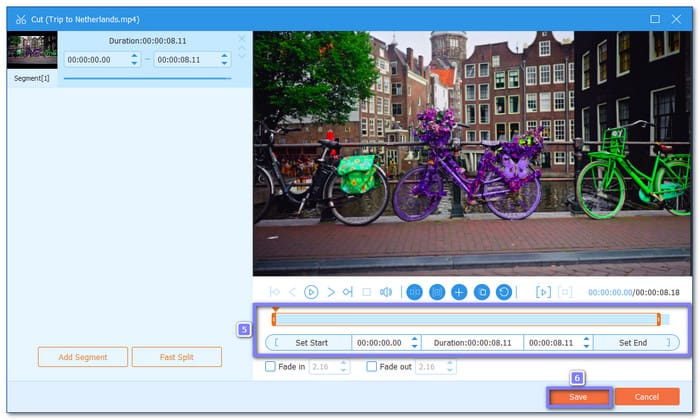
Step 4 If there are start and end parts you want to remove from your video, you can do that in the Trim option. Just move the end bars to the part you want to keep. Once selected, click the Save button.
Step 5 Move to Setting. Here, you can add a Start Title and an End Title. You can also keep the original soundtrack or add new background music by clicking the Add button.

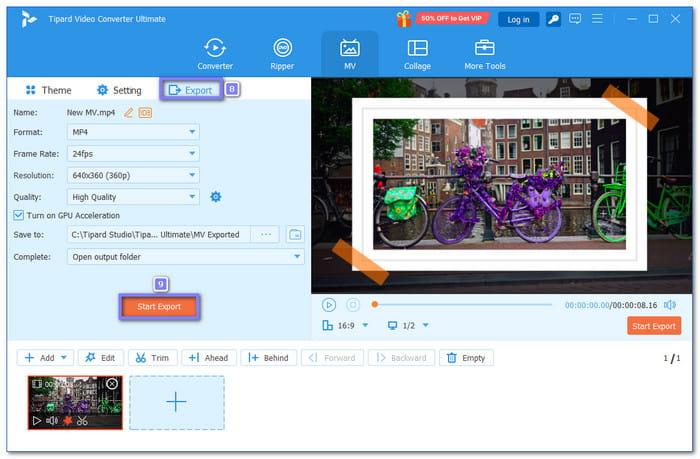
Step 6 For the final step, go to the Export option. Here, you can choose your preferred Format, Frame Rate, and Resolution. Once set, click the Start Export button. Then, enjoy your edited video and share it with others.
Tipard Video Converter Ultimate offers more editing tools than Lightroom. So, there is no doubt this video editor can help you refine your video and achieve a polished, professional look immediately.
Conclusion
Are you satisfied with editing videos in Lightroom, even though it is limited to full video projects and advanced editing?
If you want more editing tools, count on Tipard Video Converter Ultimate. It lets you crop, rotate, apply filters, add background music, etc. It helps you easily improve your videos and achieve a clean, professional finish every time.
More Reading


About the Author
