

- Part 1. How to Record Audio to a Single PowerPoint Slide
- Part 2. How to Record a PowerPoint Presentation with Audio
- Part 3. How to Record Screen with Audio in PowerPoint
- Part 4. How to Insert an External Audio Recording to PowerPoint
- Part 5. Which Method Should You Choose
- Part 6. Troubleshooting: PowerPoint Not Recording Audio
How to record audio in a PowerPoint deck? Whether it's a short voice note on one slide, a narrated presentation, or a screen recording of a demo, PowerPoint already has most of the tools built in. This guide covers 4 ways to record audio in PowerPoint on Mac and Windows, plus what to do when recording fails.

- Part 1. How to Record Audio to a Single PowerPoint Slide
- Part 2. How to Record a PowerPoint Presentation with Audio
- Part 3. How to Record Screen with Audio in PowerPoint
- Part 4. How to Insert an External Audio Recording to PowerPoint
- Part 5. Which Method Should You Choose
- Part 6. Troubleshooting: PowerPoint Not Recording Audio
Part 1. How to Record Audio to a Single PowerPoint Slide
When only one slide needs narration, you can record your voice for it in PowerPoint and the audio lives as an object on that slide. This method is fast, and it allows you to re-record one slide without touching the others. It doesn't capture timings or laser-pointer actions.
Step 1 Select the slide
Open the presentation and click the slide you want.
Step 2 Open Record Audio
In the top menu, go to Insert > Audio > Record Audio. You'll see a small Record Sound dialog.

Step 3 Record your voice
Give the clip a name if you like. Click the red Record button, speak, then hit Stop.
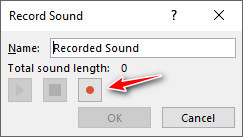
Step 4 Preview the audio
Preview with Play. If you don't like it, you can click the Record button again to record a new one. When it sounds right, click OK, and a speaker icon appears on the slide.
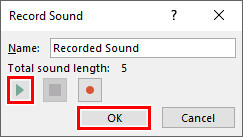
Step 5 Adjust the recording object
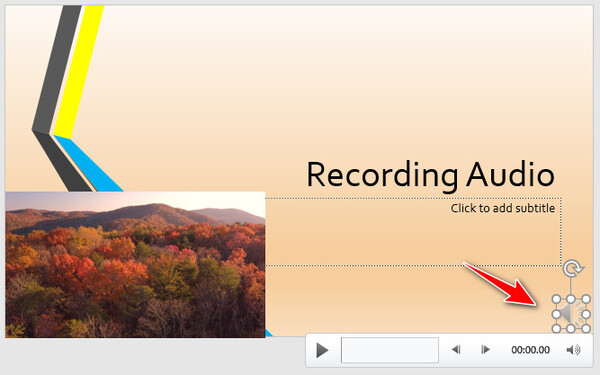
You can drag the speaker icon wherever you like. On the Playback tab you can set it to start Automatically or On Click, trim silence, change volume, or hide the icon during the show.

Part 2. How to Record a PowerPoint Presentation with Audio
You can use PowerPoint's built-in recorder for a full narrated run-through. Important tip: audio is silent during slide transitions, so wait for the transition to finish before speaking again.
Step 1 Start recording
In recent Microsoft 365 versions, use the Record tab in the top menu. On older builds, go to Slide Show > Record Slide Show. Then choose From Beginning or From Current Slide, depending on what you need.
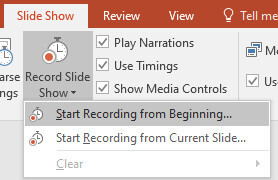
Step 2 Speak
The recording window opens. Make sure the right microphone is selected and the mic recording is turned on. After a 3-second countdown, you can start speaking. Advance slides when ready. You can pause, use the pen or laser, and stop at any time.
Step 3 Review and export
Hit Stop. Audio and timings are saved per slide, and a speaker icon shows up on each narrated slide. You can re-record any single slide without affecting the rest.
If you prefer to export as video: File > Export > Create a Video (Windows) or File > Export and choose MP4/MOV (Mac). Select Use Recorded Timings and Narrations so your voice and pacing make it into the final file. Or you can also export as .pptx and convert the PowerPoint file to MP4 later.
Part 3. How to Record Screen with Audio in PowerPoint
When you need to show the desktop, a browser, or another app, use screen recording. In this way you can record a PowerPoint presentation with both audio and video.
Use PowerPoint Built-in Screen Recorder (Windows only)
This PowerPoint screen recorder captures microphone only, not system audio from other apps.
Step 1 Open the tool
On the slide where the video should appear, go to Insert in the top menu and select Screen Recording.

Step 2 Select an area
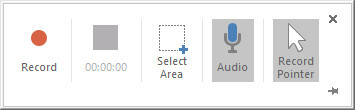
Click Select Area and drag over the area you want to record. Remember to keep Audio checked for microphone input.
Step 3 Start Recording
Click Record, do your demo, then stop by clicking the square button at the top or pressing Windows + Shift + Q. If you want a separate MP4, when the video appears on the slide you need to right-click and choose Save Media as.
Use Built-in Screen Recorder on Mac
Although you can't record the screen in the PowerPoint Mac version, you can use the built-in free screen recorder of macOS to do the same. It's pretty simple.
Step 1 Open the toolbar
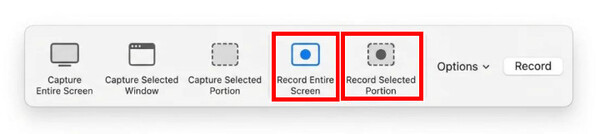
When your PowerPoint slide is ready, press Command + Shift + 5, then choose Record Entire Screen or Record Selected Portion.
Step 2 Enable mic and record
Click Options and select your microphone. Start recording, run the slideshow, then stop from the menu bar or with Command + Control + Esc. It captures your voice but not system audio by default.
Tipard Screen Capture (Windows & Mac)
If the built-in options feel a bit limited, Tipard Screen Capture works on both platforms. It can record the full screen, a single window, or just a custom region, and it grabs your mic and system audio at the same time. It has pretty much everything you might need for a recording. If you make a lot of tutorials or just want more control than the native tools give you, it's worth a try.
- Records full screen, a single window, or a custom region
- Captures microphone and system audio at the same time
- Supports up to 4K recording, real-time annotations, and optional webcam overlay
- Includes basic editing tools plus a media format converter

Step 1 Open Screen Recorder
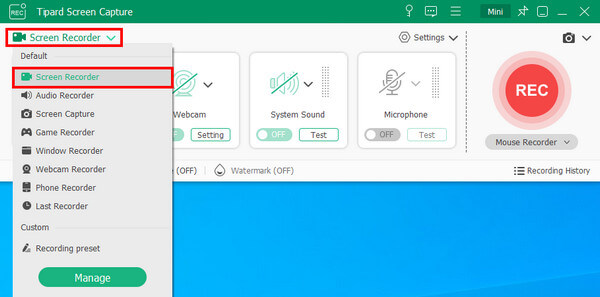
After installing and running the program, select Screen Recorder in the dropdown menu at the top left.
Step 2 Select the capture area
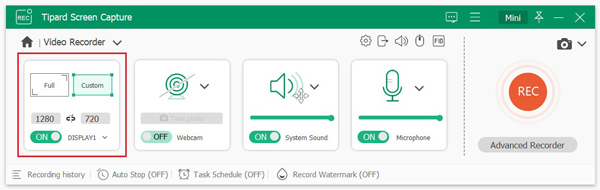
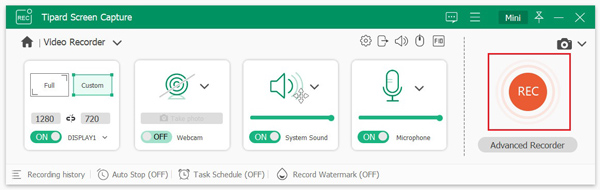
Get your PowerPoint ready on your screen. Then, in the left-hand bar, choose Full for a full-screen recording or Custom to drag the area yourself.
Step 3 Adjust webcam and audio settings
You need to decide whether to enable the Webcam, System Sound, or Microphone. After that, click REC to begin recording your PowerPoint slides. You can add annotations and take screenshots during the recording.
Step 4 Finish Recording
Click the red square button to end the recording. Then you can preview and do some basic editing before saving it.
Part 4. How to Insert an External Audio Recording to PowerPoint
Already have a recording from another app or a music track? Just insert the file.
Step 1 Choose the slide
Click the slide where the audio should sit.
Step 2 Insert the file
- Windows: Insert > Audio > Audio on My PC.
- Mac: Insert > Audio > Audio from File.
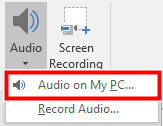
PowerPoint handles common formats like MP3, WAV, and M4A. You can use the Playback tab to set start behavior, volume, fade, and whether the audio plays across slides. You can also trim the clip right inside PowerPoint.
Part 5. Which Method Should You Choose
Short voice note on one or two slides: Use Insert > Audio > Record Audio.
Full narrated presentation with timings: Use the built-in Record Slide Show / Recording Studio. Works on Windows and Mac and exports cleanly to video.
Need to show the desktop or another program: Windows users can use PowerPoint's Screen Recording. Mac users should use the Screenshot toolbar or QuickTime, then insert the video. If you also need system audio or more editing options, Tipard Screen Capture is the stronger choice.
Already have a finished audio file: Just insert it into your slide.
Part 6. Troubleshooting: PowerPoint Not Recording Audio
Silent recordings are usually a permission or device-selection problem. Try these in order and you should be good.
1. Check microphone permissions
On Windows: Go to Settings > Privacy & security > Microphone. Make sure access is on for desktop apps.
On Mac: System Settings > Privacy & Security > Microphone and give PowerPoint permission.
2. Make sure the right mic is selected
In the recording window, open the mic dropdown and pick the correct device. Watch the input meter while you talk: no movement means wrong device or no signal.
3. Set the default recording device
In Windows Sound settings or Mac Sound pane, set your preferred mic to the default recording device. PowerPoint follows the system default more often than you might expect.
4. Quick resets
Fully close PowerPoint in Task Manager and reopen it. If that fails, right-click the PowerPoint shortcut and select Run as Administrator. Also close any other apps that might be hogging the mic: Teams, Zoom, other recorders, etc.
5. Run the audio troubleshooter (Windows)
Go to Settings > System > Troubleshoot > Other troubleshooters > Recording Audio.
6. Update drivers and Office
Outdated audio drivers or a buggy PowerPoint install are common culprits. Go to Device Manager > Audio inputs and outputs > right-click your mic > Update driver. Then check for Office updates.
7. Last resorts
Restart the PC, update Windows, or reinstall/repair Office if nothing above helps. Unplug and replug an external mic if you're using one.
Conclusion
Usually the built-in Record Slide Show feature is enough for recording audio for PowerPoint. Use the single-slide recorder when you just want a quick voiceover, and switch to the screen tools if you have to show the desktop. When you need extra editing, annotations, conversion, and compression, reach for Tipard Screen Capture.

Record full screen, portion, window, game, and phone seamlessly without lag
100% Clean & Safe
100% Clean & Safe

More Reading




About the Author


 Tipard Screen Capture