
How to Share Screen on Skype for Business on Windows 8

Skype is a helpful communicate tool, for people to make online calls in very convenient way. You can call international calls to a group of people, which up to 25 people. If you want to see friends in far distance, who have not met for a long time, you can make Skype video calls for free. The free convenient way of communicating online has spread over the whole World. Therefore, Skype calls do not only take place our daily life, but also commercial communication. As for commercial business, it is very common to send and share documents or PPTs. The wise way is to share screen on Skype for business, which can avoid wasting time on sending and receiving files, especially some of them are large files.
Part 1. Share Screen on Skype for Business on Windows 8.1
Using Skype to share screens on Windows 8 may be refused, because of the announcement that Skype do not work on Windows 8 until January 12, 2016. But users still have 24 months to update to Windows 8.1 to support Skype usage. Sometimes you may face Skype screen sharing not working, there are many reasons you need to consider about. For instance, whether you update the latest Skype version, the Internet connection or maybe you just not in neither a voice call nor a video call. Because Skype screen sharing only works after you are in real call online. Thus, you need to know whole share screen on Skype Windows 8.1 working processes, to succeed at last.
-
Step 1Sign in your Skype account, and then choose Video Call with a contact. (Before Skype screen sharing start, make sure your Internet connection is broad. And prepare Skype Premium first, it is the essential point during Skype screen share on Windows 8.1 laptop.)
-
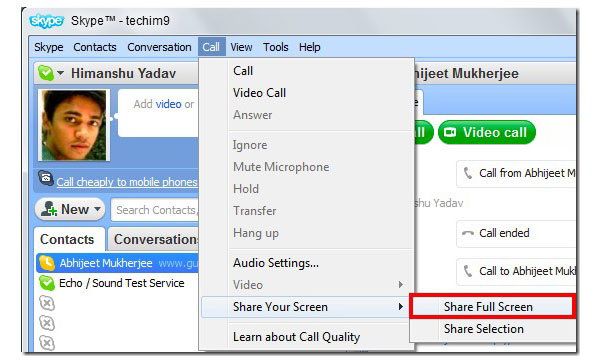
Step 2Tap the Plus blue icon on the bottom, and then choose Share screens in the third place.
-
Step 3Choose whether to Share desktop or Share window, before you starting sharing capture screen on Windows 8.1 desktop.
- (Share desktop means all your files will display to people, and Share window means only your streaming screen will be presented. Or you can see Share Selection, which enables you to customize sharing screen size.)
-
Step 4Tap the Start option below to share screen on Skype for business on Windows 8.1.
- The person who you share Skype screen captures of commercial usage must be in your contact list. And he or she should install Skype on his computer too. Remember to upgrade Skype timely.
Part 2. Share PowerPoint Slide Show in Multiple Monitor Situation
Let us pretend that you need to have meetings with groups of people, and you need to present your PPT to everyone. You can share screen on Skype for commercial directly, it means you are the monitor to display PPT files. Or you can have a better choice, share Skype screens on Windows 8.1 to one large screen device. And then, present the secondary monitor to others. You play a primary role in Skype screen sharing of Windows desktop for business. Your can leave your personal computer out of presenting in front of a large group of people. So here are the second methods of sharing screen on Skype desktop.
-
Step 1Open PowerPoint files on your laptop, which is the primary monitor.
-
Step 2Tap From Beginning from the Slideshow menu. You can see it display on the second monitor.
-
Step 3Choose Present option, and then select Present Desktop to share Skype screen files.
-
Step 4Click your secondary monitor from the Present dialog to present sharing screen.
Then if you need to share another files, go to sharing toolbar, and then choose Give Control to open new files. After that, tap Take Back Control to share screen on Skype of Windows 8.1.
Part 3. Tipard Screen Capture – Record Videos on Windows
What if you need to share Skype screen capture for business over too many people, using Skype directly is not a wise choice. What's more, choosing screen capture to replace Skype screen capture not working on Windows computer is easy to operate for most people. Tipard Screen Capture can record screen capture video, with audio of system and microphone too. Thus, you can explain during recording tutorials on Windows desktop. Or you can add background for Skype screen capture, based on your original voice. Tipard Screen Capture can record audio and video files in 100% quality. Moreover, you can record videos too.
-
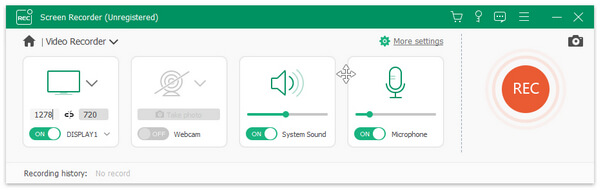
Step 1Install Tipard Screen Capture on your Windows computer, and then Turn to Record Video and Audio page.
-
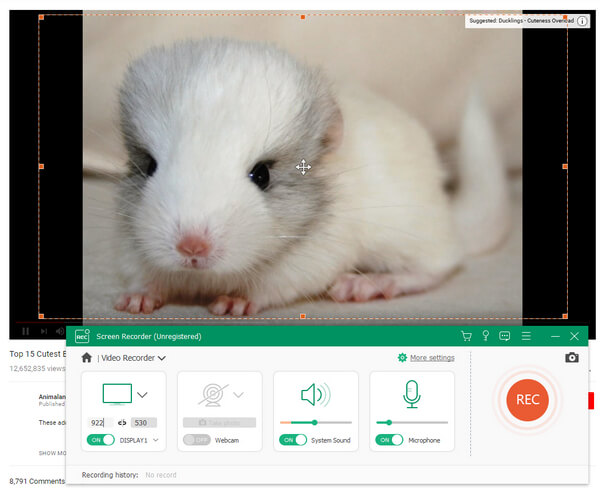
Step 2Choose Recording Inputs whether to be System Audio or Microphone. And then customize Windows screen capture size in Full Screen or Customize way. Select Screen Device, by desktop capture or turn on webcam.
-
Step 3Tap REC red icon to start share screen on Skype for Windows 8.1 app. You can Pause, Resume and Stop any time you want.
-
Step 4Choose Save under Options to output in several video formats. You can also share to business or friends by emails or social platform.
Tipard Screen Capture offers record timer, which can save people from long time screen capturing. If you need to point out the important keys during screen capturing videos, you can use cursor effects to emphasis. There are many cursor effects you can choose, by highlight cursor, change cursor color and etc. To prevent record something improper of Skype screen capture sharing for business, the Preview feature allow you to check in detail.

 Recording Your Screen on Mac and Windows – by QuickTime Screen Recorder
Do you really know whole functions of QuickTime Player? Or can you start QuickTime screen recording in simplest way? If you are not so sure, then you can turn to this QuickTime guide to learn.
 Top 4 Free Dxtory Alternative Apps to Capture Games in Super High Frame Rate
If you are looking for gameplay recorder working smoothly like Dxtory free version, you can look through this video capture review to get your answer.
 How to Record Your Screen for Windows/Mac/Android/iOS Devices
In order to record your screen for different devices, the article explains the methods to capture video for Windows, Mac, Android and iOS devices.
 [2026 List] Top 8 Game Recorders to Record Gameplay for Windows
If you want to record your gameplay and post them on the platform, you may want to know the best game recorder to meet your demand. Read this article to learn the 8 best game capturers on Windows.