
How to Record My Screen Quickly for Different Platforms
If you are searching Screen Recorder; that means you need to find out the best screen recorder for your digital device. The best screen recorder is an uncertain concept. For different devices, the best one may be different. It will become a simple task to record my screen with appropriate tool.
On the other hand, screencasts are extremely helpful in explaining something, showing some skills, saving wonderful moments and broadcasting some ideas. Today, more and more people have multiple devices, like PC, tablet, laptop and smartphone. Some people even have four digital devices. So they have to grasp the ways to record my screen in different devices. That is the purpose of this article. We will introduce the appropriate ways to capture my screen on different digital devices.
Part 1. How to take screenshot on Mac
There are many screen recorders available to Windows. But if you are looking for the best one, Tipard Screen Capture may be a great choice. Firstly, it is compatible with Windows 7/8 and Windows 10. So you do not need to worry about compatibility problem when you upgrade operating system. Moreover, this screen recorder will generate highest quality videos. We will not miss anything when record my screen with Screen Capture. It supports to capture audio along with video images and multiple audio inputs, like microphone audio and system audio.
How to record my Windows screen with Screen Capture
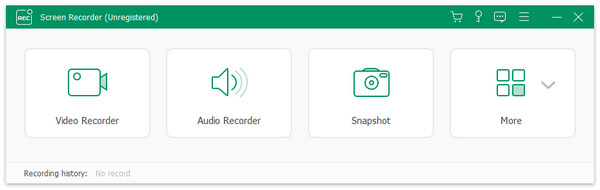
After preparations, launch Screen Capture. Before recording screen, I have to set the record screen size. Screen Capture provides multiple options related to screen size, like full screen, custom and dimensions. You can select anyone and customize my screen recording size.
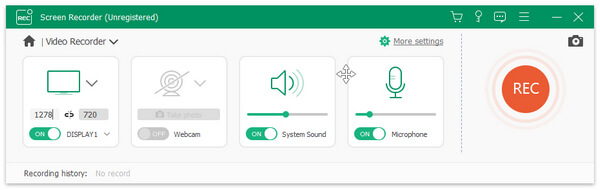
Screen Capture has the ability to record the sound from system and microphone. When recording videos, we need to enable System Audio and disable Microph Audio at the same time. And we can enable both inputs at the same time to capture our voice with the screencast.
Screen Capture has the ability to record the sound from system and microphone. When recording videos, we need to enable System Audio and disable Microph Audio at the same time. And we can enable both inputs at the same time to capture our voice with the screencast.
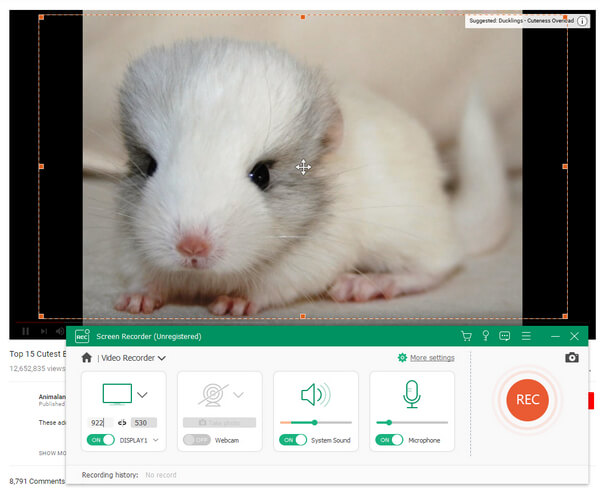
After settings, click on red REC button to begin recording. After settings, click on red REC button to begin recording.
If the output is perfect, click on Save to complete the process. Then you can enjoy my screen recording on your computer or share it with friends.
Part 2. Capture my screen on Mac
Although there are many screen recorders available on Windows, the options are scarce to Mac users. So Ripcorder Screen attracts my attention. It is a dedicated screen recorder for Mac computers. And you can enjoy its features without pay any penny. It supports to capture screen in full screen mode or record a part of screen. You can set the input sources before recording my screen. After recording, Ripcorder Screen will save the output in the form of QuickTime movie. When it comes to the details to record my screen, you can follow the steps below.
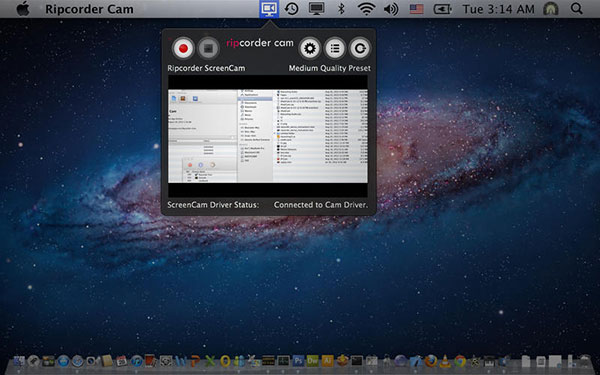
How to capture my Mac screen with Ripcorder Screen
Step 1. After install Ripcorder Screen on your Mac computer, launch it. You will discover it icon appears in menu bar.
Step 2. Hit its icon to open the window, which contains some buttons for recording, pausing, stop and settings.
Step 3. Click on Settings button shaped as a gear to open setting dialogue.
Step 4. Select Screen option and decide the recording screen size. Full Screen will capture the entire screen and Partial Screen allows you to select an area to record.
Step 5. Drop down the quality list and select your favorite video quality.
Step 6. Located to Advanced section, you can decide whether to Highlight Mouse Click in Video. If you check Automatically stop recording and select a value in drop-down list, this Mac screen recorder will stop spontaneously.
Step 7. After setting, press the recording button with a red circle to start recording your screen.
Step 8. Click on stop button next to recording button, when screen recording is over. And then just play the screen recording in QuickTime Player.
Part 3. Take my screencasts on iPhone
iOS is a close operating system. And considering cybersecurity and privacy, Apple does not permit screen-recording apps in App Store. So you cannot take screencasts on iPhone directly. However, that does not mean you can take my screencast of iPhone. In this article, we will use QuickTime and Mac computer as the example.
Step 1. Connect your iPhone to computer with USB cable.
Step 2. Open QuickTime Player on your Mac computer. You can find it in Applications folder.
Step 3. Click on File menu and select New Movie Recording option to open the my screen recording dialogue.
Step 4. Press the downward icon next to record button.
Step 5. Then you will discover your iPhone appear on the input list. Select your iPhone in Camera and Microphone respectively.
Step 6. And select a video quality.
Step 7. After select your iPhone in QuickTime, the Movie Record box will show up in your iPhone.
Step 8. Once you click on the record button on your iPhone, QuickTime will start recording my iPhone screen on Mac computer.
Step 9. When finished, tap on stop button and save the screencast on your Mac computer.Of course, you can take iPhone screencasts on Windows computer with QuickTime Player.
Part 4. Record my Android screen
Compared to iOS, Android is apparently more open. You can find some screen recorders in Google Play Store and use them to record Android screen directly. But most screen recorders need root your handset first. So A-Z Screen Recorder attracts my attention. It could capture my screen on Android phone without root.
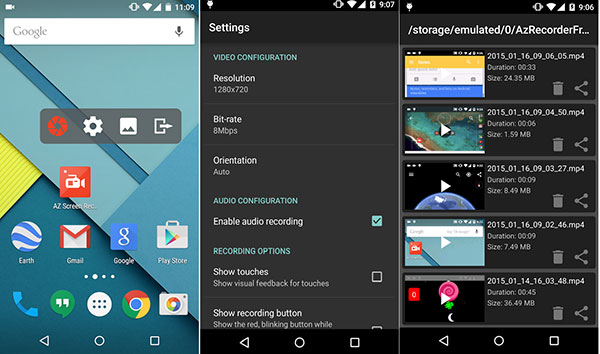
Step 1. Open A-Z Screen Recorder app. Then a box with four buttons will pop up.
Step 2. Tap on setting button shaped as a gear to open settings dialogue.
Step 3. You can customize recording solution, frame rate, bit rate and other parameters here. After settings, press Back to return to interface.
Step 4. Open the app or navigate to the screen you'd like to record.
Step 5. Click on the red camera button, A-Z Screen Recorder will record all actions on your Android screen.
Step 6. When you prepare to stop recording, open the notification button and press stop recording option.
Then you can play the recorded video on your Android phone or share it on social media.
Conclusion
This article has introduced how to record my screen on different digital devices. Tipard Screen Capture is the best choice on Windows, for it supports almost all Windows systems. Moreover, you can enjoy high quality screen recordings. Ripcorder Screen seems to a good choice to record my screen on Mac computers. iPhone does not have dedicated screen recorder app. But we can capture my screen of iPhone on computers through QuickTime Player. If you want on Android without rooted, A-Z Screen Recorder is a useful app.

 Best Game Recording Software to Capture Game Video in High Quality
If you want to record your gameplay and post them on the platform, you may want to know the best game recorder to meet your demand. Read this article to learn the 8 best game capturers on Windows.
 Top 10 Video Capture Software to Record Videos Easily
What is the best video capture software you should choose for your computer. Learn more detail about the top 10 video-capturing tools from the article.
 How to Capture Skype Calls without Informing Party Members
If you need to record a Skype call and save it on your computer, you can read this article to learn more about 2 efficient ways to capture Skype video calls.
 BSR Screen Recorder and Top Alternatives You Should Know
From this article, you can know not only BSR Screen Recorder features accurately, but also other two good BSR alternative desktop capture programs recommend in detail.