Living in the digital age paves the way for innovations in processes. That includes health consultations. Others prefer an online consultation for the convenience of both the health practitioner and the patient. Doxy.me is a secure and simple telehealth platform for secure video consultations. With it, healthcare providers may set an appointment to meet patients for virtual checkups, consultations, and follow-ups.
Meanwhile, the platform offers professional features, such as text and email notifications, file transfers, screen sharing, payments, and group calling. However, Doxy.me does not support recording, which is an important feature when a physician caters to different patients. In this post, we will walk you through the workarounds to record Doxy meetings and sessions.

Part 1. Can You Record Doxy.me Sessions?
Currently, Doxy.me does not allow recording meetings. One of the possible reasons is that the platform is not allowed to store any protected health information of both parties. Hence, it features encrypted peer-to-peer. Patients stay anonymous during the call. Also, all data transmitted during the call is permanently destroyed as soon as the session ends. So if you are asking if you can record on Doxy.me, the answer is no. But just like in any case, there is an exception to the rule. In general, healthcare providers are not allowed to record virtual consultations. The only time it is allowed is when there is consent from the patient with acknowledgement from all parties involved. In this case, a video recording tool is needed. With this kind of need, we looked for some workarounds that could help users record videos with ease.
Part 2. The Best Way to Record Doxy Meeting on Windows and Mac
Clear documentation and accurate communication are essential because these directly affect health outcomes. For that, you need a well-rounded tool that provides all the practical tools for recording sessions without making the process complicated. This is what Tipard Screen Capture is developed for. The tool enables you to capture video and audio on your computer with the best quality - sharp video quality and clear audio output. Furthermore, it supports long-duration recording without lags, meaning it can record a session for an extended period of time without quality and interruption problems. Also, it ensures recordings are protected from unauthorized viewing, copying, or distribution. One of those, users can manage recorded sessions with an organized history, and clear the Doxy record label or rename it. Now, let's see how to capture sessions with this tool:
Step 1 Get the app by clicking the Free Download button. Make sure to get the right installer based on your computer's operating system. You can access this tool on both Windows and Mac PC. Next, install and launch it on your computer.
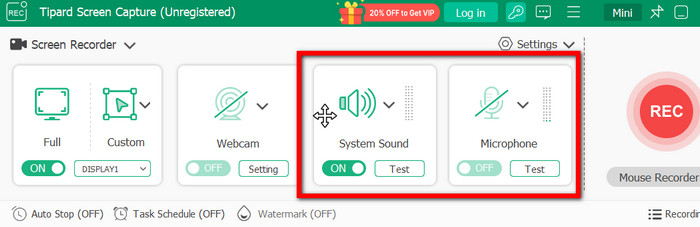
Step 2 Now, decide which audio source you wish to capture between System sound and Microphone by ticking the toggle button.
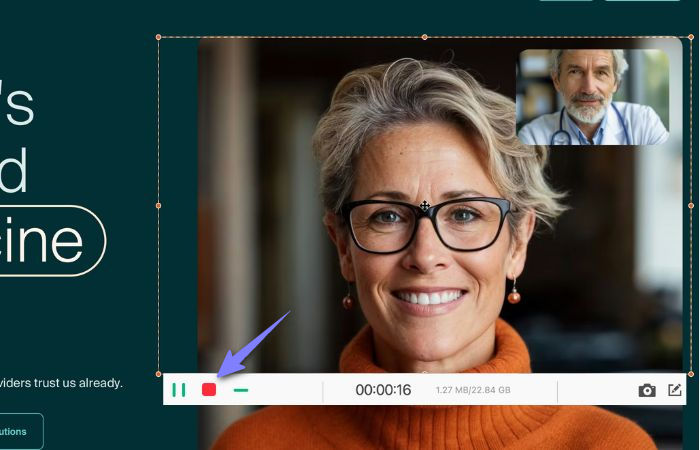
Step 3 Then, choose the recording region and adjust the frame according to the dimensions of your video call. You may now start the consultation and ask for the patient's consent to record the call. After that, click the red REC button to commence the recording process.

Step 4 While the recording is ongoing, click the Pencil button to add annotations on the recorded screen. You may include serial numbers, arrows, and lines. To end the recording, click the red square button.
Part 3. Use a Doxy.me Record Google Extension
Since Doxy.me runs in a web browser like Chrome, you may run a screen recording software alongside it to capture your Doxy meetings. Screencastify is a Chrome-based screen recording plugin that enables you to record webcam, browser tab, and the entire screen. Additionally, it lets you capture the audio both from the microphone and system sources and then share the meetings easily. Users may also enjoy basic editing tools such as trimming and annotation tools. It not only allows you to directly from your computer screen. It also acts as a webcam recorder, enabling you to capture videos from your plugged webcam. Just watch out for some limitations that it is only for the Chrome browser. It will not run natively on other browsers, as this is a Chrome extension. Also, a few users find the interface confusing at first. But you'll get the hang of it as you continuously use it. If you want to record Doxy meetings using Screencastify, follow the guide below:
Step 1 The tool requires you to be in Chrome, so you need to launch your Chrome browser. Then, go to the Chrome Web Store page. Next, search for Screencastify. After that, click the Add to Chrome button at the top right corner of the screen. From the pop-up dialog, click the Add extension button. Then, it should show up in the upper right side of your browser.
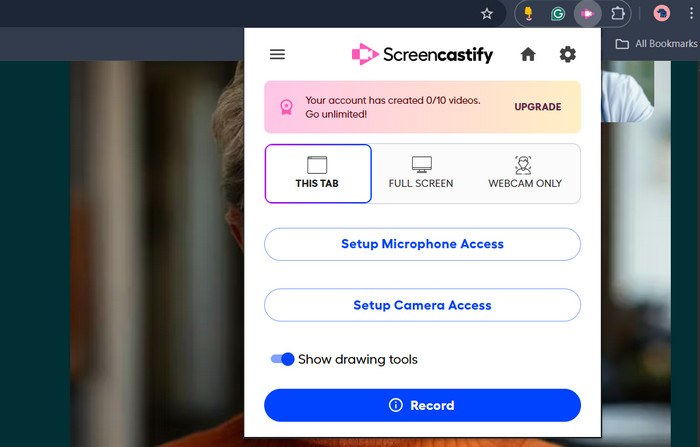
Step 2 Next, you will need to sign in to your Google account and set up some permissions. After that, you should be ready to go. Go over to your Doxy call session and click on the Screencastify button in the upper-right corner of the browser.
Step 3 While the session is ongoing, click the blue Record button to begin the screen recording.
Step 4 The floating bar of the recorder will appear in the lower left corner of your screen. Now, you can annotate on the screen. Once you are done recording, click the Stop sharing in the middle of the screen.
Part 4. How to Record Doxy Meeting on iPhone and Android
Now, if you are using a mobile device to conduct a virtual consultation, you can still record the sessions using a mobile app that works on iOS and Android devices. For this need, you can utilize V Recorder. It is a free screen recorder that lets users record 4K stable video quality while functioning as a game recorder, voice-to-text transcriber, video editor, and voice recorder. What is so good about this program is that it comes with advanced AI noise reduction that removes background noise while keeping your voice clear. If you want to learn how to use this app, follow the steps.
Step 1 Download and install the app from the Google Play Store or App Store. Then, launch it on your Android or iPhone. Get familiar with the app using the tutorial from the homescreen.
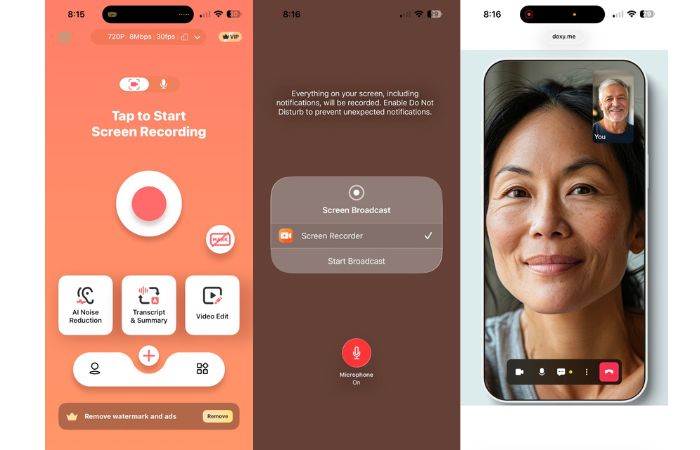
Step 2 While your Doxy meeting is ongoing, press the Record button in the middle of the interface, and press Start Broadcast. Ensure that the Microphone is enabled.
Step 3 When the record button transformed into a square and started counting, the recording was initiated.
Step 4 To stop recording, tap the recording button on the notch of your phone. Then, it will instantly give you a preview of the recorded screen. For instance, if you are only extracting audio from your device, there is a tutorial on how to record audio on Windows, Mac, iPhone, and Android systems.
Conclusion
Staying healthy is essential nowadays. But with the inconveniences that arise, technology has emerged to bridge the gap. Now you can record Doxy meetings to help patients and healthcare practitioners review important instructions as they affect health outcomes. The screen recorders we mentioned are effective in capturing those consultations and checkups, but always clarify why the sessions are being recorded with a simple consent from all parties involved.
More Reading

About the Author