
FL Studio is popular among beatmakers, composers, and EDM producers because of its ability to capture the sounds you need. Undoubtedly, it became one of the most widely used DAW software for creating and recording music. But did you know that FL Studio can also record audio and microphones from your system besides being a powerful DAW?
However, its complex interface and advanced features can be tough for first-time users. To help with this, we will teach you how to record audio in FL Studio through detailed steps. In addition, we will present some tools you can use to record FL Studio vocals. Without further ado, let us get started!

Part 1: Detailed Steps to Record Audio in FL Studio
FL Studio is an advanced digital audio workstation (DAW) with various recording, editing, and music creation tools. It can record both system sounds and a microphone at the same time. It is helpful when you want to record clear sound for music, podcasts, or any other audio production.
One of its strengths is the advanced editing options it offers. It allows you to trim unwanted parts of your recording, fine-tune volume levels by dragging or panning, and apply EQ (Equalization) settings to improve sound clarity. If you are recording your first audio track or working on a full music project, FL Studio has everything you need to make it happen. Keep reading to discover how to record audio in FL Studio!
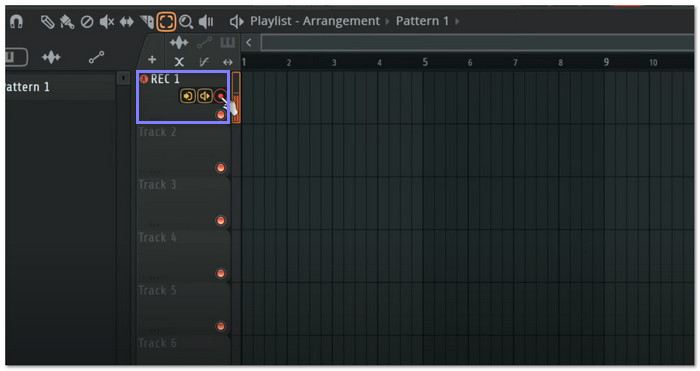
Step 1 Open FL Studio & Select Your Channel
First and foremost, get FL Studio from the official website. Next, open the program and choose the channel you want to record.
Step 2 Set Up the Mixer and Input
Go to the Mixer section and navigate to Insert 1. Click on None to open the input options and choose your preferred one. Once selected, the volume meters in Channel 1 will show activity. It will confirm that your input is ready for recording.
If needed, click the Red dot at the bottom of the channel to ensure it is the only channel recorded during the session.
Step 3 Start the Recording Process
Hover your mouse pointer to the upper part of the main window. Click the Red Record button. A popup will appear, offering two options: choose the option that will be most appropriate for you.
• Audio, into the Edison audio editor/recorder saves your recording into the Edison plugin for further editing.
• Audio, into the playlist as an audio clip, records directly into the playlist as a single audio file.
Step 4 Begin and Stop Recording
You will hear four ticks before the recording starts. After the countdown, start recording your vocals or other sounds. Once finished, hit the Stop to end the recording session.
Step 5 Export the Final Recording
Once you are happy with your recording, click File and then Export. Choose your preferred audio format, MP3, WAV, or another option. Finally, save your file. You can find your exported recording in the folder you set up during the export process.
Part 2: How to Record Sound in FL Studio with the Best Audio Quality
You are working on an important project in FL Studio and want to record sound with the highest clarity. Because of that, you need a tool that can handle both with ease and give you the best results. Tipard Screen Capture is the ideal solution for this.
This program allows you to record sound in FL Studio with outstanding audio clarity. You can capture both system sound and microphone input without losing clarity. Even better, it lets you choose your preferred audio output format, like MP3, AAC, M4A, or WMA. Once you are done, you can easily review your recording with its built-in waveform display, ensuring you hear every audio detail.
- Capture both video and audio with excellent quality.
- Record system audio and microphone with clear sound.
- Support MP3, AAC, M4A, or WMA for your audio output.
- Set automatic stop time for long recordings.
- Offers trimming of your recordings for easy editing.

Rely on the steps below on how to record sound in FL Studio with amazing audio clarity using Tipard Screen Capture:
Step 1 Run Tipard Screen Capture
First and foremost, ensure FL Studio and Tipard Screen Capture are ready to go. Now, launch Tipard Screen Capture on your computer to get started.
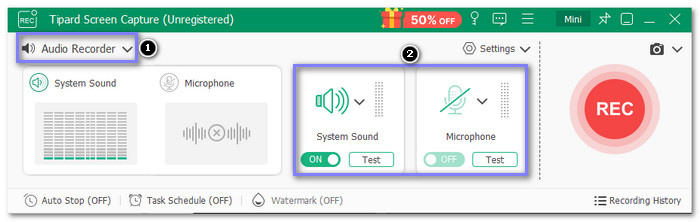
Step 2 Pick Audio Recorder
Click the Recorder drop-down menu and select Audio Recorder. Next, turn on System Sound and Microphone options. These options allow you to record the sound on your computer and your microphone.
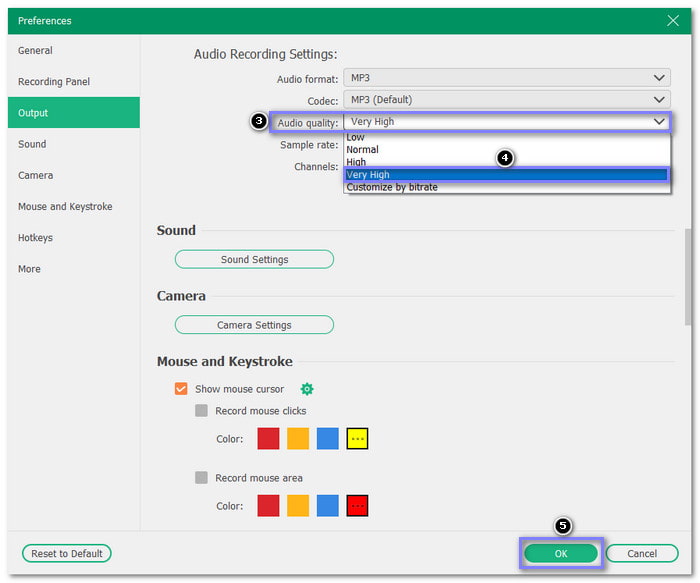
Step 3 Choose High Audio Quality
To achieve the best audio clarity, go to the Settings drop-down menu and select Output Settings. Under Audio Recording Settings, select the Very High for Audio quality option. After that, hit the OK button to confirm the changes.
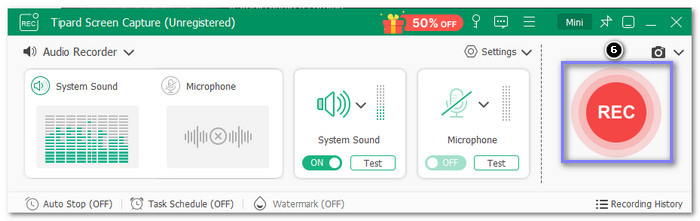
Step 4 Record FL Studio Sound
Open the FL studio and play the audio. Then, open Tipard Screen Capture and click the REC button. It will begin capturing the sound playing in FL Studio. After you finish recording, hit the Stop button.
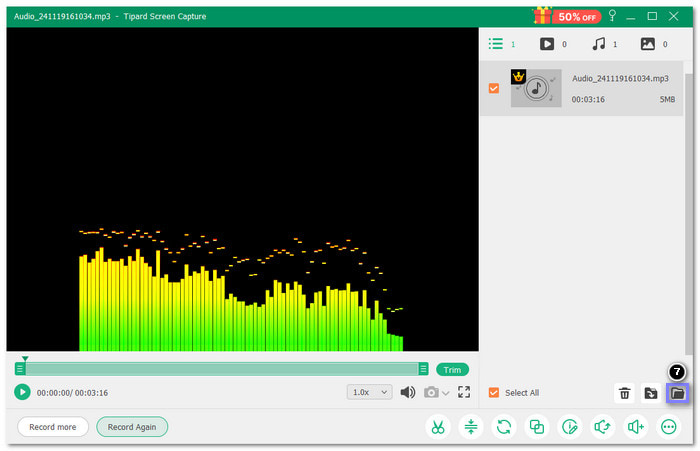
Step 5 Save Recorded Sound
You can hear and see the waveform display of your recorded sound. You can use the Trim option if unnecessary parts were captured in the recording. Now, save your recorded sound in FL Studio in your local folder.
Part 3: How to Record Audio on FL Studio in Audacity
While FL Studio has a complex interface and options for a beginner, Audacity is quite the opposite. It is easy to use and has handy tools such as audio effects, multitrack, and noise reduction. Do not worry; Audacity is an open-source and free audio editor. Also, it is integrated with almost all the operating systems.
Below are the step-by-step process on how to record audio on FL Studio in Audacity:
Step 1 Select Your Recording Device
Open Audacity on your computer and look for the Recording Devices tab. Click on it, and select the device you want to use for recording from the drop-down menu.
Step 2 Set Up Your Trask
After selecting your recording device, go to the Menu and select Tracks. Next, choose Add New and pick the type of track you need for your recording.
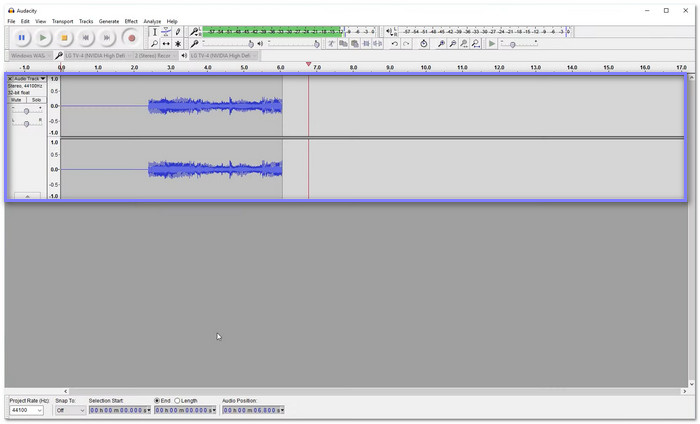
Step 3 Start & Stop Recording
Once you are ready to record, press the Red Circle button to start. Speak or play the audio you want to capture. When you are done, press the Stop button to finish.
Step 4 Export Your Recording
Finally, export your recording to save it in the format you prefer. Now, your recording is ready to use.
Conclusion
Recording vocals in FL Studio can be easy if you know the right steps. You can start now that you have learned how to record vocals in FL Studio.
Tipard Screen Capture and Audacity are great tools for recording sound in FL Studio. However, if you want to ensure the best audio clarity, Tipard Screen Capture is the perfect choice. It provides high-quality recordings and lets you choose the output format. Whether you are recording vocals or system sound, Tipard Screen Capture helps you get the clearest audio every time.
More Reading


About the Author
