
An 8-track recorder lets you record many sounds at once. Each instrument or voice stays on its own track. This makes mixing easier and your music cleaner. Even if you are new, you can follow simple steps to get good results. This guide shows you how to prepare, record eight tracks with a DAW, and capture sound and screen in high quality.
Part 1: Understanding Multitrack Recording (8-Track)
An 8-track cassette recorder enables musicians to record multiple sounds in different tracks of the same tape. As an illustration, you can put drums in one track, bass in a second, guitar in a third and vocals on a fourth. Individual adjustment of the sounds is possible, and it is easier to mix everything perfectly. It is also able to add additional instruments or harmonies to other tracks without interfering. This provides artists with complete control of the sound and greater space to be innovative.
Before multitrack recording, musicians had to play everything perfectly in one take. Any mistake meant starting over. With an 8-track tape recorder, that is why it matters:
• Mistakes can be fixed without redoing the whole song.
• Each track can be edited, processed, or balanced individually.
• You can add or remove layers, giving creative freedom and cleaner recordings.
Multitrack recording changed music production. It allows beginners and professionals alike to experiment, fix errors, and create richer recordings with more depth and clarity.
Part 2: Things to Prepare for 8-Track Recording
Get ready before you record. Pick the right recorder. Choose your instruments. Find a quiet room. Organize your cables and tapes. This part will show you how to set up everything for 8-track recording.
1. Choosing Your Recorder
Pick a recorder first. A vintage RCA 8-track record player console stereo is all-in-one. It has speakers and an 8-track player. A recorder is modern. It lets you record digitally and edit easily. The right recorder helps you get clean tracks.
2. Preparing Your Recording Environment
Use a silence room without any background noise. Make sure your recorder 8-track has power or full batteries. Get all cables ready. A prepared space helps you record without problems and keeps the sound clear.
3. Selecting Instruments and Microphones
Choose which instruments to record, like the Tascam 8-track recorder. Give each instrument its own track. Pick microphones that match your instruments. Dynamic microphones work well. This makes each track clear and easy to mix.
4. Setting Up Your Recorder and Organizing Tapes
Connect instruments and microphones to the 8-track record player cabinet. Set input levels so the sound does not distort. Make sure all tracks are ready to record. Keep tapes and gear organized. This makes recording smooth and fast.
Part 3: Recording 8 Tracks with a DAW Program & Common Mistakes to Avoid
Recording multiple tracks with a DAW is simple. You can build a full song step by step. Start with a beat, then add melodies and bass. Record your vocals on separate tracks with audio capture. Mix everything and finish with mastering. Follow these steps, and you will have a clean, polished song ready to share.
1. Start with a Beat
Open your DAW and start by making a beat. The beat is the foundation of your song. Use a drum sequencer or loops to create a simple rhythm. You can connect instruments through a Webcor 8-track player and recorder to capture live sounds while working in your DAW.
2. Add Melodies and Harmonies
When you have your beat ready, then add melodies. Play with virtual instruments or a MIDI keyboard. Extra sounds can also be used by means of samples. Add each instrument to a track of the DAW. This simplifies the editing process as well as maintains the cleanliness of the song.
3. Add Bass and Low-End Sounds
Next, add bass lines. Bass adds depth and groove to your song. Use a bass VST or a real bass instrument. You can record it using an 8-track digital recorder or directly into your DAW to keep it separate from other tracks.
4. Record Vocals
Record vocals in a quiet space with a good microphone. Use a pop filter and record multiple takes. Layer vocals for a fuller sound. Such effects as EQ, compression and reverb will make every track stand out. To be even more specific, you can even run vocals through a Magnavox 8-track record player console and then digitally record.
5. Mix and Add Effects
After recording, mix your tracks. Adjust EQ to balance frequencies, use compression to even volume, and add reverb or delay for depth. Moved the pan channels left and right to form a wide stereo sound. During the mixing process, a vintage console record player with an 8-track may be utilized to monitor the tracks to give them a classic touch.
6. Master and Export
Finally, master your song. Use limiting to control overall volume, tweak EQ for balance, and widen the stereo if needed. When done, export your track as WAV or MP3. This gives you a clean, high-quality version ready to share. Plus, you can use tools to record audio on a PC to capture high-quality audio and get your final track to sound clean and professional.
Wh at are the Common Mistakes to Avoid:
• Recording at the wrong levels can distort if too loud or make editing harder if too quiet.
• Not labeling tracks can make mixing confusing and messy.
• Skipping a sound check can lead to poor recordings from untested instruments or microphones.
• Ignoring background noise can ruin audio quality.
• Recording all tracks at once without planning can cause mistakes and make editing difficult.
• Not using a metronome or click track can make songs go out of rhythm.
• Overusing effects too early, like reverb, compression, or EQ, can make tracks hard to fix later.
• Not backing up recordings can result in lost files due to crashes or mistakes.
• Poor cable management can cause hums or dropped signals.
• Neglecting headphone monitoring can make you miss mistakes or unwanted sounds while recording.
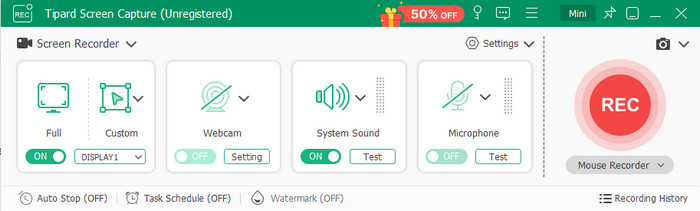
Bonus: Record Sound and Screen in the Best Quality
Tipard Screen Capture is a reliable tool for recording both audio and screen. It can capture sound from your computer, phone, or microphone. The software supports 7.1 channels and high-quality formats like AAC, AC3, and FLAC. It allows long recordings without lag or distortion. Tipard is simple to use and works well for beginners and professionals alike.
This tool is highly recommended if you want clear and professional recordings. It is perfect for recording tutorials, music, or any audio from your devices. With Tipard Screen Capture, you can save your recordings in top quality quickly and easily.
Conclusion
In conclusion, an 8-track tape recorder makes recording music easier and more flexible. It enables each instrument and vocal to occupy its own track, hence the ability to fix the mistakes, mix sounds, and add layers. With an 8-track tape recorder, you have more control, a clearer recording, and even the liberty to be creative with your music when you are a beginner or a pro.
More Reading


About the Author
