
Sometimes, you need to capture a quick moment on your screen, a picture, a note, or a message. If you are unsure how to screenshot on a Dell, this guide is for you. Dell computers offer several easy ways to take screenshots, including shortcut keys and built-in tools. We will walk you through each method step by step. By the end, you will know how to capture, save, and share your screen like a pro.

Part 1. Screenshot Options on Dell Computers
Taking a screenshot is an easy way to save what you see on your screen. If you are learning how to screenshot on a Dell laptop, there are many ways to do it. You can use keyboard shortcuts for speedy captures or built-in tools for more control. The Snipping Tool and Snip & Sketch let you select the part of the screen you want, add notes, and save it immediately. You can also utilize third-party apps for extra features like editing or auto-saving. Each option works well for different needs, whether you are saving notes, sharing images, or making guides.
Part 2: Use Keyboard Shortcuts to Screenshot on a Dell
Keyboard shortcuts are the swiftest way to take a screenshot. If you are learning how to screenshot on a Dell computer, try these simple key combinations to capture exactly what you need.
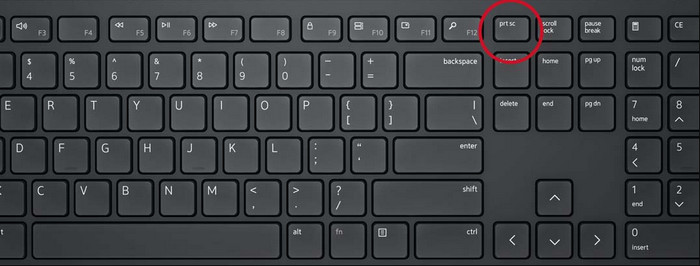
1. Full Screen - PrtScn Key
Press PrtScn to capture the entire screen. The image is copied to your clipboard, so you can paste it into Paint, Word, or any app to save it.
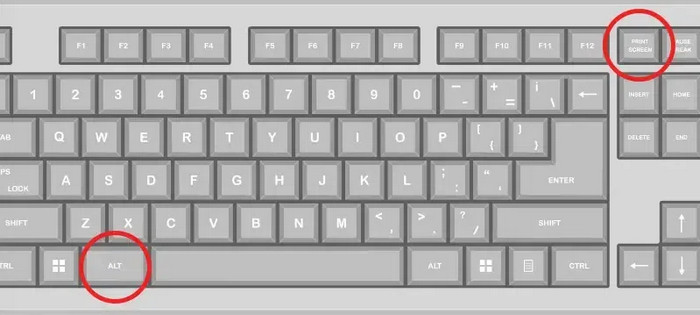
2. Active Window - Alt + PrtScn
Use Alt + PrtScn when you only want to capture the active window. This is useful when you are working with multiple apps and want to focus on one.
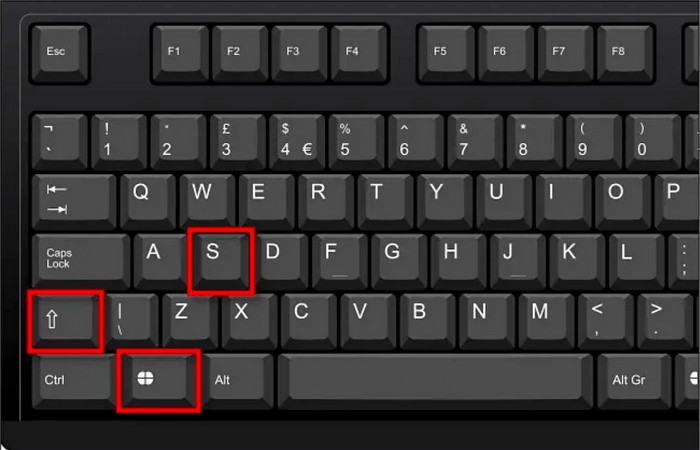
3. Custom Area - Windows + Shift + S
Press Windows + Shift + S to open the Snip & Sketch tool. Drag to select the part of the screen you want. The image will appear as a small preview in the corner, where you can edit or save it.
These shortcuts are compatible with most Dell laptops and desktops, enabling you to capture screens quickly and share them with ease.
Part 3: The Best Way to Take a Screenshot on a Dell
While Windows presents built-in tools, using trustworthy software can give you more features and better results. If you want to learn how to take screenshots on a Dell computer with top quality, Tipard Screen Capture is one of the best tools to try. It allows you to take screenshots in high image quality and save them in popular formats, such as JPG or PNG. You can also capture scrolling windows, making it easy to save long web pages or chat threads.
Additionally, Tipard allows you to add annotations, arrows, or stickers to highlight specific parts of your image. With its simple shortcuts and smooth interface, it makes every screenshot fast, clear, and ready to share.
Step 1 Download the Screen Capture
By clicking the download button that is here, you can get the app on your Dell and ensure that you will tick the Windows version. After that, follow the installation process it requires and do the setup before you launch it.
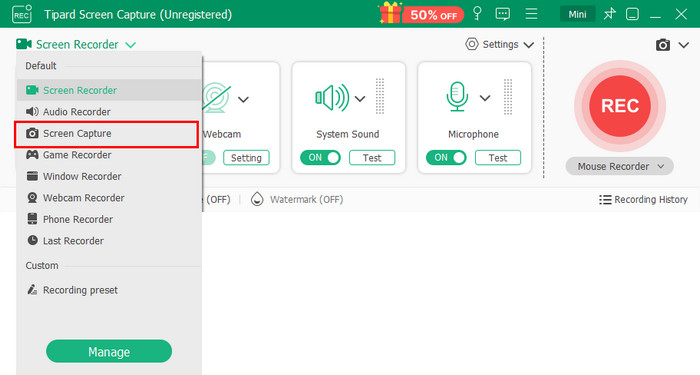
Step 2 Open the Screen Capture
Once the floating toolbar appears on your screen, click the dropdown button on the left side of the interface and select Screen Capture. Once you select that, your mouse cursor will turn into a target, which allows you to select the area you want to capture.
You can right-click the area and drag it to capture a specific area, or you can tap instead to capture the whole screen or a specific highlighted area.
Optional: For Scrolling Screenshot
If the image you want to capture is a long website or chat threads, then this is the perfect tool for you. Here, you can click the Scrolling Screenshot option. With the use of your scroll wheel or space bar, you can scroll the page of the website or chat thread you want to capture. To save it, simply press the left-click button on your mouse.
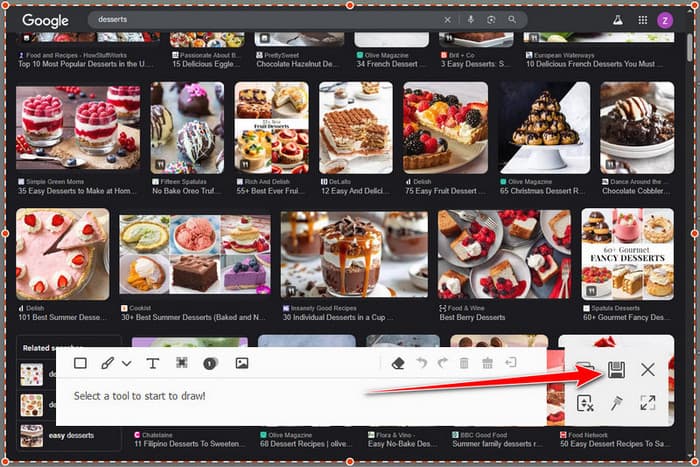
Step 3 Add Annotation
Now that you have taken a screenshot, several options are available here if annotating is needed. You can add text, shape, draw, and even attach an image to the one you are screencapturing on your Dell.

Step 4 Save and Export
Now that you have taken the screenshot you needed on your Dell, you can simply click the Save button. Set the file name of the screenshot, pick the format, the destination where you want it to be saved and click Save.

Amazing, right? The tool not only offers a screencapture feature but also a scrolling screenshot, which is helpful if you need to capture a full thread of messages but are tired of doing per piece. Plus, if you want to fully utilize all of its advance features, using the pro version gives you the opportunity to do so.
Part 4: Tips for Managing and Editing Screenshots
Once you learn how to take a screenshot on a Dell, it helps to keep your images organized and easy to edit. Managing screenshots the right way saves time and ensures your files always look clean and professional. Here are some practical tips you can follow.
1. Keep Your Files Organized
Create a primary folder called Screenshots on the desktop or within your Pictures folder. You can also make subfolders within it where you can use your work or school, or personal folders. This makes you find what you want so easily without searching through the random files. When you take many screenshots on a Dell, a clear folder system keeps everything tidy and easy to locate.
2. Use Clear File Names
Avoid saving screenshots with default names like Screenshot (1).png. Instead, rename them using short but descriptive titles, such as Project-Report-April or Invoice-2026. Doing this helps when you often capture multiple images and wonder how do you screenshot on a Dell laptop efficiently. Clear names also make searching faster when you have hundreds of screenshots stored.
3. Save in the Right Format
The selection of the appropriate file format influences the quality of an image and space. Dell, save your screenshot in PNG to get crisp and detailed images, which are particularly important in documents and text. Light files that are simpler to share on the internet should be used with JPG. PNG helps maintain the sharpness of the quality even when you need to edit later, whereas JPG is good for uploading or emailing.
4. Edit Before You Share
Before sending or posting your screenshot, take a moment to edit it. Crop out unneeded areas, adjust brightness, or highlight important parts. A simple edit makes your screenshot of a Dell laptop look polished and clear. Adding annotations or arrows helps others understand what you are showing, especially for tutorials, guides, or reports.
5. Use Tools with Extra Features
While built-in tools work well, apps like Tipard Screen Capture or Snip & Sketch give you more flexibility. They also allow you to write, blur sensitive information or even add stickers to improve the look. With these tools, you may hang on to your screenshots and still make them informative without having to strain. You can easily make pictures look professional with such features as scrolling capture and simple editing, and within minutes.
By following these tips, you can manage your screenshots better, reduce clutter, and make your captures more useful. Whether for work, school, or sharing online, an organized approach keeps every image easy to find and ready to use. Also, this is applicable for those who usually record their screen, which is a nutshell for organizing and managing the final output.
Conclusion
Learning how to screenshot on a Dell laptop is easy once you know the right methods. Simple keyboard shortcuts are used to take quick captures, in-built features like Snipping Tool can be used to take more control captures, and some apps, such as Tipard Screen Capture, can be used to edit and have a better image quality. Sharing good management of your screenshots also makes you organized and work faster.
Regardless of whether you are saving notes, working on guides or sharing pictures over the web, Dell laptops can provide you with numerous opportunities to capture your screen conveniently. Having the right tools and habits, screenshot taking and editing can be a pleasant routine that is a part of your daily routine.

Record full screen, portion, window, game, and phone seamlessly without lag
100% Clean & Safe
100% Clean & Safe
More Reading


About the Author
