
As one of the world’s top ICT companies, Acer is present in more than 160 countries. It produces hardware and electronics, including desktop PCs, laptops, tablets, Chromebooks, servers, and more. Generally speaking, Acer PCs and laptops run Windows. If you want to create tutorials, capture gameplay, or save video calls, this guide walks you through multiple ways to screen record on Acer laptops, PCs, or Chromebooks.

Part 1: Ultimate Way to Screen Record on Acer Laptop
If you are looking for a flexible Acer laptop screen recorder, Tipard Screen Capture is a good option. It offers multiple modes, including screen, audio, gameplay, portable device, and more. It supports a wide range of recording sources and uses AI to optimize video quality.

- Screen record on Acer desktops and laptops with one click.
- Draw on screen recordings in real time.
- Add webcam and microphone to screen recordings.
- Preview screen recordings with a built-in media player.
- Offer a basic video editor to edit and enhance your recordings right away.

How to Screen Record on an Acer Laptop
Step 1 Install the Acer recorder
Launch the Acer screen recorder after installing it on your laptop. It is available on Windows 11/10/8/7 and macOS 10.13 or above. Choose the Screen Recorder mode.
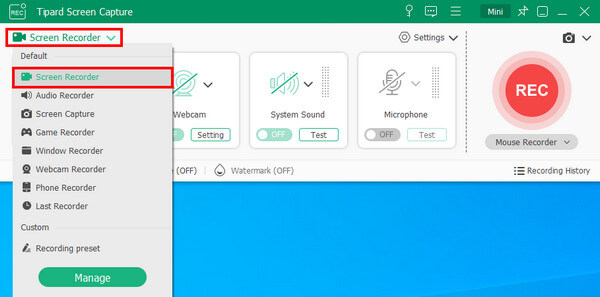
Step 2 Record your screen
Turn on the Recording area option and set it on your desktop. Turn on System Sound and adjust the volume. To add your reaction, turn on Webcam and Microphone. Click the REC button to begin recording Arce.
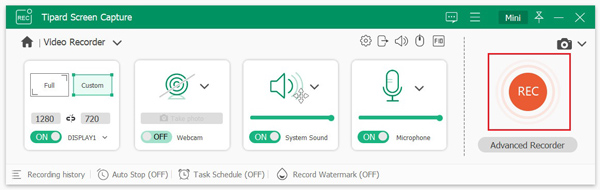
Step 3 Export screen recording
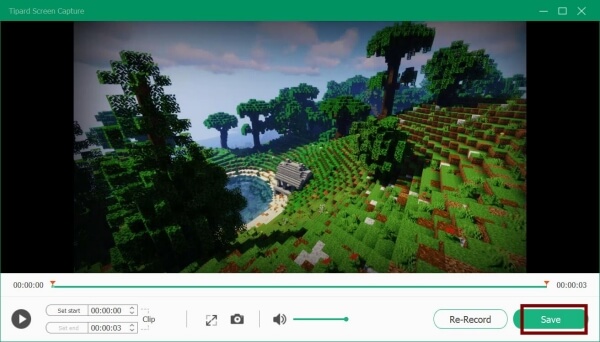
During the process, you can draw on the recording with the toolbar. When it finishes, click the Stop button on the widget. Next, preview the result and click Save to export it.
Part 2: How to Screen Record on an Acer Laptop with Game Bar
Xbox Game Bar is the built-in screen recorder on Acer laptops and PCs running Windows 11/10. It gives you instant access to widgets for screen capture and sharing. Then it will save screen recordings as MP4 files.
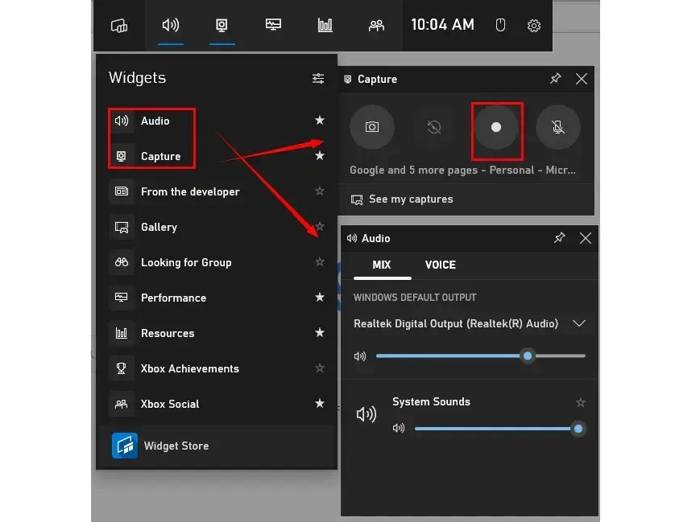
Step 1 Press the Windows + G keys on your keyboard to open Game Bar.
Step 2 Click the Record from now button to start a clip.
Step 3 Configure the audio sources on the Audio panel. Plus, the Take screenshot button lets you capture a screenshot while recording.
Step 4 When the screen recording finishes, click the Stop recording button.
Step 5 Go to the Videos folder and open Capture to find the MP4 recording file.
Part 3: How to Screen Record on an Acer Laptop with Snipping Tool
The Snipping Tool is the preinstalled screenshot feature on Windows. Microsoft stopped it on Windows 10. Now, Microsoft has improved this utility and added it to Windows 11. If your operating system is up to date, you can screen record on an Acer laptop using the Snipping Tool.
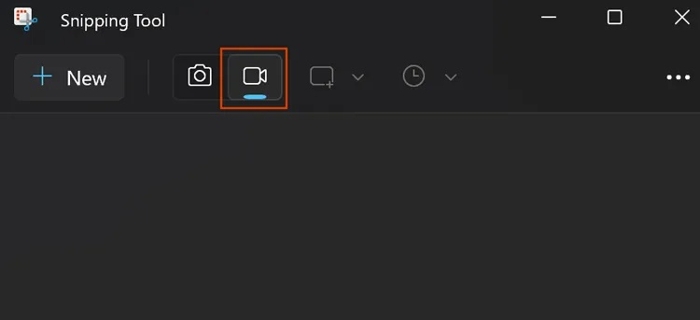
Step 1 Press Windows + Shift + S keys on your keyboard to open the Snipping Tool or run it from the Start menu.
Step 2 Choose the Record tool with a video camera icon.
Step 3 Once you are ready, click the New button and drag your cursor over the area you want to record.
Step 4 Click the Start button to begin recording the Acer screen after the 3-second countdown.
Step 5 When you want to stop, click the Stop button on the widget.
Step 6 Then you can preview, trim, and save the recording as an MP4 file directly.
Part 4: How to Screen Record on Acer Chromebook
Chrome OS comes with a native screen recording feature. If your Chromebook runs OS 89 or newer, you can screen record on an Acer Chromebook without an extra application. Here are the steps:
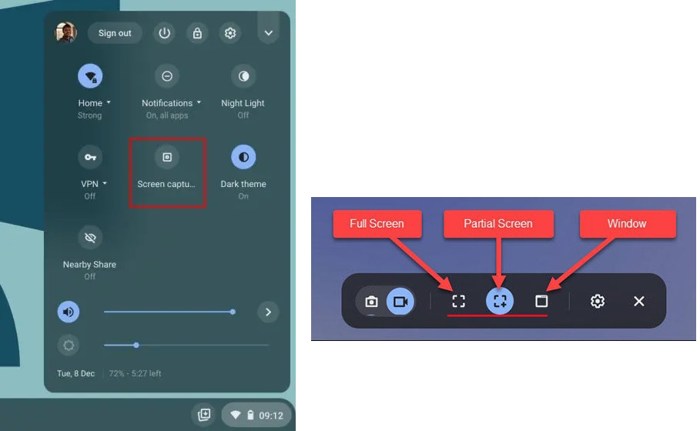
Step 1 Open chrome://flags/#screen-capture in your Chrome browser and set it to Enabled.
Step 2 Next, restart your Chromebook.
Step 3 Open the Quick Settings panel from the bottom right corner.
Step 4 Choose the Screen capture tool to open the toolbar.
Step 5 Switch to the Record option with the video camera icon.
Step 6 Click the Settings button and decide if you want to record the microphone.
Step 7 Then, select a mode, such as Full Screen, Partial Screen, or Window.
Step 8 Click the Record button to start screen recording on the Acer Chromebook.
Step 9 Finally, click the Stop button to end it.
Step 10 Click Show in folder to locate the Downloads folder and find the recording. It is saved as a .webm file.
Conclusion
This guide shared four ways to screen record on an Acer laptop, desktop PC, or Chromebook. The built-in Game Bar and Snipping Tool on Acer allow you to capture the entire screen or a partial area quickly, but they lack additional features or a video editor. The native Screen Capture feature is available on the Acer Chromebook. Tipard Screen Capture is a good option for beginners to generate pro-level screen recordings on an Acer PC or laptop.

Record full screen, portion, window, game, and phone seamlessly without lag
100% Clean & Safe
100% Clean & Safe

More Reading



About the Author

 Click here to join the discussion and share your comments