
Top 4 Methods to Clear History on An iPad

In our daily life, it's common to use iPad to surf the Internet. Because the iPad is more convenient than the laptop and the screen of iPad is bigger than the smart phone. However, when it comes to the privacy, you may not want a record of web pages you've visited or the other activities on iPad. You may want to delete browsing history on iPad, or even clear up the whole iPad without track. If this is what your concern, then you come to the right place. The article will introduce you 4 methods to clear history on iPad, iPad air or iPad mini.
Method 1: How to clear history on iPad without track
In order to clear history on an iPad without track, Tipard iPhone Eraser should be the best data eraser to clean up the whole iPad. It is able to securely wipe out the browser history, login information, cache data, messages, videos, music files, photos and more from iPad with 100% unrecoverable.
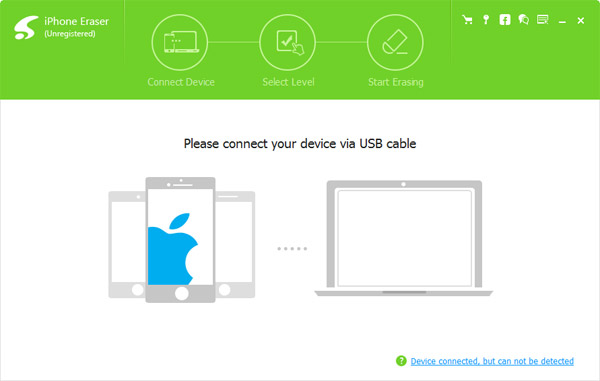
Connect iPad to the program
Launch Tipard iPhone Eraser after. Then use USB cable to connect your iPad to computer and the program will detect it automatically. You can delete Google history, clean cache and memory, apps, browser history, safari cookies and more from iPad with ease.
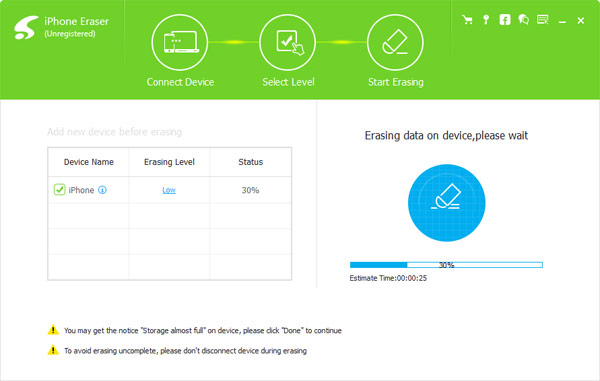
Choose erasing level
Choose the erasing level to clear all histories on iPad. The program provides 3 erasing levels to permanently wipe all cache on your iPad, and you can choose the blue "low" erasing level to wipe out all histories and events.

Clear up history on iPad
Click "Start" button to erasing data on your iPad. When you whole process finishes, you can find all the data is wiped out. The browsing history, cache, photos, video and other files on iPad can no longer be restored.
Method 2: How to Delete History on iPad in Settings
If you just need to remove the browsing history on iPad, you can simply delete them directly in Settings. Just check out the detail process to clean the browsing history without track as the following steps.
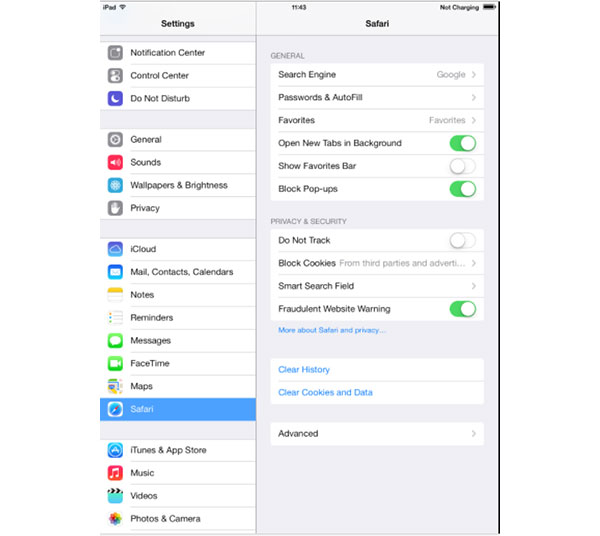
Step 1: Access browsing history on Settings
Tap "Settings" icon from iPad home screen. Scroll down on the left-hand side until you find an entry for Safari. Press the "Safari" option and you can find "Clear History", just above "Clear Cookies and Data".
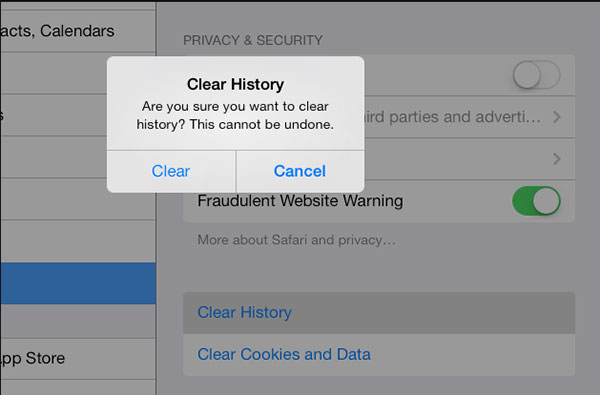
Step 2: Clear history on an iPad in Settings App
Once you click the "Clear History" option, you'll be asked to confirm your choice that you will delete history on iPad. Agree to the option and the visited web browsing history will be gone forever.
Tips: Clear history on iPad is grayed out
When there's no history or website data to clear, the setting turns gray. The setting might also be gray if parental controls are set for websites. To check your settings, go to Settings > General > Restrictions, then scroll to Allowed Content.
Method 3: How to Clear History on an iPad by Safari
Besides delete history on iPad in Settings App, you can also directly remove the browsing history by Safari. As for the method, you can remove some unwanted browsing histories on iPad only instead of all of them.
Step 1: Open the bookmarks
Open up Safari by clicking the Safari icon in the bottom left-hand corner of your iPad screen. Now click the "bookmarks icon", found in the top of your browser window, just to the right of the address bar.
Step 2: Select the history option and clear the history
Select the 'History' option. You'll now see a list of all the pages you have visited, together with the day and date on which you went to that site. At the bottom of the light, you'll see the option 'Clear'. Hit this. You'll now be given two options 'Clear History' or 'Cancel'. To delete your browsing history on iPad, simply hit 'Clear History'. And that's it.
Method 4: How to get rid of Browsing Data on iPad Google Chrome
Google Chrome is a great browser on the iPad, and it's friendly and easy to use. However, Google Chrome for iPad stores your browsing data on your tablet, including the history of the websites you've visited. That's not safe for your privacy. So if you want to avoid this situation, you should learn how to get rid of the browsing data. Here is the solution.

Step 1: Access the setting option
Open your browser. Tap the Chrome menu button (three vertically-aligned dots), located in the upper right-hand corner of your browser window. When the drop-down menu appears, select the Settings option.
Step 2: Clear the browsing data
Locate the Advanced section and tap on Privacy. Then you will see the Clear Browsing Data option and click it. The Clear Browsing Data on iPad screen should now be visible, offering the following options.
- 1. Browsing History
- 2. Cookies, Site Data
- 3. Cached Images and Files
- 4. Saved Passwords
- 5. Autofill Data
Chrome can delete part of the data on the iPad because you may not want to delete all your personal information in one fell swoop. Select the particular item for deletion and a blue check mark is placed next to its name. Tapping a private data component a second time will remove said check mark.
Step 3: Deletion the browsing data
To begin deletion, select Clear Browsing Data on your iPad. A set of buttons will now appear on the bottom of the screen, requiring you to choose Clear Browsing Data a second time to initiate the process.
Summary
Bought a new iPad and want to erase all data on your old iPad in order to sell it on eBay? You cannot get your data removed completely from your iPad by simply deletion or restoration. IPhone Eraser will be your best choice to clear all data on your iPad permanently and protect your private information from stolen. This iPhone data eraser software can erase everything from iPhone and overwrite the storage space to make the erased data unrecoverable.

 How to Clear The Cache on An iPad With Ease
This guide will shows you how to clear browser history cache, apps cache, google history cache, cookies on your iPad.
 How to Delete Movies and TV Shows from iPad
When you need to remove movies and TV shows from iPad, you can find the best method to clean up iPad movies.
 How to Delete Apps Completely on iPad
If you are facing the challenges to delete apps on iPad, you can learn multiple methods to erase apps on iPad thoroughly.
 How to Delete Photos from an iPad With Ease
When you have many photos on iPad, you need to know the different methods to delete photos from an iPad accordingly.