
Best Solution to Rip a DVD and Convert Video on Mac/Windows

For both Mac and Windows users, this guide will show you how to rip DVD using Tipard DVD Ripper and convert your DVD to all other video and audio formats for all the portable players. The output formats mainly include: MP4, AVI, MOV, FLV, WMV, MKV, 3GP, 3G2, MPG, MP3, AAC, M4A, OGG, RA, RAM, RMVB, etc.
Part 1: How to rip and edit DVD with a profession Mac DVD Ripper(For Mac)
Download and install Tipard DVD Ripper for Mac(Intel Version) or (Power PC Version)
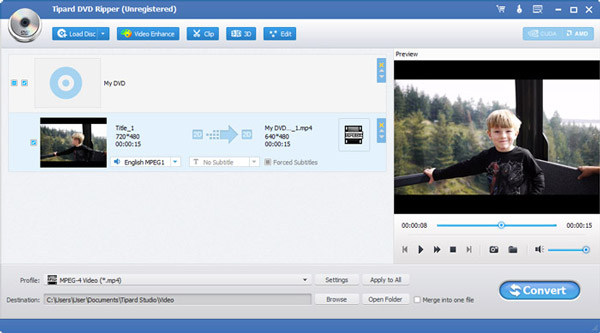
Step 1: Load your DVD
Step 2: Choose the output format and set the exact parameters
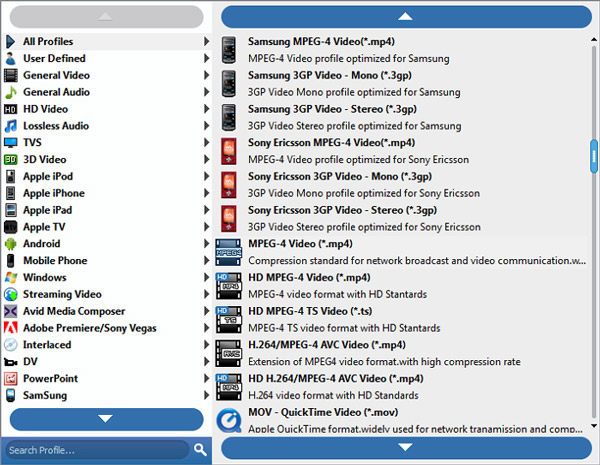
Click "Profile" drop down arrow to choose the output format you want.
Click "Settings" to set the exact video and audio parameters to fit for your player.
Step 3: Click "Start" button to begin the conversion
Wait a short moment, the conversion will be finished soon.
More editing functions:
1. Set audio track and subtitles for your converted video
"Audio Track" and "Subtitle" are under the preview window
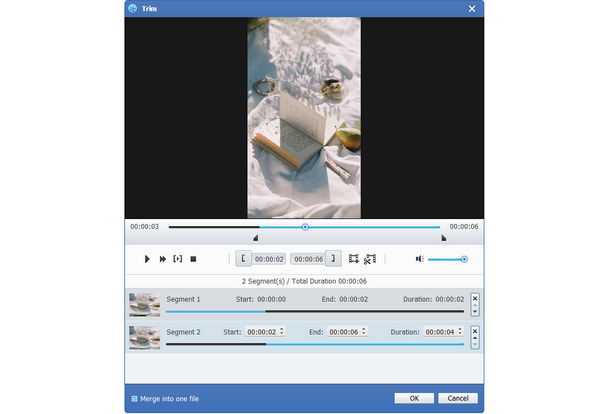
2. Get any time-length video clips
Click "Trim" button to open the trim window, you can set the exact begin and end time for your clips or just drag the slider bar.
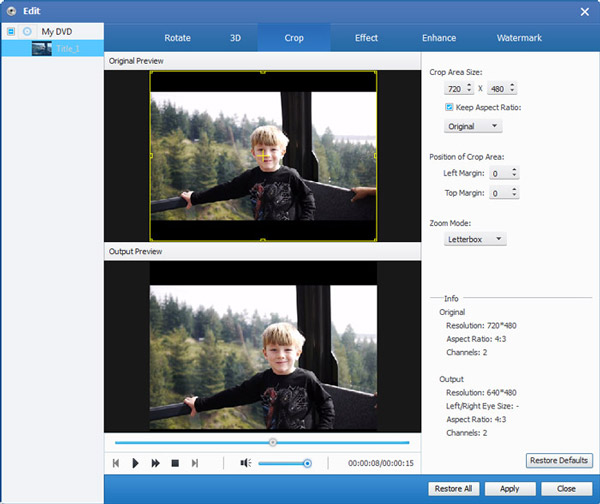
3. Adjust the video play region
Click "Crop" to open the crop window to crop off the black edges around your video or adjust any video play region. You can also set the video play ratio when playing on player: keep original, full screen, 16:9, 4:3.
4. Set the video effect
Click "Effect" to adjust the video Brightness, Contrast, Saturation and Volume for you to get the perfect playing effect.
5. Join several chapters of your DVD into one file
Select the chapters that you want to join, and then pick "Merge into one file". After conversion, these chapters will be saved into one file.
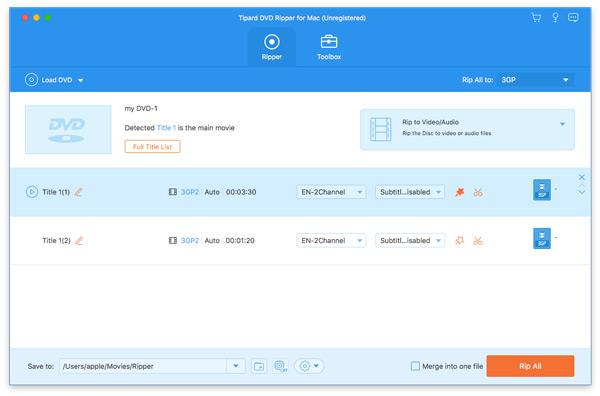
Part 2: How to Rip DVD to MP4/AVI/MP3/WMV/3GP
Step 1: Click "Load DVD" button to load your DVD.
This professional DVD Ripper can load three DVD source, you can load your DVD from DVD drive, DVD folder in your PC and also IFO file.
Step 2:Select the output video format you want from the "Profile" drop-down list.
Step 3:Click the "Start" button to begin your conversion.
You can have a coffee or have a walk now ! In a short while the conversion will be finished.
Tips:
Some powerful editing functions are available as followings.
1: Capture your favorite picture.
If you like the current image of the video you can use the "Snapshot" opinion. Just click the "Snapshot" button the image will be saved.
2: Merge videos into one file.
Just check the "merge into one file" option if you want to merge the selected contents into one file As default the merged file is named after the first selected file (either a title or a chapter)
3: Trim any clip of your video.
You can get any clip of your video by just using the "Trim" function. You can click the "Trim" button and a dialogue pops up. You can set the Start Time and End Time or just drag the slide bar to the position you want and start conversion then you can get the clip.
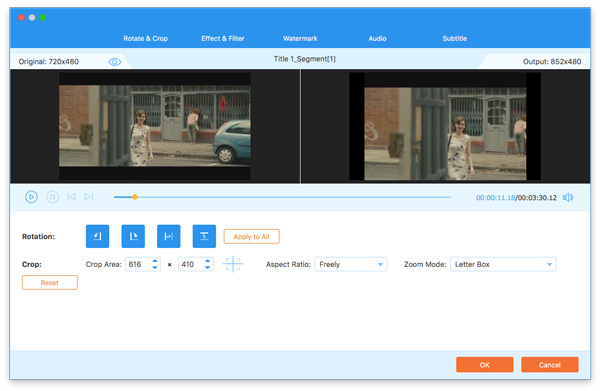
4: Crop video
There are two methods available to crop your video:
Method 1: Crop by selecting a crop mode
Select a crop mode in the Crop Mode drop-down list and click OK to save the crop. There are seven pre-set crop modes for your choice: No Crop, Cut off Top and Bottom black edges, Cut off Top black edge, Cut off Bottom black edge, Cut off Left and Right black edges, Cut off All black edges and Custom. For "Custom", it allows you to customize your movie according to your needs. To crop your movie video, you can just drag your mouse cursor from four sides and four angles.
Method 2: Crop by setting the crop values
There are four crop values on the lower right part of the crop window: Top, Bottom, Left and Right. You can set each value to crop your movie video, and the crop frame will move accordingly.
Note: Before you start to crop your movie video, you can select an output aspect ratio from the Zoom Mode. There are four choices available: Keep Original, Full Screen, 16:9 and 4:3. After you select an output aspect ratio and finish the crop, the result can be previewed in the Preview window of the program main interface.
Part 3: How to convert video to any other formats
Download and install Tipard Video Converter.
Step 1. Click the "Add File" button to load video file.
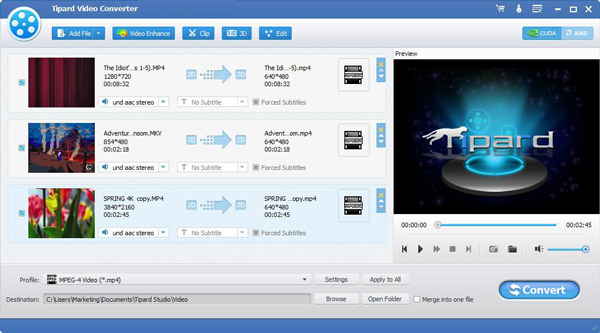
Step 2. Video setting
Select the output video formats you want from the drop-down list of profile
Note:
By cicking the "Setting" button, you can set the video parameters and audio tract.
step 3. Click the "Start" button to start conversion, it is very fast and in a short while your conversion will be finished.
Tips
1: Snapshot
If you like the current image of the video you can use the "Snapshot" option. Just click the "Snapshot" button the image will be saved and then click the "Open" button next to "Snapshot" button to open your picture.
2: Merge
If you want to merge several videos into one file you can choose them and click the "Merge into one file" to do it.
3: Trim
If you just want converter a clip of your video, then you can use the "Trim" icon to set the Start time and End time of the clip or you can directly drag the slide bar to the accurate position.
4: Crop
By using the "Crop" function you can crop the black edge of your video and you can also drag the line around the video image to adjust your video to your Google Phone.
Now you can enjoy your DVDs and Videos on your Google Phone at any time and anywhere!

 How to Import DVD Movie to iTunes for Playback
Is there any method to import DVD to iTunes? Learn more detail about the methods to extract DVD content to iTunes from the article now.
 The 3 Solutions to Convert DVD to iPad Compatible formats
Copy your movies to iPad or convert DVD to iPad playable formats? With the tutorials in this post, you can easily rip DVD to any format iPad supports.
 3 Easiest Way to Rip DVD Disc/Movie to MKV Video
When you need to rip DVD to MKV for computer or tablets, you can learn more detail about the top 3 solution from the article.
 What Should You Do to Convert DVD to MP4 on Windows and Mac
This tutorial shows you how to convert DVD to MP4 on Windows and Mac. Just check out the detail solution to rip the MP4 files from DVD now.