
Older camcorders used Mini DV tapes to save videos. These tapes hold special memories, but they do not last forever. Since Mini DV is an old analog format, the clarity fades over time. That is why it is smart to save your videos by converting them to a DVD.
It not only keeps your videos safe but also lets you enjoy them again on a big screen. We are here to guide you on how to convert Mini DV to DVD. So, do not let those tapes collect dust; start saving your memories today.

Part 1. What Is Needed for Converting Mini DV to DVD
Do you want to save your Mini DV to DVD? You will need a few tools to do it right. Each part has its job. Here is what you need:
1. A Mini DV Camcorder or Player
You need the camcorder that recorded the tape, or any Mini DV player that still works. It must have a FireWire or USB port to connect to your computer.
2. FireWire or USB Cable
It is the wire that moves the video from your camcorder to the computer. Most Mini DV uses FireWire (IEEE 1394). If your camcorder has a USB, use that.
3. Video Capture Software
You need a program that takes the video from your tape and saves it on your computer. It shows what is playing on the camcorder and turns it into a video file.
4. Blank DVDs
Use DVD-R or DVD+R discs; these are the most common, and they work in most DVD players.
5. DVD Authoring Software
After saving the video, you need a way to burn it to a DVD; a mini DV tape to DVD converter is a kind of program that takes your video and gets it ready for the disc, and also helps make the DVD work in regular players.
Part 2. How to Convert Mini DV to DVD with a DVD Recorder
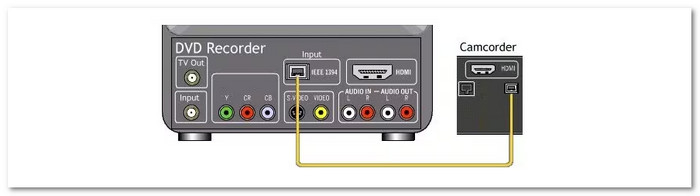
The easiest way to save Mini DV tapes is by using a DVD recorder. You just connect your camcorder to the recorder with the right cable. Most camcorders work best with a FireWire cable, but if you do not have one, you can also use HDMI, S-video, or RCA cables. The type of cable depends on your camcorder. Once it is connected, you can copy the tape straight to a DVD. It is simple, fast, and helps keep your videos safe.
Refer to the steps below to learn how to copy Mini DV to DVD:
Step 1 Use the cable that came with your camcorder. Plug one end into the camcorder's output and plug the other end into the input on the DVD recorder. Most camcorders use an AV or FireWire cable.
Step 2 Put the Mini DV tape into your camcorder. Put a blank DVD into the DVD recorder; please wait until both are fully loaded. After that, use your DVD recorder remote to select the input source you just used.
Step 3 Press Play on the camcorder, and at the same time, press Record on the DVD recorder. Your video will start copying to the DVD right away.
Step 4 Once the tape is finished, press Stop on both the camcorder and the DVD recorder. Your Mini DV video is now on the DVD.
Part 3. The Best Way to Convert Mini DV to DVD on Windows and Mac
Got old Mini DV tapes you want to keep safe? Maybe you want to watch them on a DVD player or share them with family. The best way to convert Mini DV to DVD on Windows or Mac is by using Tipard DVD Creator. Just connect your Mini DV player to your computer with a FireWire cable and open it using Tipard DVD Creator.
Moreover, it lets you pick your disc type (DVD-5 or DVD-9), set the aspect ratio (16:9 or 4:3), and even edit your video. You can crop, trim, add effects, or adjust the volume, brightness, and contrast. You also get lots of cool menu templates to choose from, and you can preview everything before burning.
- Burn videos to DVD or Blu-ray in many formats.
- Offer the fastest burning speed with a smooth and easy-to-use setup.
- Add audio tracks and subtitles, merge or split chapters, and edit the title.
- Customize the menu, frame, button, text, background, and music.

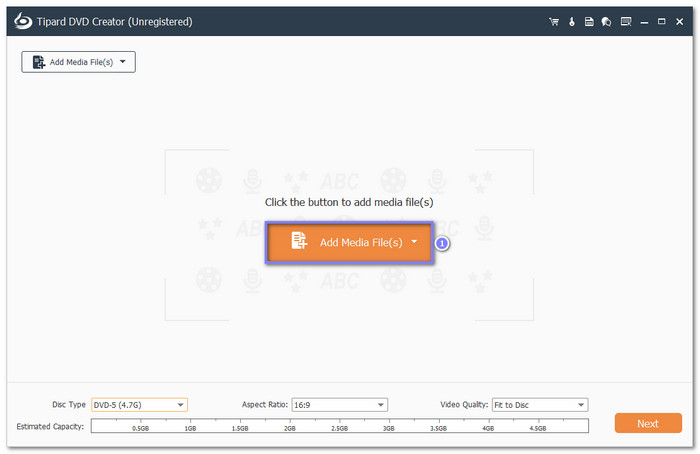
Step 1 Use a FireWire cable to connect your Mini DV camcorder or player to your computer. Once the video is copied to your computer, open Tipard DVD Creator, insert a blank DVD, and press Add Media File to import your Mini DV video.
Step 2 Pick the DVD type, DVD-5 or DVD-9, from the bottom left. You can also refine your video using the tools on the right by trimming parts, adding effects, or fine-tuning brightness. Once you are ready, click Next.

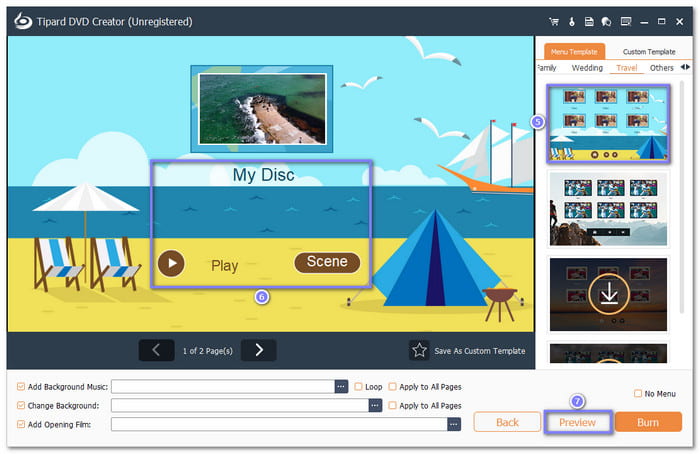
Step 3 Proceed to choose a DVD menu for your video. Pick a style you like. You can also change the menu buttons if you want. To see what it looks like when played, click the Preview button.
Step 4 Once satisfied, click the Burn button beside Preview, and proceed to select Burn to disc from the options and choose your blank disc. After that, press the Start button to burn your Mini DV video to DVD.

Part 4. Choose a Mini DV to DVD Service Near You
Not everyone has the time or equipment to transfer Mini DV to DVD at home. If that is you, the best choice is to convert Mini DV to a DVD service near you. These places have the right equipment and can do the job fast and safely.
Many local photo labs, video stores, or electronics shops offer this service. You can also check big names like Walmart, CVS, Walgreens, or Costco. Some of them let you drop off your tapes in-store or ship them by mail.
These services usually include cleaning your tape, converting the video, and adding a basic DVD menu. Some even offer extra options like digital files or cloud backup. Just call or visit their website first to ask about prices, wait time, and what formats they support.
It is a simple and easy way to save your old memories without doing it yourself.
Conclusion
How do I transfer Mini DV to DVD?
You have surely learned that above. You can do it using a DVD recorder, Tipard DVD Creator, or even a Mini DV to DVD service near you. Each one works differently, but all of them help save your videos on a disc.
If you want to do it at home, Tipard DVD Creator is the best pick. You can use it on both Windows and Mac. It lets you add menus, edit videos, and burn them to DVD with just a few clicks.
More Reading

About the Author
