
- Part 1. What You Should Prepare for Burning ISO to DVD
- Part 2. The Easiest Way to Burn ISO to DVD on Windows and Mac
- Part 3. How to Burn ISO to DVD on Windows 7/10/11 with Windows Disc Image Burner
- Part 4. How to Burn ISO to DVD on Mac with Disk Utility
- Part 5. How to Burn ISO to DVD on Windows 11/10 with UltraISO
ISO files can store full movies or games with no quality loss, but here is the thing: some DVD players cannot read ISO files at all. That is why burning an ISO to a DVD is a smart fix; it helps make the file work better on Windows, Mac, and most DVD players.
If you do not know how to burn an ISO to a DVD on your computer, do not worry; this guide will show you four easy tools that work great. Just select the one that fits you best and follow along. Let us begin!

- Part 1. What You Should Prepare for Burning ISO to DVD
- Part 2. The Easiest Way to Burn ISO to DVD on Windows and Mac
- Part 3. How to Burn ISO to DVD on Windows 7/10/11 with Windows Disc Image Burner
- Part 4. How to Burn ISO to DVD on Mac with Disk Utility
- Part 5. How to Burn ISO to DVD on Windows 11/10 with UltraISO
Part 1. What You Should Prepare for Burning ISO to DVD
It keeps things easy and seamless if you have the appropriate files and tools ready before burning an ISO to DVD. What you need to get ready for is this:
1. A blank DVD: Use a clean DVD-R or DVD+R and make sure it is empty and not scratched.
2. A working DVD burner: Some computers do not have one; if yours does not, use an external DVD drive.
3. A complete ISO file: Save your ISO on the computer, and it should not be broken or halfway downloaded.
4. DVD burning software: You need a program that can open ISO files and write them to DVDs.
Once you have all these, you are good to go.
Part 2. The Easiest Way to Burn ISO to DVD on Windows and Mac
Burning ISO to DVD does not have to be hard. In fact, it can be super easy, with a few clicks. If you are on Windows or Mac and want the simplest way to do it, Tipard DVD Creator is your best choice.
It provides everything you need; you get features to edit the video, sound, and subtitles, and you also get features to split or join parts and set thumbnails. Additionally, you can pick one from the numerous menu templates it provides.
Do you want to add music or a custom background? You can do that, too. You can even add an opening film to make it feel like a real movie. Before burning, you can watch the video to see how it plays.
Check the guide presented to learn how to burn ISO to DVD using Tipard DVD Creator:
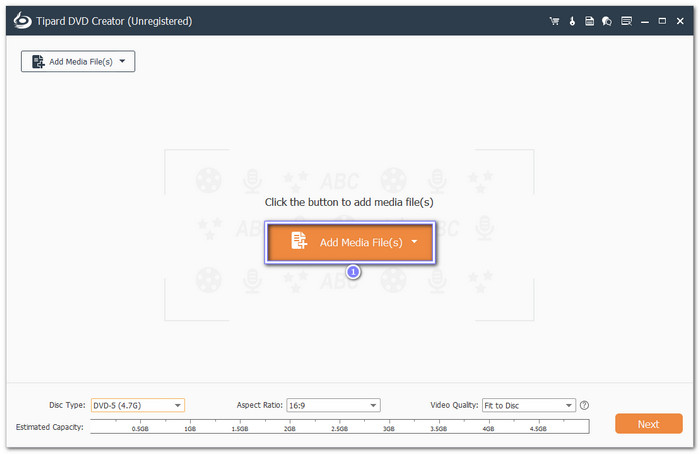
Step 1 Head to the Tipard DVD Creator's primary website and click Free Download, whether you are using a Windows or Mac computer.
Step 2 Put a blank DVD into your disc drive, and once the DVD is in, proceed to open the creator.
On the main screen, select DVD Disc as your disc type. Next, click the Add Media Files button; look for and import your ISO files.
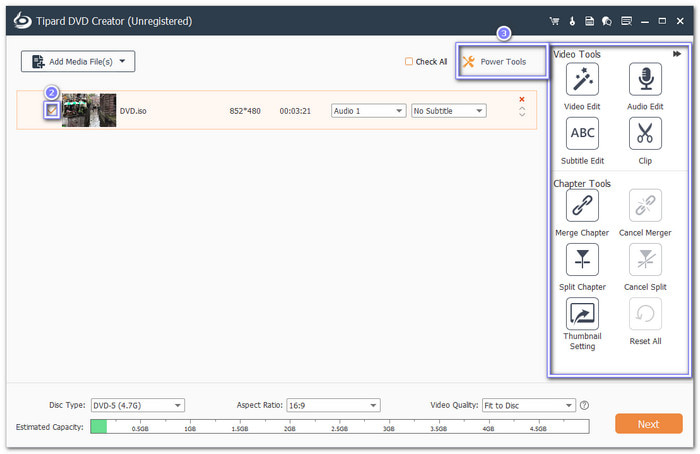
Step 3 Once your file is uploaded, click it to highlight it, and it will turn on the Power Tools feature. You will see two sets of tools: Video Tools and Chapter Tools.
Under Video Tools, you can use:
- Video Edit
- Audio Edit
- Subtitle Edit
- Clip
Under Chapter Tools, you can:
- Merge Chapters
- Split Chapters
- Set Thumbnails
- Cancel Merges
- Cancel Splits
Use these if you want to edit your video before burning.
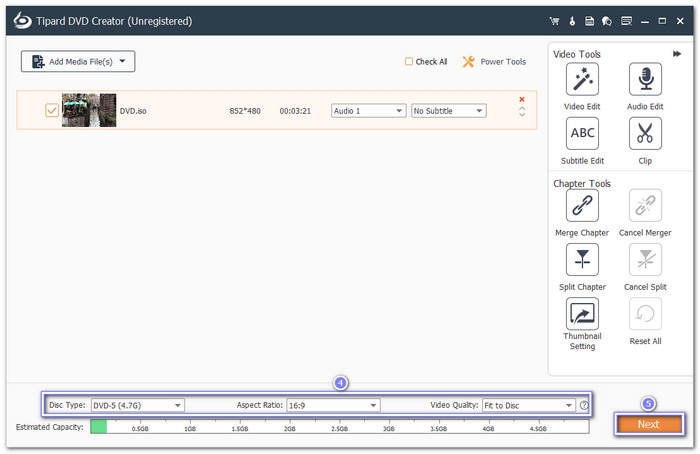
Step 4 Now, go to the Disc Type section and choose the size you want: DVD-5, DVD-9, DVD-25, or DVD-50. Then, pick the Aspect Ratio, either 16:9 or 4:3. Next, choose the Video Quality; you can set it to Fit to Disc, Low, Medium, or High. When you are happy with the settings, click Next.
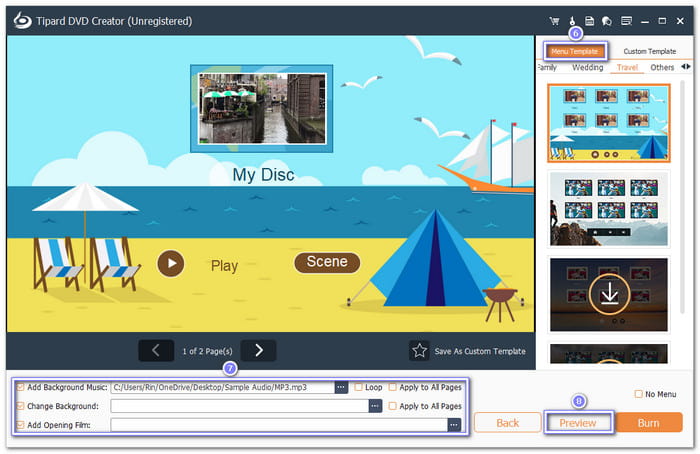
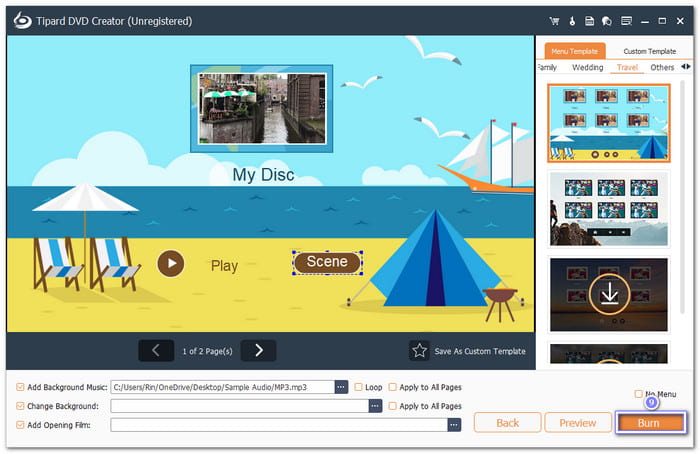
Step 5 It is time to pick a Menu Template; choose one that fits your DVD style. You can also add cool extras like:
- Background Music
- Background Image
- Opening Film
Simply check the box next to the option you want. After setting everything, click Preview to see what your DVD will look like.
Step 6 Once everything looks good, press the Burn button, and Tipard DVD Creator will now burn your ISO to DVD. Just please wait a bit, and your DVD will be ready.
Part 3. How to Burn ISO to DVD on Windows 7/10/11 with Windows Disc Image Burner
Windows has a built-in tool called Windows Disc Image Burner. It lets you burn ISO images to DVD without downloading anything. However, the burning process is a bit slow, and it might lower the quality of your video or file after burning.
Step 1 Get a blank DVD and put it into your DVD drive. It can be an internal or external drive; just make sure your computer can read it.
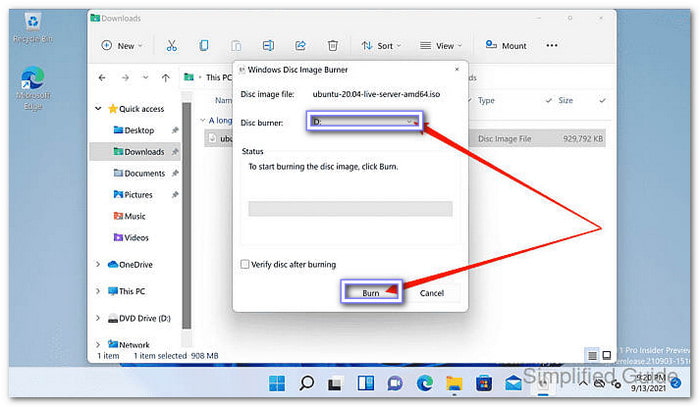
Step 2 Find the ISO file you want to burn by right-clicking the ISO file. From the menu, click Burn disc image. After you click the Burn disc image, the Windows Disc Image Burner display will open.
Step 3 In the display, choose your DVD drive from the drop-down menu. You can also check the box for Verify disc after burning if you want Windows to check the disc when it is done.
Step 4 Finally, click the Burn button, and the burning process will begin, so please wait for it to finish.
Part 4. How to Burn ISO to DVD on Mac with Disk Utility
Mac computers come with a tool called Disk Utility. It can burn ISO files straight to a DVD. You just insert a blank disc and start. However, you cannot change anything once the burn starts, and the output may lose some quality.
Step 1 Go to Applications, open the Utilities folder, and from there, launch Disk Utility.
Step 2 Put a blank DVD into your external disc drive. If you are using an Apple SuperDrive, that works, too.
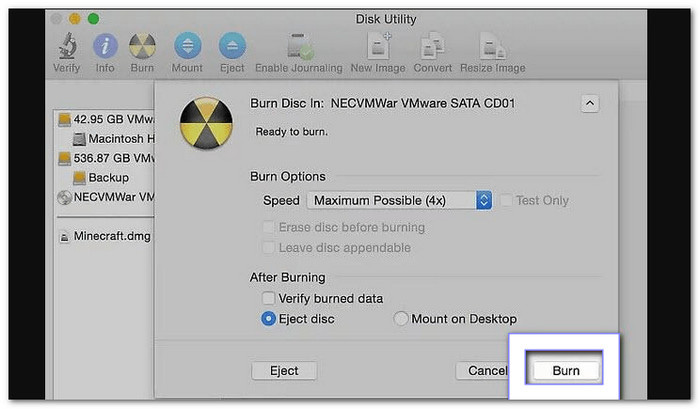
Step 3 In Disk Utility, look for your ISO file on the left side of the display. Click on it once to select it, and then click the Burn button at the top.
Step 4 A display will pop up; from there, pick your blank disc as the target, and you can also set the burning speed. If you want, check extra options like Verify burned data, Eject disc when done, or Mount on Desktop.
Step 5 Once you are ready, hit the Burn button, and then please wait while your Mac burns the ISO to DVD.
Part 5. How to Burn ISO to DVD on Windows 11/10 with UltraISO
UltraISO is a small but smart program that helps burn ISO files to DVD fast. It works well on Windows 10 and 11. It does not offer DVD menus, but it makes up for that with clean output and fast speed. Everything looks neat and clear after burning.
Step 1 Open UltraISO on your Windows 11/10 computer.
Step 2 Head to the File button at the upper left, click Open and look for your ISO file. Once you add it, it will appear or show up in the program.
Step 3 Now that the ISO file is loaded, look at the top menu and click the button that says Burn CD/DVD Image. It is where you will set up the burning.
Step 4 UltraISO will now look for your DVD drive. Make sure your drive is connected and that a blank DVD is inside. When all is set, click the Burn button to begin.
Just wait for the burning to finish. When it is done, you will have your ISO file turned into a working DVD.
Conclusion
From "How do I burn an ISO file to a DVD" to "I know now how to burn an ISO file to a DVD," as you have learned everything in this post.
For a better result, use Tipard DVD Creator, as it enables you to burn ISO files to DVD without quality loss. You can even add simple menus, trim parts, add subtitles, or create chapters.
Share your results with friends or help others who want to do the same!
More Reading
About the Author
