
Compared with AVI, FLV is a more popular video format for video streaming. It loads faster, takes less space, and works well on many online platforms. If you want to convert AVI to FLV format before uploading to YouTube, Hulu, and more, you can try our following AVI to FLV converters.
This post will also offer clear steps to convert AVI to FLV so you can easily follow and get the best results. This way, you can upload and share them online with ease. If you are ready to dive into this process, please continue scrolling.

Part 1. What Are AVI and FLV
AVI stands for Audio Video Interleave. Microsoft made it in 1992. It can store both video and audio in one file. AVI files often have good quality, but can be large in size. They work on many devices and media players.
FLV stands for Flash Video. Adobe made it for streaming videos online. It is smaller in size, so it loads faster. FLV was used a lot for videos on websites like YouTube in the past. Now, it is less common because Flash is no longer supported on most browsers.
In short, AVI is better for high-quality videos, and FLV is better for smaller files and online use.
Part 2. Best Solution to Convert AVI to FLV
Converting AVI to FLV has many benefits. FLV files are smaller, so they take up less space, and they also load faster, which makes them great for online sharing or streaming. You can achieve this by using the best solution to convert AVI to FLV, and that is none other than Tipard Video Converter Ultimate.
It boasts 60× faster speed to convert videos and supports hardware acceleration for smooth performance. You can pick your desired resolution, even in high definition, so your video stays sharp. You can also modify the output parameters, like resolution, frame rate, and sample rate, to match your needs.

- Offers various options to enhance video clarity.
- Allows you to convert many videos at the same time.
- Supports converting 8K, 5K, 4K, and HD videos to many formats.
- Lets you edit any video with tools like cropping, rotating, adding filters, etc.

Step 1 Go to the official Tipard Video Converter Ultimate website. Download the program and install it on your computer. It works on both Windows and Mac. Once installed, open the program.
Step 2 Hit Add Files at the top right and look for the AVI video you want to convert. If you have many AVI videos to convert, you can import them at the same time, as Tipard Video Converter Ultimate supports batch conversion.

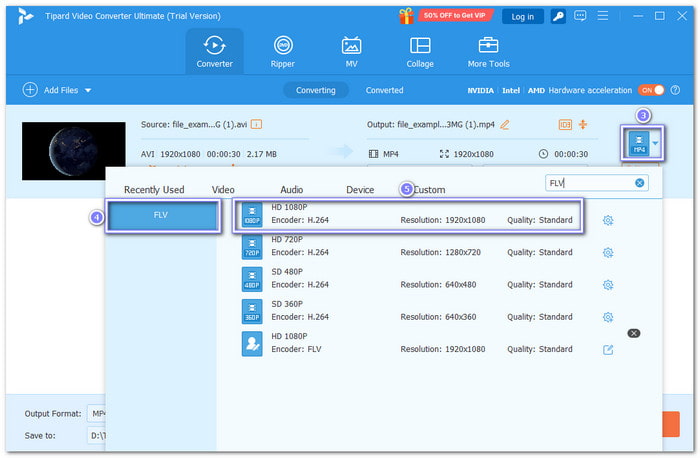
Step 3 Click the Format button next to your video. From the Video section, choose FLV. You can also pick the quality you want, like HD 1080P, HD 720P, SD 480P, and SD 360P.
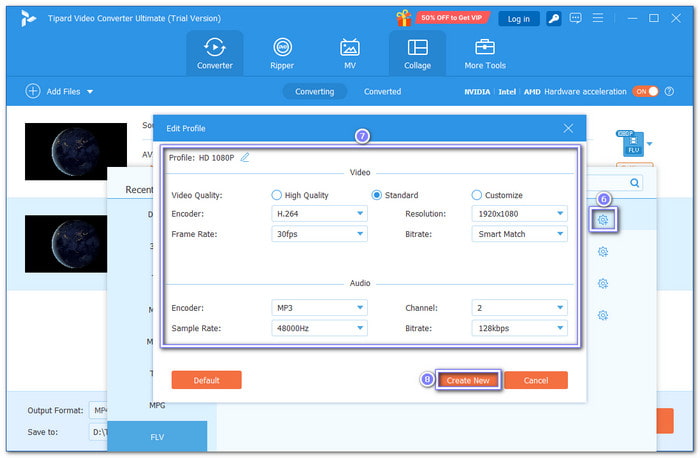
Step 4 Tipard Video Converter Ultimate also lets you customize the video and audio settings before conversion. To do that, just click the Cogwheel button and proceed to fine-tune output settings.
You can modify the video's encoder, frame rate, bitrate, and resolution, as well as the audio's encoder, bitrate, channel, and sample rate. Once settled, click Create New to apply the changes.
Step 5 Finally, choose where you want to save the FLV file by clicking the Save to drop-down menu. Once selected, click the Convert All button, and Tipard Video Converter Ultimate will start changing your AVI file into FLV. Once the conversion process is done, you can find the file in the folder you chose.
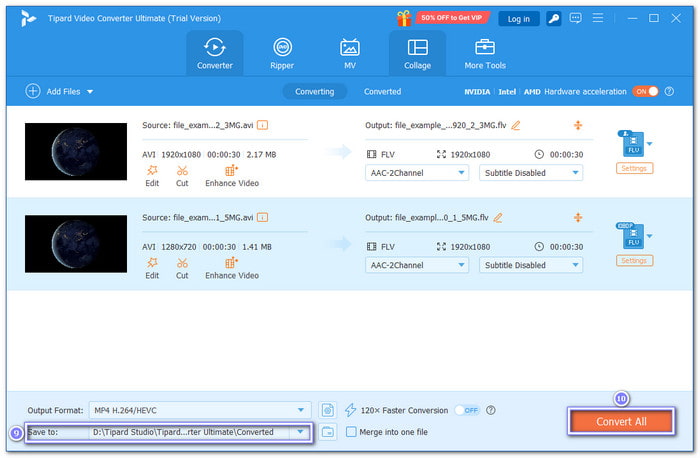
If you uploaded many videos and want them in one FLV file, just enable the Merge into one file option before starting the conversion to merge FLV. It is useful when you want to make a long video from different clips. It saves you time and keeps everything in one file, so you do not have to join them later.
Part 3. Convert AVI to FLV Using FFmpeg
FFmpeg is a free program that can change videos from one format to another. It works on Windows, Mac, and Linux. You use it in the command line, which means you type the commands instead of clicking buttons.
FFmpeg can convert AVI to FLV with good quality. It can also change audio settings so the FLV file will play without errors. You can control things like resolution, bitrate, and sample rate. With the right settings, FFmpeg can give you an FLV file ready for streaming or sharing online.
Check the steps below to learn how FFmpeg AVI to FLV conversion works:
Step 1 Open your terminal or command prompt. Use this simple command:
ffmpeg -i input.avi -ar 44100 output.flv
It changes your AVI file to FLV format and sets the audio sample rate to 44100 Hz, which FLV supports.
Step 2 If the video looks blurry or not clear, you can keep the same quality as the source by adding the -sameq option:
ffmpeg -i input.avi -sameq -ar 44100 output.flv
It will make the FLV file bigger in size, but the video will look much better.
Step 3 FLV does not allow every audio sample rate. You can only use 44100, 22050, or 11025 Hz. If you use other values, the conversion will fail.
Step 4 After the conversion, play the FLV file in a media player to check if both video and audio work well.
Part 4. Convert AVI to FLV Online
For an online tool, you can put your trust in FreeConvert; it can help you convert AVI to FLV format easily. The free version lets you import files up to 1 gigabyte, and you can sign up for a bigger limit. It also supports bulk conversion, so you can change many videos simultaneously.
When you convert, you can use the advanced options to fine-tune your video. In addition, your files are kept safe with encryption and are deleted after a few hours. It makes it a simple and secure way to convert AVI to FLV without losing too much quality.
Step 1 Go to FreeConvert - AVI to FLV Converter's primary website using your preferred search engine.
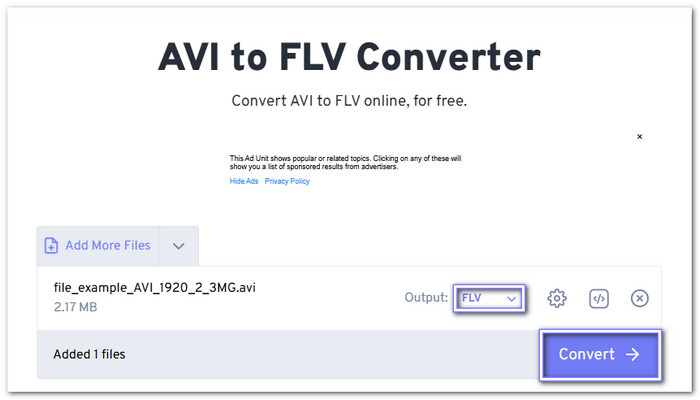
Step 2 To add your AVI files, click the Choose Files button in the center; you can import from Device, Dropbox, Google Drive, OneDrive, and URL.
Step 3 As for your output, FLV is already set, so you are good to click the Convert button and download the new FLV file.
Conclusion
With the help of the AVI to FLV converters, you can now get a smaller video file that is easier to share and faster to load online without losing too much quality. One of the best tools for this job is Tipard Video Converter Ultimate. It works fast, supports many formats, and keeps your video looking clear. You can also edit, merge, and adjust settings like resolution, frame rate, and audio quality before converting.
More Reading
About the Author
