
DaVinci Resolve's powerful video editing features are well-known. Did you know you can also use it for audio editing? Are you surprised about it? But the question is, how does DaVinci Resolve audio editing work?
In this post, you will learn what DaVinci Resolve can do when it comes to audio editing. We will also answer questions about whether it is really free to use and provide a step-by-step tutorial to help you edit audio easily. But that is not all. We will also introduce another tool that lets you edit audio creatively and effortlessly. Stay tuned to find out!
Part 1. Can DaVinci Resolve Do Audio Editing
So, you are wondering if DaVinci Resolve can do audio editing? Yes, it can! It is not just for video. This program has a whole section called Fairlight. That is where you can edit, mix, and tweak your audio. You can cut sounds, remove noise, and even add effects. It is similar to having an entire audio studio within the application. So, if you need to fix your sound, DaVinci Resolve has the tools for it!
Part 2. Is DaVinci Resolve Actually Free
If you are curious about whether DaVinci Resolve is free, the answer is yes! Just download it and start editing. But hold on, DaVinci Resolve Studio is also available for purchase. That one has extra features like ways to reduce background noise from video and better effects. But for most people, the free version is enough. You get pro-level tools without spending a dime. It is fantastic, right? A top-tier editor, and you do not have to pay. So yes, DaVinci Resolve is really free!
Part 3. How to Edit Audio in DaVinci Resolve
Since you are already here, why not learn how to edit audio in DaVinci Resolve? But do not worry; we are here to help you every step of the way. Just follow these five steps, and you will get great results. We will walk you through the process of cutting, trimming, adjusting volume, applying effects, and more. By the end, you will know how to edit audio like a pro!
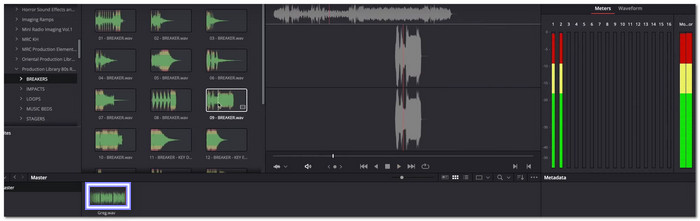
Step 1Start by creating a new project in DaVinci Resolve and importing your audio files. Drag your voiceover, music, or sound effects into the media pool. Then, create a new timeline by going to File > New Timeline. Set up multiple audio tracks:
- Mono track for voiceovers.
- Stereo tracks for music and sound effects.
To organize your tracks, rename them accordingly (e.g., VO for voiceovers, SFX for sound effects).
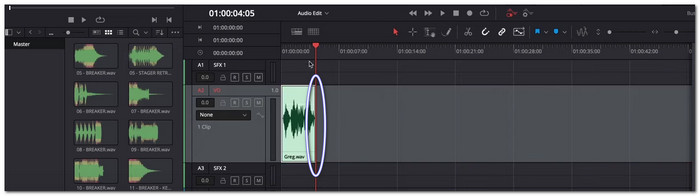
Step 2Once your audio files are on the timeline, use the Blade (Scissors) tool to cut unwanted parts. Zoom in for precise cuts and delete unnecessary sections. If you are editing a voiceover, remove mistakes or pauses to make it sound clean.
Step 3Balance the audio levels using the Inspector panel or the Mixer:
- Increase or decrease the volume to ensure the voice stands out.
- Use keyframes to fade in or out background music and sound effects for a smooth mix.
- Avoid clipping by keeping the levels below 0dB.
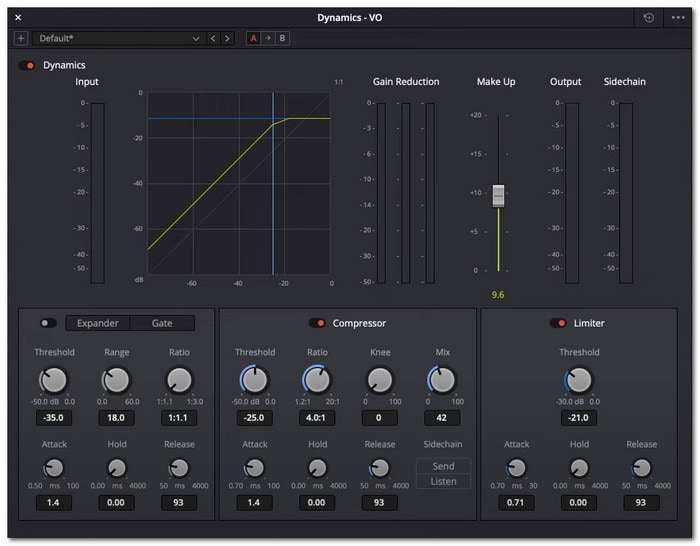
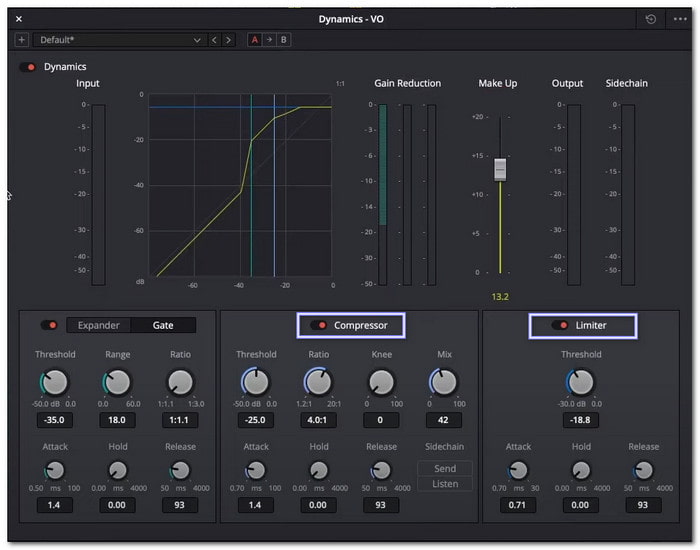
Step 4Improve the quality of your audio using built-in tools in the Fairlight tab:
- Compressor: Makes the voice sound even and professional.
- EQ (Equalizer): Adjusts bass, treble, and mid-tones for clarity.
- Noise Gate/Expander: Reduces background noise.
- Limiter: Prevents distortion by keeping volume within a safe range.
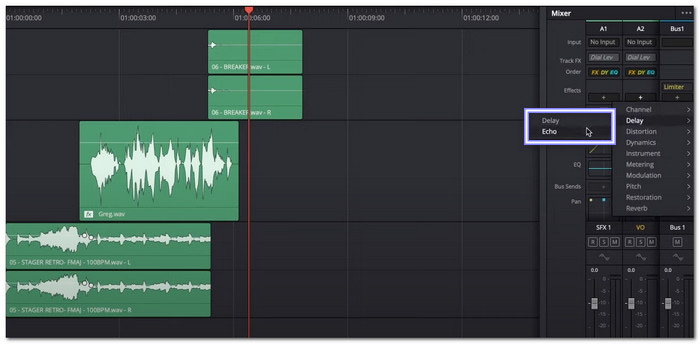
Step 5Listen to the final mix and make minor adjustments. Add effects like Echo or Reverb for a polished sound if needed. Once satisfied, export the project by going to Deliver, choosing your format, and clicking Render.
These five steps help you edit audio smoothly in DaVinci Resolve. Following them will make your audio sound clear, professional, and well-balanced.
Tip: If you record in a quiet studio, you will not have to worry about background noise. But in real life, recordings often pick up unwanted sounds. DaVinci Resolve has a tool to reduce this.
Open the audio editor and find the mixer on the right. Click the + button, go to Fairlight FX, and choose Noise Reduction.
For most voice recordings, Auto Speech Mode should work fine. If some noise remains, switch to Manual Mode and adjust the settings until the sound is clear. Repeat this for every track that needs cleanup.
Bonus Tip: Edit Audio Creatively with the Best Audio Editor
Without a doubt, audio editing in DaVinci Resolve works. But you should also remember that editing audio should be easy and fun, not confusing or frustrating, and allow you to edit audio creatively. That is why Tipard Video Converter Ultimate is the best tool for the job. It has a simple interface, so you would not get lost. You can edit audio with just a few clicks.
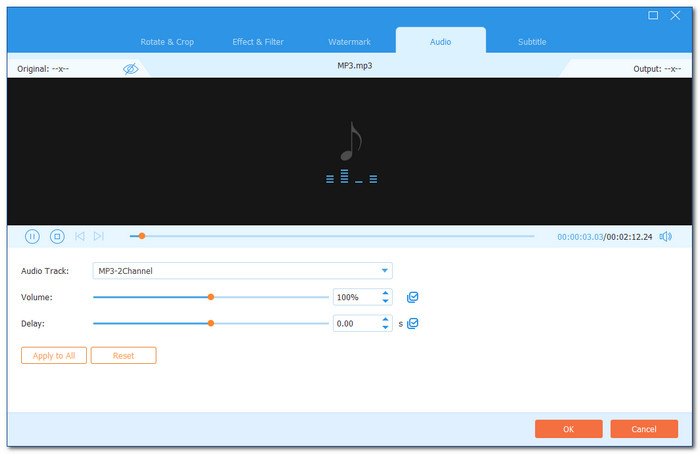
This tool lets you trim, add, or extract audio from any video. You can also sync audio if it is not in time with the video. Need to make the sound louder? Use the volume booster. Want to clean up background noise? The noise remover will help. It even has an audio compressor to make large files smaller without losing quality.
Tipard Video Converter Ultimate supports multiple audio formats, such as MP3, AAC, WAV, FLAC, WMA, M4A, OGG, AIFF, etc. With that, you do not have to worry about compatibility problems. Whether you want to edit music, voice recordings, or sound effects, this audio enhancer makes it simple.
Key Features of Tipard Video Converter Ultimate:
- Easily change one audio format to another without losing quality.
- Boost audio levels up to 200% for a clearer and louder sound.
- Fix sync issues by adjusting the delay up to 10.00 seconds.
- Apply smooth transitions for a more professional sound.
- Cut out unwanted parts, fast split audio into sections, and add segments.
Conclusion
Can you edit the audio in Davinci Resolve? Yes! You can edit audio in DaVinci Resolve, and this article has helped you learn how to do it. DaVinci Resolve is really a powerful tool with advanced audio editing features. It gives you complete control over sound, allowing you to enhance, adjust, and fix audio for a more professional output.
DaVinci Resolve can be complicated, though, particularly for new users. Learning takes time, and some features may be too much to handle. Tipard Video Converter Ultimate is an excellent substitute if you are looking for a quicker and easier way to edit audio. Easy-to-use tools for trimming, merging, increasing volume, eliminating noise, syncing audio, and more are included in its user-friendly interface. Try them both and see what works best for you!
More Reading


About the Author
