
You want to try video editing. You open a program. Then, you see buttons and settings you do not understand. You start to feel stuck before you even begin.
We got you, so worry no more. In this post, we will help you by sharing the most common video editing terms you should know. We will also show you a tool that is great for editing. It is beginner-friendly and will not confuse you.
So, if you want to create videos and understand what you are doing, this is the best place to start.

Part 1. The Most Common Video Editing Terms
Video editing can sound confusing at first. You might hear words like 'cut,' 'render,' or 'timeline.' But once you know what they mean, it is way easier to edit your videos. Check out the common video editing terms below!
1. Aspect Ratio: It is the shape of your video, like 16:9 (wide) or 1:1 (square).

2. B-Roll: Extra video used to cover your main footage, like showing scenery while someone talks.

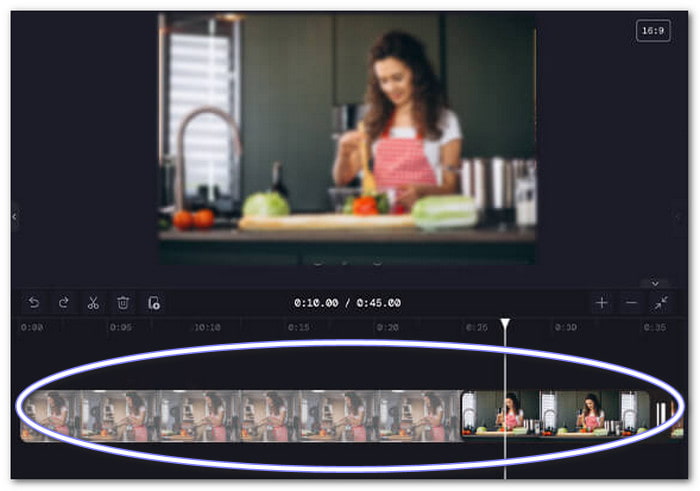
3. Clip: A small piece of video. You put clips together to make one full video.

4. Cut: It means splitting a video into parts. You can delete pieces you do not want.

5. Denoise: It refers to the process of removing noise from a video. Noise appears as tiny dots or grains that become visible, especially in dark or low-quality footage. Denoising a video helps make it look cleaner and smoother.

6. Export: It means saving your final video. You choose the format and quality.

7. Overlay: It is when you put something over your video. It could be text, music, or another clip.

8. Timeline: It is where you build your video. It is like a row of blocks, with each block serving as a clip. It is one of the terms in video editing you should be aware of.

9. Transition: A cool way to switch from one clip to the next. Like a fade or slide.

10. Trim: Like a haircut for your clip. You take off a little from the start or end.
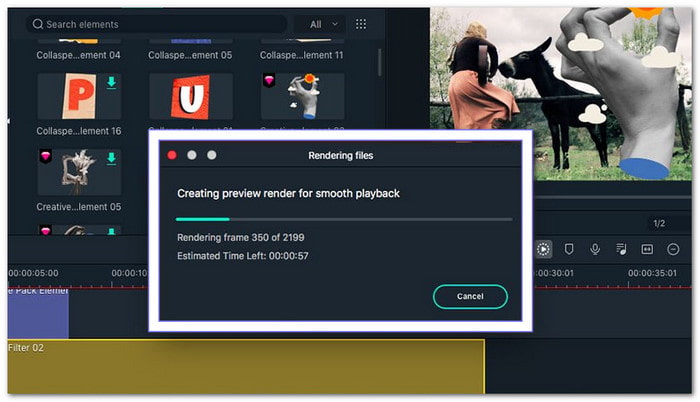
11. Render: It means to save your edited video. The computer combines all the information into a single file.
Part 2. Some Core Video Concepts
These are essential things to understand if you want to work with videos. Whether you make videos or want to know how they work, these concepts are essential. This part will explain each one!
1. Video/Audio Codec
A codec compresses large video or audio files into smaller ones. It also helps play the file correctly.
Some popular video codecs include H.264, H.265 (also known as HEVC), VP9, and AV1. Some common audio codecs are MP3, AAC, and Opus.
Why do we need them?
Without codecs, video files would be too big. They would take too long to load or stream. Codecs help the file stay clear while using less space.
2. Resolution
Resolution refers to the clarity of the footage. It tells you how many tiny dots (pixels) are on the screen. The more pixels, the sharper the video.
- HD (1280×720) has less detail.
- Full HD (1920×1080) looks sharper.
- 4K (3840×2160) looks super sharp.
The numbers indicate the width and height in pixels. So 1920×1080 means 1,920 pixels across and 1,080 pixels down.
Why does it matter?
A higher resolution means better quality. However, it also increases the file size. So, it uses more space and internet data.
3. Frame Rate
Frame rate means how many pictures are shown each second in a video. These pictures are called frames. When shown quickly, they appear to have smooth motion.
Frame rate is written as FPS - frames per second.
- 24 FPS is used in movies.
- 30 FPS is common on YouTube.
- 60 FPS looks smoother and is great for games.
Why is this important
A higher FPS looks smoother. However, it also increases the size of the video file. Lower FPS saves space but may look choppy.
4. Bitrate
Bitrate shows how much data is used every second in a video or audio file. It is usually written as kbps (kilobits per second) or Mbps (megabits per second).
- Low bitrate = smaller file, but lower quality.
- High bitrate = better quality, but a bigger file.
Example:
- A 1080p video at 1 Mbps may look blurry. The same video at 5 Mbps looks much better.
What makes it important: If the bitrate is too low, the video may look bad. But if it is too high, it may buffer or not load well online.
Part 3. The Easiest Video Editor on Windows and Mac
You just learned about the basic video editing terms listed above. Now is the perfect time to try them out for real, using a tool that is easy for everyone, even if you are starting. That tool is Tipard Video Converter Ultimate. It is the easiest video editor for both Windows and Mac.
Tipard Video Converter Ultimate lets you edit videos with just a few clicks. You can cut, crop, rotate, add filters, and even add your name as a watermark. Additionally, it features AI tools that can help improve the clarity of your video.
Despite all those features, it still runs smoothly, with no lag or crashes when in use. Additionally, it supports a broad range of video and audio file formats and codecs. So, regardless of the file type you have, Tipard Video Converter Ultimate can handle it.
Step 1 Go to the Tipard Video Converter Ultimate's main website. Click Free Download for Windows or Mac. Follow the setup steps to install the program. Once it is ready, open the program to begin.
Step 2 At the top, click on the MV tab. Now, click the + Add button to bring in your video. You can add one or more files.

Step 3 Click the Edit button under your video. You will now see the main editing tools.
Here is what you can do:
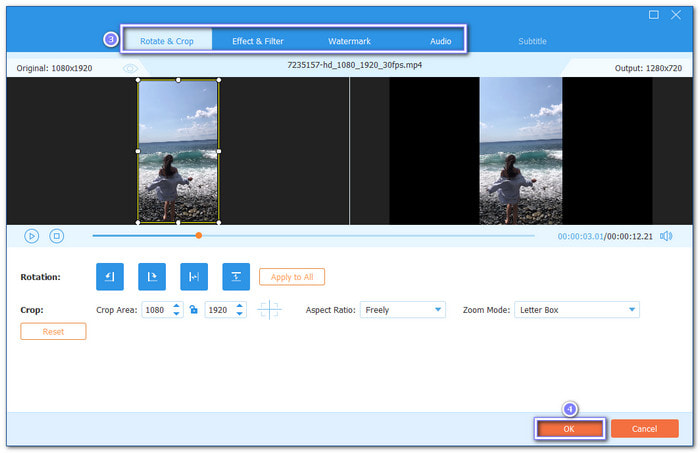
- Go to Rotate & Crop to adjust the video angle or remove the black parts.
- Select the Effect & Filter to adjust colors and apply fun video filters.
- Click Watermark to add your name, logo, or image.
- Head to Audio to change the volume or fix the sound delay.
Once done, hit the OK button to save your changes.
Step 4 Press the Trim button. Use the Slider to remove the start or end that you do not want. Only keep the best parts of your clip. You can also apply Fade in and Fade out effects if you want to. Just put a checkmark beside their corresponding boxes. Once done, hit the Save button, and the highlighted parts will be retained.

Step 5 Still in the MV tab, navigate to the Theme and Settings section.
- Pick a Theme that fits your style.
- Add Start and End Titles if you want to say something.
- Add Background Music that matches the mood.

Step 6 For the last step, go to the Export tab. Pick your video format. Choose resolution and quality. Ensure the settings match your desired preferences. Now, hit the Start Export button. Your video will be stored on your computer!

Conclusion
It is essential to familiarize yourself with the technical terms used in video editing. If you are not familiar with them, you may end up with a blurry video, poor audio, or a file that will not play correctly.
To make all of this easier, you can use Tipard Video Converter Ultimate. It helps you edit and enhance your videos simply. It has features to improve clarity, and it supports all the formats you will have.
Happy editing! You got this!
More Reading


About the Author
