
- Part 1. Slow Down a Video with Time Stretch
- Part 2. Turn the Video Into Slow Motion with Time Remapping
- Part 3. Make Video Slow Motion with TimeWarp
- Part 4. Enhance Slow-motion Motion Effects with Frame Blending
- Part 5. Try After Effects Slow Motion Plugin - 2 Quick Review
- Part 6. Slow Down a Video with Easy After Effects Alternative
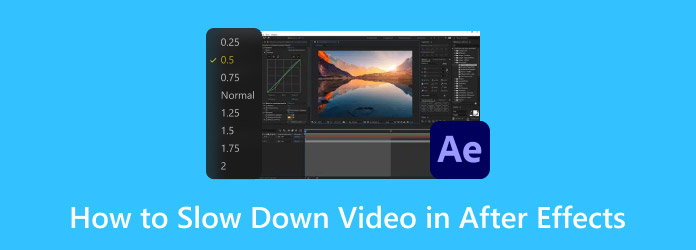
Knowing how to slow down a video in After Effects unlocks a whole new level of creative control, allowing you to transform fast-moving footage into smooth, cinematic sequences. Time-based effects in After Effects enable users to create dramatic moments as well as visualize intricate motions while allowing users to add a professional flair to their video edits. This guide explains expert approaches to slowing video playback, which produce professional-quality crisp motion without making the footage simply sluggish.
- Part 1. Slow Down a Video with Time Stretch
- Part 2. Turn the Video Into Slow Motion with Time Remapping
- Part 3. Make Video Slow Motion with TimeWarp
- Part 4. Enhance Slow-motion Motion Effects with Frame Blending
- Part 5. Try After Effects Slow Motion Plugin - 2 Quick Review
- Part 6. Slow Down a Video with Easy After Effects Alternative
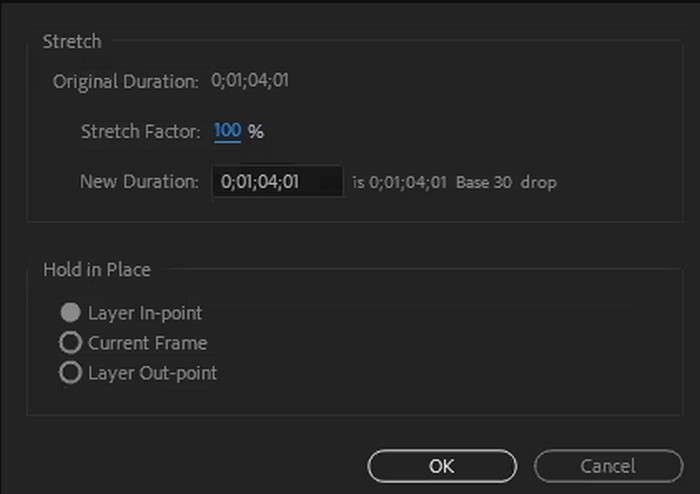
Part 1. Slow Down a Video with Time Stretch
After Effects, users can use Time Stretch as a straightforward method to slow video playback while maintaining fluid motion. A higher Stretch Factor value will result in slower footage, and a lower value will speed up the playback. Users can achieve powerful slow-motion results through this method without requiring extra plugins to implement. Adding Frame Blending or utilizing the Time Warp effect enhances your slowed-down video footage with natural smooth motion.
Step 1 Open After Effects and create a new project.
Step 2 Import your video clip into the project panel.
Step 3 Adjust the layers as needed, then right-click on the video layer. Go to Time > Time Stretch, and set the Stretch Factor to slow down the clip and change it to a higher value because it equals a slower speed.
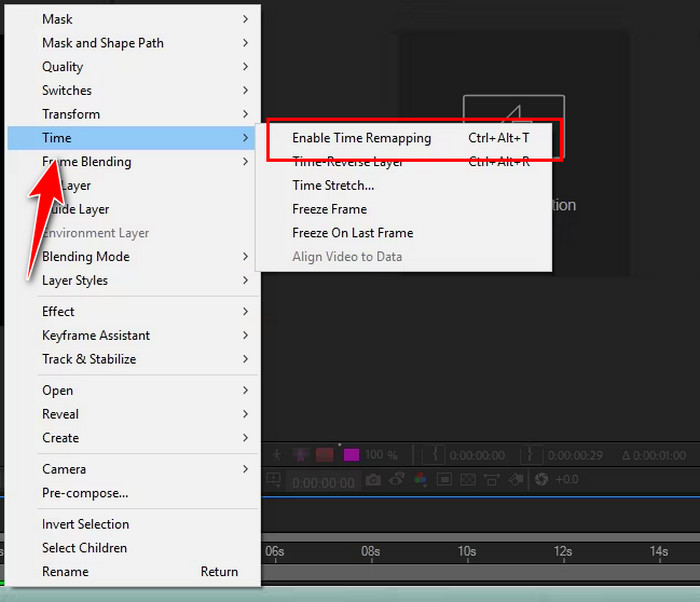
Part 2. Turn the Video Into Slow Motion with Time Remapping
After Effects provides its users with Time Remapping as a solid tool to gain complete control over speed modifications. It enables users to change keyframes manually to generate controlled slow-motion effects within targeted parts of their videos. By extending the time between keyframes, you can precisely control how to slow a video down in After Effects, making it perfect for cinematic sequences or dramatic motion effects. When using Time Remapping alongside Frame Blending, users achieve smooth playback without the playback becoming choppy while maintaining professional video quality.
Step 1 Right-click on the video layer, go to Time, and select Time Remapping.
Step 2 It will create two keyframes - one at the start and one at the end of your clip. These keyframes represent specific points in time, allowing you to adjust the playback speed.
Step 3 To slow down a section of the video, move the second keyframe or any keyframe in between further to the right. It extends the time between frames, effectively slowing down that portion of the clip.
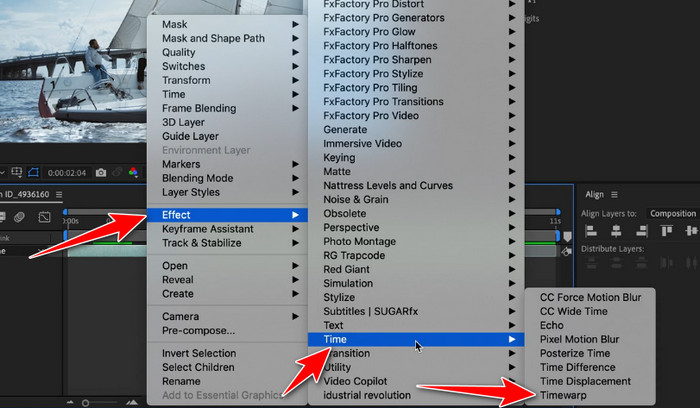
Part 3. Make Video Slow Motion with TimeWarp
Using the TimeWarp tool within After Effects enables the creation of smooth slow-motion video through Pixel Motion technology, which generates additional frames automatically. The analysis of motion data allows our tool to reduce artifacts and stuttering while working perfectly for video frames at low rates. The Speed control in After Effects allows users to determine precise speed reductions, which maintains a smooth and clear visual flow.
Step 1 Right-click on your video layer and go to Effect > Time > Timewarp.
Step 2 In the Effects Control panel, set the Method to Pixel Motion for smoother slow-motion results.
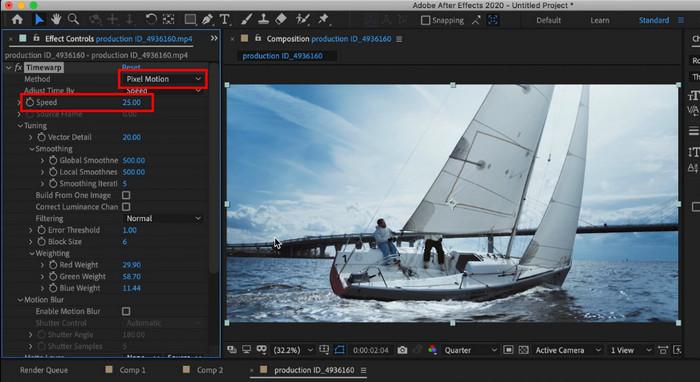
Step 3 Adjust the Speed setting - set it to 25 for half-speed playback since 50 represents full speed. Experiment with different values to achieve the perfect slow-motion effect for your clip.
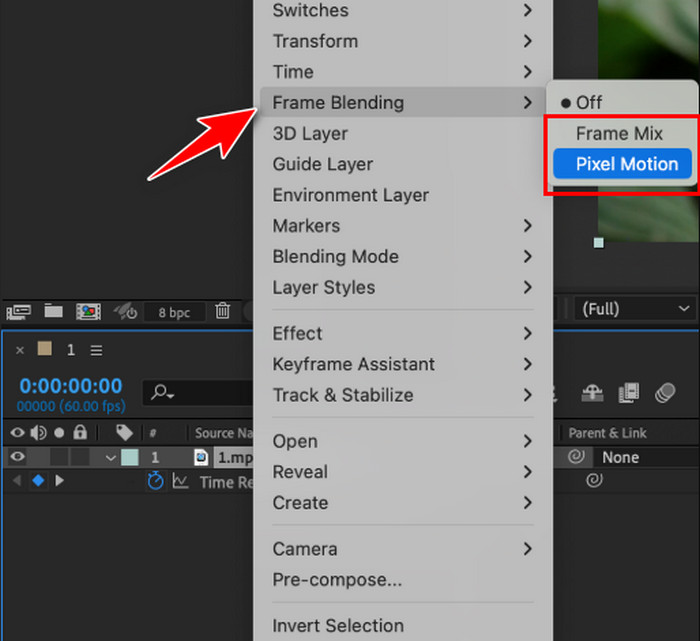
Part 4. Enhance Slow-motion Motion Effects with Frame Blending
Frame Blending serves as an essential functionality for obtaining refined results when modifying how to slow down video in After Effects. Plaid movements vanish through this tool because it creates intermediate frames that enhance the smoothness of slow-motion playback. The Frame Blending capability in After Effects includes Frame Mix, which does gentle transitions between adjacent frames, and Pixel Motion, which uses motion analysis to make natural-looking new frames. When you activate Frame Blending, you can improve the quality of slow-motion sequences, making them look more professional.
Step 1 Select your video layer, then go to Frame Blending in the timeline.
Step 2 Click the Frame Blending switch until it displays Pixel Motion. It analyzes motion between frames and generates new pixel data for smoother slow-motion playback. If you are satisfied, do not forget to export the After Effects video to MP4 so it will be contained in a standard format.
Part 5. Try After Effects Slow Motion Plugin - 2 Quick Review
1. Twixtor by RE: Vision Effects
With its motion analysis capability, Twixtor serves as a top plugin that expands After Effects' slow-motion function by creating additional interframe outputs. Standard frame rate clips benefit from users achieving ultra-smooth slow-motion effects because this plugin adds additional in-between frames during playback. Its flexibility helps users who need exact speed control by enabling the editing of motion vectors and object separation to keep distortion at a minimum.
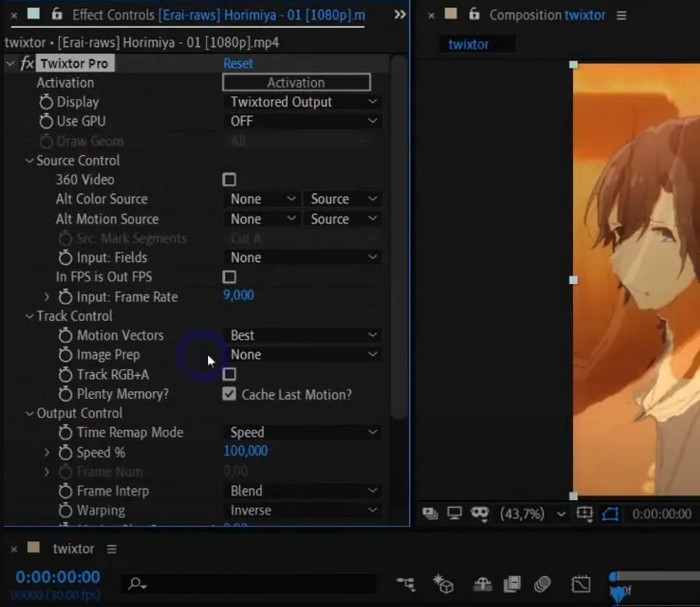
Experienced professionals commonly use Twixtor, but the tool remains expensive to obtain and requires skilled manual adjustments for optimal outcomes. For those looking to learn how to slow a video down in After Effects with professional-grade precision, Twixtor is a top-tier option that delivers exceptional results when used correctly.
2. Bullet Time by Blace Plugins
Through its user-friendly operating system, Bullet Time delivers excellent, high-quality slow-motion effects in After Effects programs. Using pixel-based motion estimation, the plugin generates new frames during interlace while maintaining smooth transitions and reducing ghosting and motion blur issues.
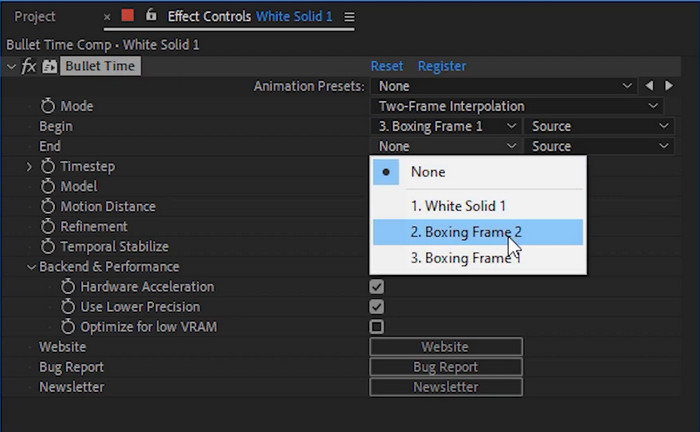
Editorial professionals who seek effortless production of cinematic slow-motion sequences will find Bullet Time to be an excellent choice, even though it lacks some of the customization capabilities of Twixtor.
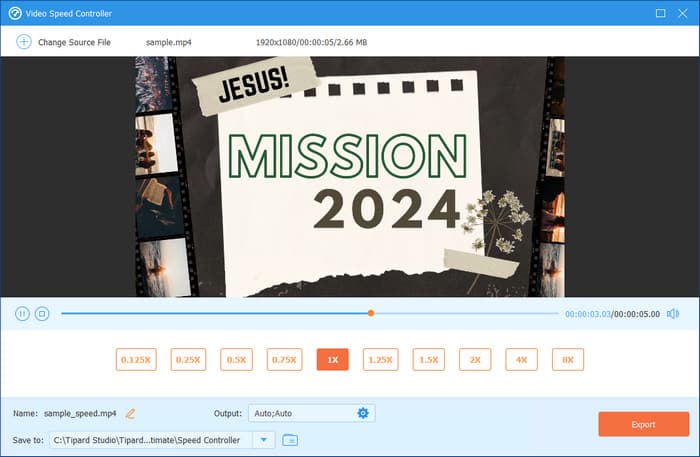
Part 6. Slow Down a Video with Easy After Effects Alternative
The complexity of After Effects for video speed control encourages users to select Tipard Video Converter Ultimate instead because of its straightforward approach. The Video Speed Controller feature of this software provides a simple solution to adjust video speed by letting you control the playback duration through basic clicks. Time remapping and keyframes are unnecessary. The program enables users with no editing experience to generate professional slow-motion effects through its built-in speed option presets.
In addition to speed adjustment, Tipard Video Converter Ultimate offers essential editing features that let users trim, crop, and even create a GIF from YouTube, as well as improve their quality. Users can benefit from an all-in-one system since it allows effortless video editing. As the perfect software for effortless video slowing, it serves users who want alternatives to After Effects.
Conclusion
How do you slow a video down in After Effects? Thanks to its built-in feature and the step-by-step guide we have added here. With the proper techniques implemented in the video, a film-like slow motion can be achieved in Adobe AE. If you have questions regarding this guide, feel free to ask!
More Reading


About the Author
