
"When I have dedicatedly edited my videos on iMovie and want to save them, I find that there is no Save button in iMovie. That made me ask, how do I save an iMovie project?"
If you have asked the same thing, do not worry. We have everything answered for you. In this write-up, we will guide you step by step on how to save iMovie in every way. Whether you are using a Mac, iPhone, or iPad or if you want to save your video as an MP4 file.
By the end, you will know exactly what to do, no matter what device you are using. Let us save your videos the right way so you do not lose all your hard work!

Part 1. Does iMovie Automatically Save
iMovie works a bit differently than some applications. You do not have to click a Save button all the time. So, does iMovie automatically save? The answer is yes! iMovie saves your work by itself. It does this so you do not lose your video if your Mac or iPhone shuts off or crashes. However, some users still get confused because they do not see a Save option anywhere.
Here is what you should know:
1. iMovie auto-saves your edits while you work, so there is no need to press Save.
2. Every change you make, like cutting, trimming, or adding music, is saved right away.
3. Your project is stored in the iMovie Library, not in your regular folders.
4. You can close the application anytime, and when you come back, your work is still there.
5. It saves in the background, so you will not even notice.
Part 2. How to Save an iMovie on a Mac
If you are done editing and want to save or export your iMovie project on a Mac, it would not just sit as a video file. You have to finish it by turning it into a video. iMovie calls this sharing or exporting. It is how you make a copy that can be played anywhere.
Rely on the tutorial below to learn how to save an iMovie on a Mac:
Step 1Open iMovie on your Mac. Find the project you want to save. Click on it so it opens in the timeline.
Step 2Look at the top-right corner of the screen. Click the Share button. It looks like a square with an arrow pointing up.
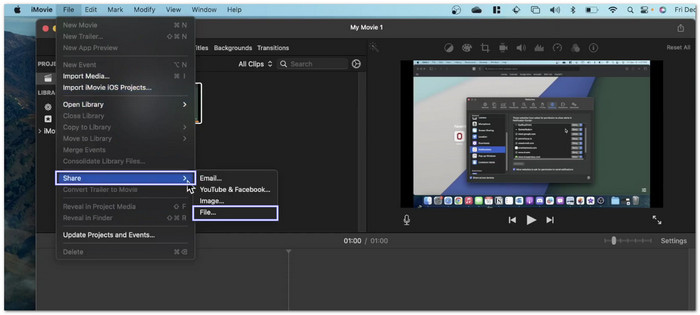
Step 3A menu will appear with different ways to share. Click on File. It lets you save the video on your Mac.
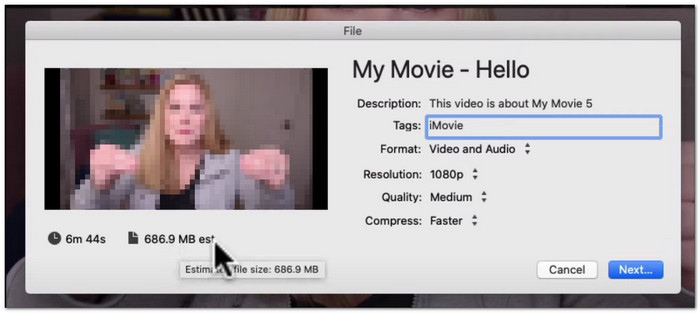
Step 4A new window will show up. Here, you can change your video title, description, resolution, format, quality, and compression speed. Please choose what fits your video best.
Step 5Click Next. Then, type a name for your video, pick where you want to save it, and click Save. iMovie will now start creating your video file.
Part 3. How to Save iMovie on iOS Devices
Saving your iMovie on an iPhone or iPad is almost the same as saving it on a Mac; it is just made for touch. Once your video is ready, you need to share it with your Photos app or Files app. That is how you turn it into a real video file.
So, how do you save an iMovie using your iOS devices? Here is how:
Step 1Open the iMovie app on your iPhone or iPad. From the list of projects, tap the one you want to save. It will open on your screen.
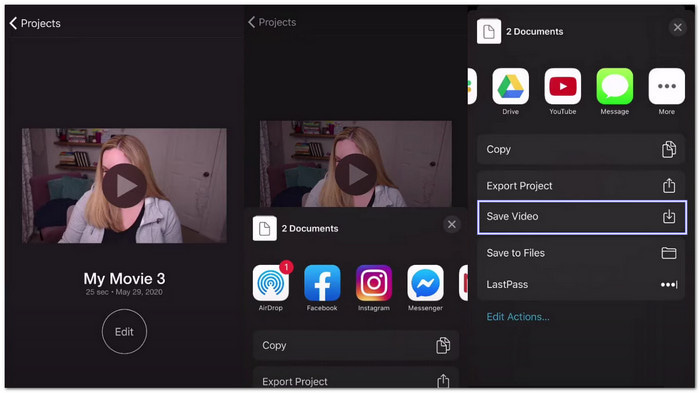
Step 2Look at the bottom or top-right of the screen and tap the Share button. This button looks like a small box with an arrow pointing up.
Step 3From the options that show, tap Save Video. It will save your finished movie to your Photos app.
Step 4You will now see different video sizes like 360p, 540p, or 720p. Pick the one you want. A higher number means better video quality.
Step 5After that, iMovie will start exporting your video. Please wait until it finishes. Once done, you will find it in your Photos app, ready to watch or share.
Part 4. How to Save iMovie as MP4
MP4 is a popular video format. It works on almost every device. iMovie lets you save your video in this format, but it does not use the words MP4. Instead, you pick File, and it saves it as an MP4 without you doing anything special.
Do this to master how to save iMovie as MP4:
Step 1Open iMovie on your Mac. Click on your project so it loads in the editing area. Make sure everything looks good before you save it.
Step 2Go to the top-right corner of the screen. Click the Share button. It appears like a square with an arrow pointing up.
Step 3A small menu will show different ways to export your video. Click on File. It lets you save the video to your Mac instead of uploading it online.
Step 4A new window will pop up. Choose your video size (like 720p or 1080p), quality (low, medium, high, or best), and compression (faster or better quality). Then, click Next.
Step 5Type in a name for your video file. Pick a folder where you want to save it. Once settled, click Save. iMovie will start exporting it as an MP4 file. Please wait for it to finish. Now, you are done!
Part 5. Best Alternative to iMovie When Editing and Saving Videos
Not everyone uses a Mac. And not everyone finds iMovie easy. Some people want a better way to edit and save videos. Something simple. Something that works fast. Something that gives them more tools without being hard to use.
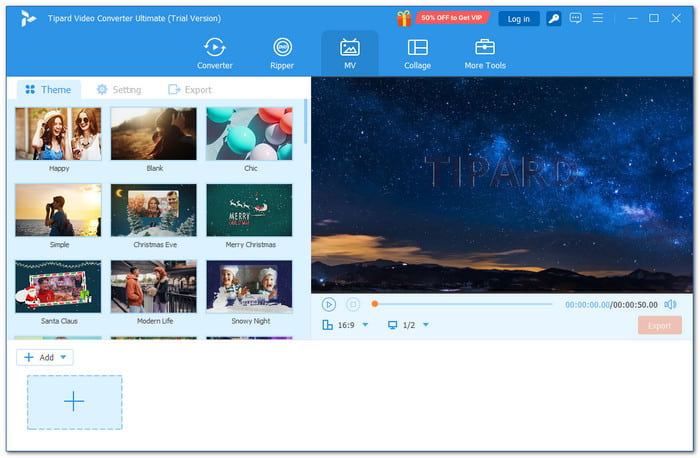
That is why Tipard Video Converter Ultimate is the best iMovie alternative. It works on Windows and Mac, so anyone can use it. It lets you refine your video by cutting, trimming, splitting, cropping, rotating, flipping, merging clips, applying filters, adjusting brightness, and fixing colors. You can also add music, watermarks, and subtitles.
You do not lose video quality. In fact, you can export in 4K or HD. You can also change video formats like MP4, MOV, AVI, and more. All it takes is one click and a few simple steps. Undoubtedly, this iMovie for Windows gives you all the tools iMovie has and even more. It is fast, clear, and easy. And it makes your videos look just how you want.
Conclusion
You have now learned how to save your iMovie project. Whether it is done automatically, saved on a Mac, shared from an iPhone or iPad, or exported as an MP4 file. iMovie makes saving simple, but it can still feel limited when you want more features or control. That is where Tipard Video Converter Ultimate can help. It works on Windows and Mac, and it does more than just convert videos. You can edit, trim, cut, rotate, add filters, adjust brightness, add subtitles, and even merge clips. So, download and install it on your computer and start exploring its features!
More Reading


About the Author
