
You went on a trip and took lots of photos and videos on your iPhone. Instead of uploading them one by one, you want to showcase them all together on one screen at once.
That is exactly what a collage can do, which this guide is all about. We will teach you how to make a collage on an iPhone. So, please get your photos and videos ready and let us start the collage making!

Part 1: Using a Dedicated Collage App (The Most Powerful Way)
1. PicPlayPost
PicPlayPost is one of the best collage apps for iPhone. There is no doubt because it gives you many layouts with two, three, or four screens. It also offers effects like grayscale, gloom, sepia, and vintage for a softer look. Plus, you can add music, check a quick preview, and save it when it feels right.
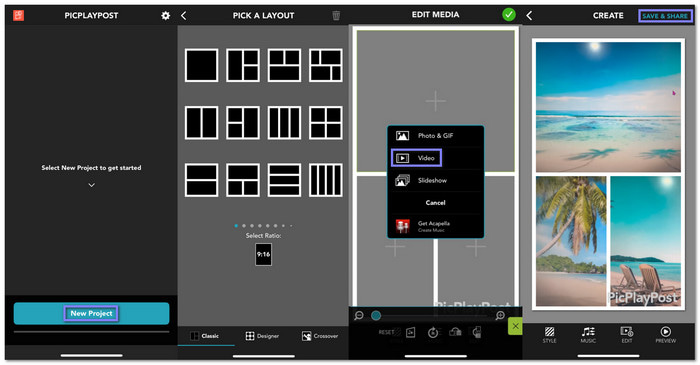
Step 1 Get PicPlayPost: Video Editor from the App Store. Once installed, open it, press the New Project button, and then select Create a Collage.
Step 2 Pick a style for your collage like Classic, Designer, or Crossover, and then choose a Ratio such as 9:16, 16:9, or 9:19.5.
Step 3 Choose a layout based on how many screens you want: two screens, three screens, or more, with different frame designs.
Step 4 Tap the Add button to upload your videos to each screen. You can drag the videos inside the frames to show exactly the part you want.
Step 5 Once you are happy with your collage, press the Checkmark button, then Save and Share to keep your collage or share it with friends.
2. MixCollage - Collage Video & Pic
Some apps try to do everything for you, and this collage maker on iPhone is close to that. MixCollage starts fast, but it has ads, so be ready for that. It gives you 36 layouts and allows you to change the border space and switch colors like brown, white, black, pink, or blue.
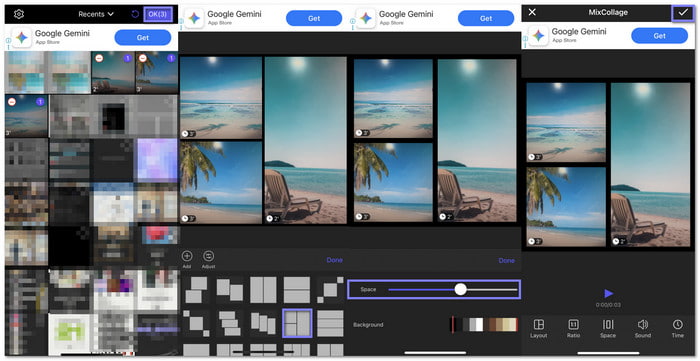
Step 1 Install Open MixCollage on your iPhone. Once opened, it will require you to select the videos you want to include right away.
Step 2 The app will automatically make a collage for you. If you want to change it, press the Layout option to pick a different style.
Step 3 If you want, you can also adjust the space between borders by dragging the bullet on the line bar. Move it to the right for more space or left for less space.
Step 4 Once your collage looks good, press the Checkmark button to save it.
Part 2: How to Make a Collage Without an App (Using iOS Photos)
You can make a simple collage on your iPhone without any apps, and everything is manual. You only use the Photos app with a screenshot or any plain image as your canvas. Then, you copy each photo and paste it into Markup. It is easy, and you place every picture the way you want.
Check out the steps below to learn how to make a photo collage on iPhone using the Photos app:
Step 1 Pick a photo that will work as your canvas. It can be a plain white picture, a screenshot, or any simple background you like.
Step 2 Launch the Photos app and select the pictures you want in your collage. Once selected, hold on the photos until a small menu pops up and press Copy.
Step 3 Go back to your background photo. Press the Markup option, which looks like a pen tip inside a circle. In the Markup toolbar, click the Add button at the bottom, and select Add Text.
A text box shows up. Tap and hold inside the box until a menu appears and select Paste. The text box will go away, and your copied photo will appear like a sticker on the background.
Step 4 You can use the blue handles around the pasted picture to move it, or make it bigger or smaller. Place it where you want it on the canvas. Each picture you paste becomes its own layer, so move them one by one.
Step 5 Once everything looks good, tap Done to leave Markup. Tap Done again to leave the main editor. Your collage will save as a new image in your camera roll.

Part 3: How to Make a Video Collage on iPhone
Using the split-screen feature of iMovie, it is possible to make a video collage on your iPhone. You can place two clips together, line them up, and show them on the screen at the same time. If you need more editing, you can rotate, flip, speed up or slow down, or cut the video.
Refer to the steps below to master how to make a video collage on iPhone using iMovie:
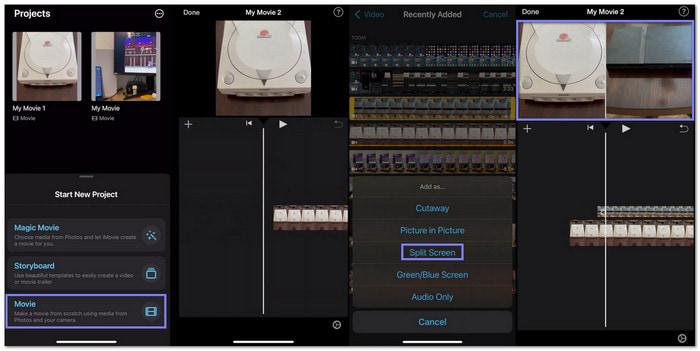
Step 1 To begin with, open iMovie and press the Movie button at the bottom. Then, choose your first video clip and press Create Movie.
Step 2 Move the playhead, or the thin line in the middle of the timeline, to the spot where you want the split screen to start.
Step 3 Tap the Add button on the top left and choose your second clip. Tap the clip, the three dots to open more options, and then select Split Screen. After that, your second video will also appear on the screen, creating the video collage look.
Step 4 Once everything looks right, save your project. iMovie will export your new video collage to your camera roll.
Recommended: Edit Collage with More Features on a Computer
If you can make a collage on an iPhone, it is more possible to create one using your computer.
For a more feature-packed collage editing experience on your computer, you can count on Tipard Video Converter Ultimate. It offers 44 layouts with different screen numbers and frame designs. You can change the border thickness or colors, like black, white, yellow, blue, or red.
You can also edit each clip by rotating, applying filters, or trimming it. There is also an available aspect ratio suited for different platforms, which is perfect if you already know where you want to share it online. Every change shows instantly in the right preview screen.
Step 1 On your Windows or Mac computer, get and set up Tipard Video Converter Ultimate.
Step 2 Navigate to the Collage tab and select a template at the bottom. You can pick a layout with two, three, or four screens, each with different frame designs. Once picked, click the Add button on each screen to import the videos you want to collage.
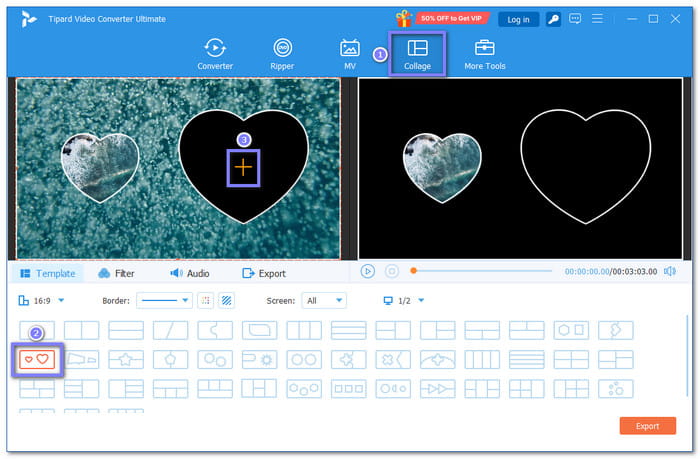
Step 3 To improve the visual appearance of your collage, click the Filter option and select one. There are forty-two filters in total, so choose what to apply.

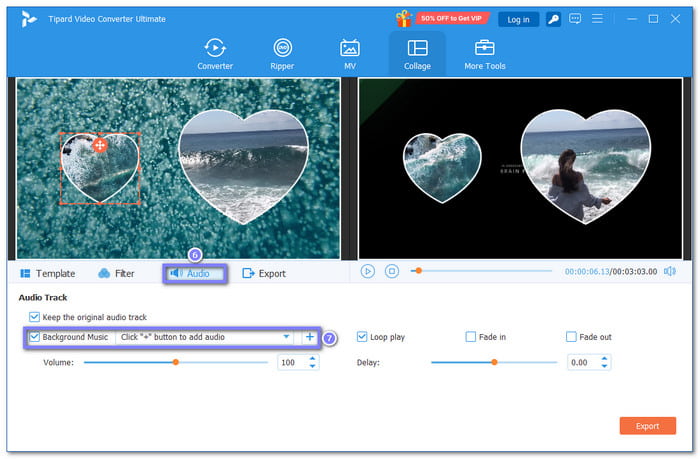
Step 4 Move to Audio option. Here, you can keep or remove the original audio track and add Background Music. To add music, click the Add button, and select the audio file you want to use for your collage.
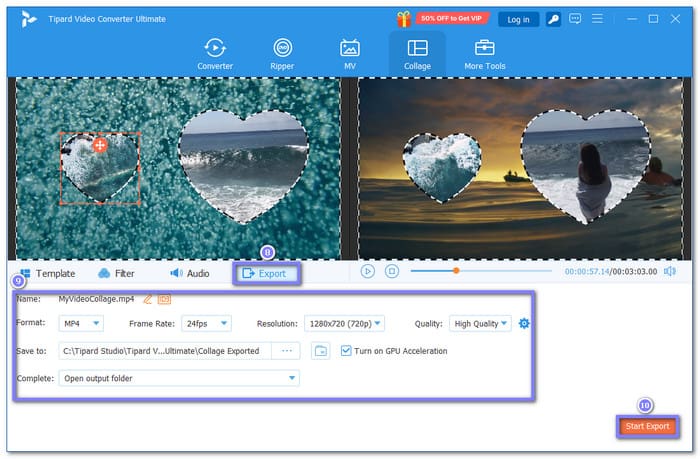
Step 5 Finally, name your video collage, change the video format, resolution, and pick a location in the Export option. Once settled, click the Start Export button, and your video collage will be stored in your chosen folder.
Undoubtedly, this photo and video collage maker can take your collage creation to the next level, even beyond what you can do on your iPhone.
Conclusion
Learning how to create a collage on iPhone is fun, right? You can display all your moments on one screen at the same time. If you have a computer, you can also try Tipard Video Converter Ultimate. It gives more editing features, which can make your video collage even better.
More Reading


About the Author
