
Tipard Video Converter for Mac Guide
Tipard Video Converter for Mac is a versatile and economic Mac video converter, which can convert almost all kinds of video files to many mainstream video and audio formats on Mac. Plus, Mac users are allowed to freely trim, crop, effect and watermark the source file to get customized video for entertainment.
Step 1: Install and register Tipard Video Converter for Mac
Download Tipard Video Converter for Mac installation file, then double click the downloaded installation file to start installation; next, follow the instructions to finish the installation.
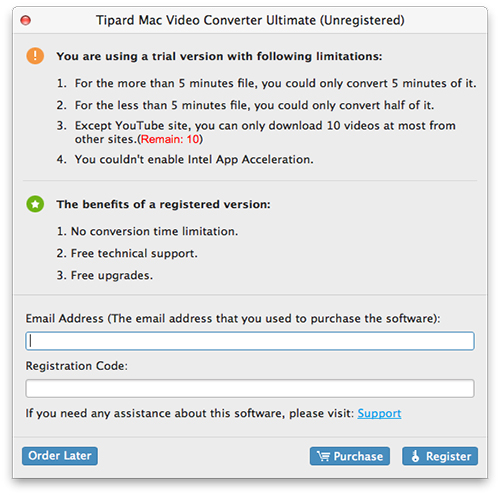
After installation, please launch Video Converter for Mac, then enter correct User Name and registration key in pop-up registration window, then click "Register" button to finish registration.
Step 2: Load video file
After registration, you will see the the following screenshot.
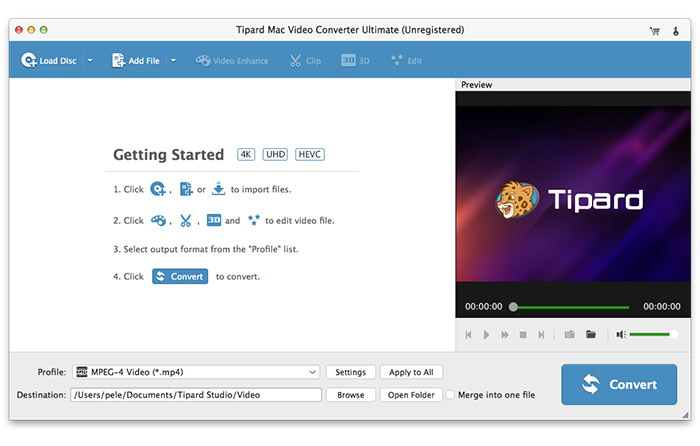
Load any video file you want to convert by clicking "Add Video" option under the "File" menu. Or you can click the "Plus" image button in the main interface.
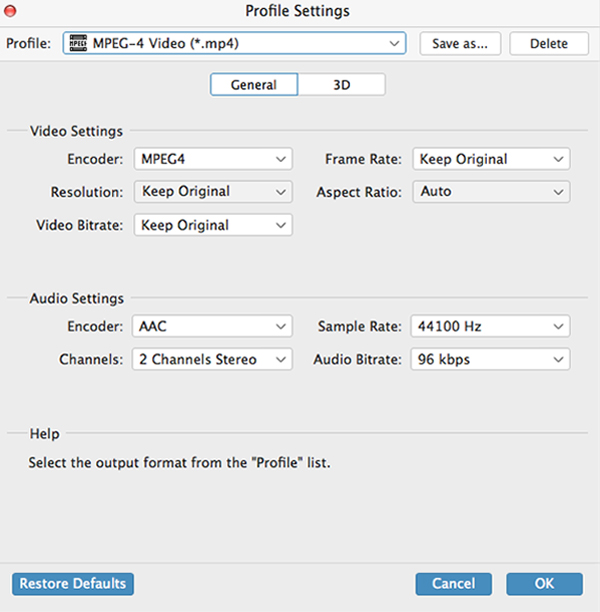
Step 3: Choose output format
Based on the formats supported by your portable devices, you can select the output format for the movie from the "Profile" column and set the destination folder. Also you are allowed to select your preferred audio track and subtitle for your video.

Detailed video and audio settings are provided by this Video Converter for Mac for you to adjust, such as video Encoder, Frame Rate, Resolution, Bitrate and audio Encoder, Channels, Bitrate, Sample Rate, etc. Even more, you can input your own parameters and choose preferred Aspect Ratio. The well-customized profile can be saved as "User-Defined" for your later use.
Step 4: Edit output video as you like
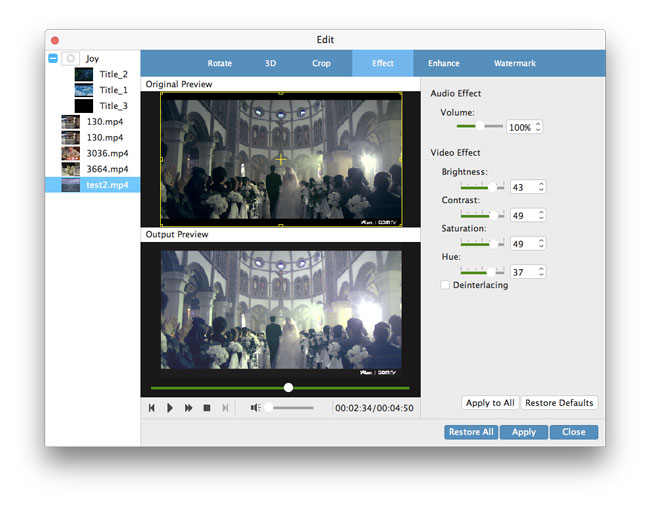
1. Adjust output video effect
Click "Clip" on the initial interface, and choose "Effect" command after context menu popped up to open the Effect window. Or you can just click button to open the Effect window.
You are allowed to freely drag the Brightness, Contrast, Saturation, Hue and Volume 5 Effect scroll bars to choose the perfect video effect you like best.
2. Trim any video
Click "Clip" on the initial interface, and choose "Trim" command after context menu popped up to open the Trim window. Or you can just click button to open the Trim window.
Tipard Video Converter for Mac provides you two methods to trim your video length.
Method 1: Enter the start time in the "Start Time" box, then enter the end time in the "End Time" box and click OK.Method 2: Drag the scissors bars under the preview window when you want to trim, then the time will be shown in the Start Time box and End Time box for your reference.
After you set the trim time, the length of the captured clip will be shown in the Select Length box for your reference.
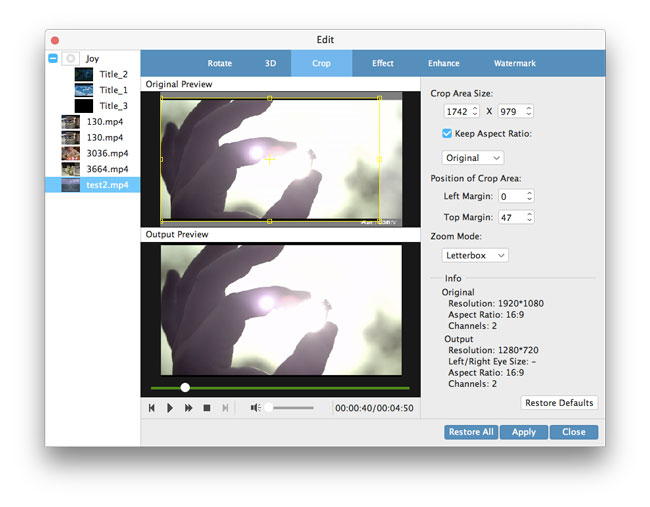
3. Crop any video
Please look up the original Aspect Ratio of the source file by clicking the "Properties" button on the main interface. Then choose your preferred Aspect Ratio by clicking "Settings" button in line with "Profile" drop-down list for output video. Then click button to open the Crop window.
Tipard Video Converter for Mac allows you to remove the black edges around your movie video and customize the size of video play region.
The crop frame is the yellow line around the movie video. There are eight small adjustment boxes on the crop frame. Each adjustment box allows you to crop the movie video from a different position.
There are two methods available to crop your video:
Method 1: Adjusting the crop frame by keeping the definite Aspect Ratio
You can just move your mouse cursor to an adjustment box and drag the crop frame.
Step A: Choose your preferred Aspect Ratio as definite Aspect Ratio value for the crop frame from the drop-down list, then check the "Keep Aspect Ratio" Check box to make your dragging action always keep the chosen value.
There are four choices available: Original, Crop area, 16:9 and 4:3.
If you choose "Original", the crop frame will always have the same Aspect Ratio with the source file, no matter how you drag the frame;
If you choose "Crop area", the crop frame will always have the same Aspect Ratio with your last drag of crop frame, no matter how you drag the frame;
If you choose "16:9" or "4:3", the crop frame Aspect Ratio will always be 16:9 or 4:3, no matter how you drag the frame.
Step B: Just drag the adjustment boxes and move the whole frame to get your perferred crop frame shape, size and position.
You also can just set the four crop values on the lower right part of the Crop window.
There are four crop values to choose: Top, Height, Left and Width. You can set each value to crop your movie video, and the crop frame will move accordingly.
By setting Left value, the left yellow border will have definite distance from the left border of the Original preview.
By setting Top value, the Top yellow border will have definite distance from the top border of the Original preview.
By setting Width value, the crop frame will have definite width, and the Height value will change automatically by keeping the definite Aspect Ratio and vice versa.
Method 2: Adjusting the crop frame without keeping the definite Aspect Ratio
You can just move your mouse cursor to an adjustment box and drag the crop frame.
Step A: Uncheck "Keep Aspect Ratio" Check box on the lower left part of the Crop window.
Step B: Just drag the adjustment boxes and move the whole frame to get your perferred crop frame shape, size and position.
You also can just set the four crop values on the lower right part of the Crop window.
You can set each value to crop your movie video, and the crop frame will move accordingly.
By setting Left value, the left yellow border will have definite distance from the left border of the Original preview.
By setting Top value, the Top yellow border will have definite distance from the top border of the Original preview.
By setting Width and Height value, the crop frame will have definite width and height.
Hint: In order to meet various viewing needs of customers, Tipard Video Converter for Mac provides 4 Zoom Modes for you to choose: Letterbox, Medium, Pan & Scan and Full.
Note: After you crop your video and set the Zoom Mode, the result can be previewed in the Preview window of the program main interface.
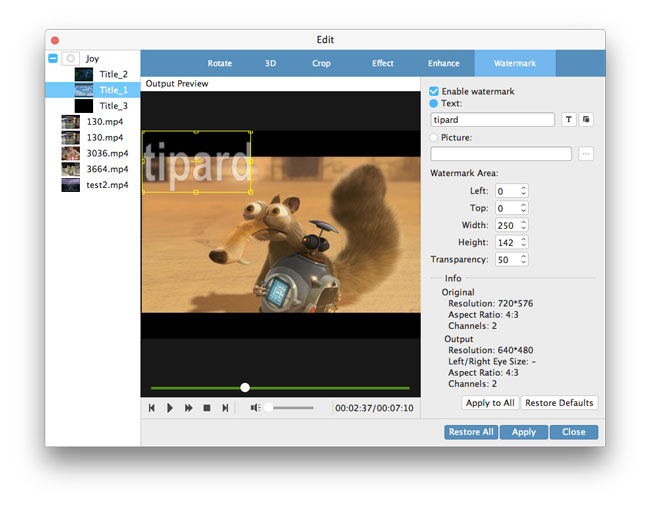
4.Add a text or image watermark
Click "Clip" on the initial interface, and choose "Watermark" command after context menu popped up to open the Watermark window.
Check the "Enable Watermark" checkbox, then select "Text" or "Picture" radio button to add a text or image watermark to any video as you like.
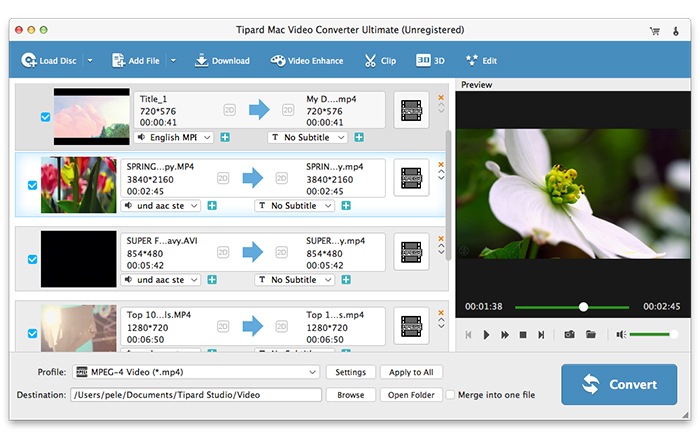
Step 5: Merge multiple video files to a single one
Load more than one video files need to be merged, then select all contents in the display list; after that, the "Merge" button on the initial interface will be activated accordingly.
Then, click the "Merge" button, the temporary file of the merger will be listed in the display list. Then temporary file by defaul will be named "Merge", and you can playing it in the "Preview" window to preview the merger video effect.
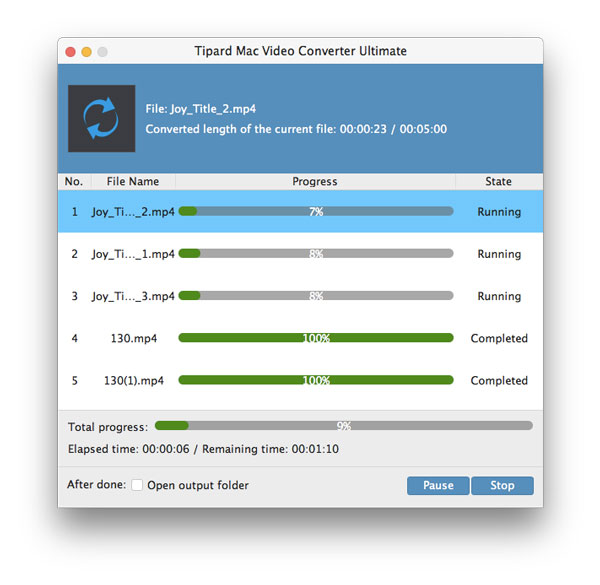
Step 6: Start conversion
Click "convert" image button to start to convert video to any video or audio format as you like on Mac.

 How to Rip Any DVD to iPod
Tipard DVD to iPod Converter provides a professional solution to rip the DVD to iPod supported video formats, MOV and extract audio from DVD.
 Best Solution to Play DVDs on PS4
Does DVD plays on PS4? Follow our tutorial to learn multiple ways to play DVD on the device directly or rip DVD for playback DVD content.
 How to Convert DVD to MP4 with 10 Best Methods
When you need to convert DVD for Smartphone or online, you need to know how to convert DVD to MP4 from the article.
 How to Burn MKV to DVD on Windows and Mac
Here are the best ways to burn MKV to DVD. You can grasp the best DVD creators and the details to convert MKV to DVD.