How to Boot into Safe Mode on Windows 7/8/10
Safe mode is an essential feature to Windows users. When people install malware or their computers crash, they can switch to Safe Mode and start the computers. The computer start in its Automatic Repair mode will not load third-party software or drivers. So the malware and unstable hardware will not affect the computer and operating system. Users could troubleshoot Windows and fix the blue screen when you enter the mode. However, booting into Safe Mode is not a simple task to ordinary people. Moreover, the ways to boot into Safe Mode on Windows 8 and previous versions are different. So, this article will introduce the methods to enter Safe Mode on different Windows operating systems in details.
1. Enter Safe Mode on Windows 8 or 10
Considering Safe Mode is an important way to fix Windows operating system, Microsoft provides multiple ways for Windows 8/10 users to boot into the Automatic Repair Mode.
Shift + Restart
If you want to enter Safe Mode when computer starting, you need to hit Power button at the login screen. Then hold down Shift key on keyboard and select Restart.
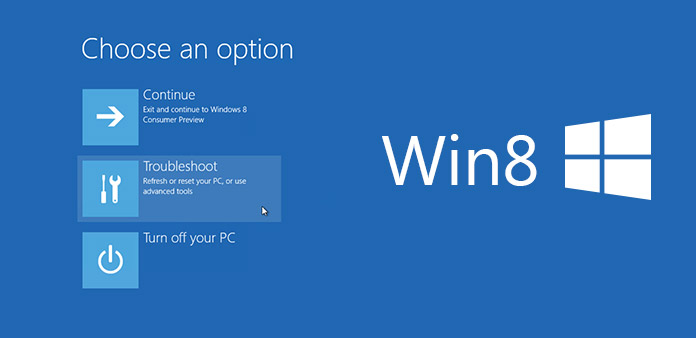
In option dialog, select Troubleshoot. And choose Advanced options in Troubleshoot window. When you go to Advanced options dialog, pick up Startup Settings.
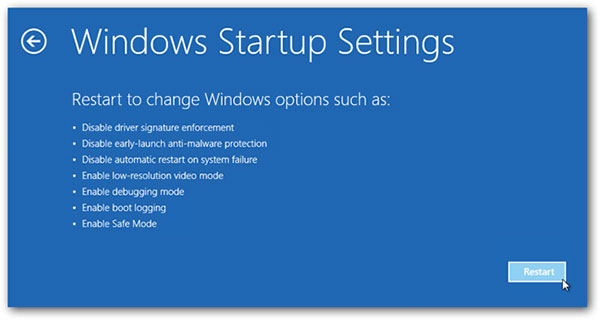
Click on Restart button on Startup Settings screen and then press F4 on keyboard. Windows 8 allows users to press F5 to enable the mode with Networking or F6 to enable Safe Mode with Command Prompt. Your computer will boot into Safe Mode depending on your selecting.
2. System Configuration
Another easy way is Configuration program, or the well-known msconfig.exe. System Configuration is more comfortable to some people, because it is more like a graphic program. And if you want to come back to normal mode, you need to uncheck Safe boot in System Configuration.
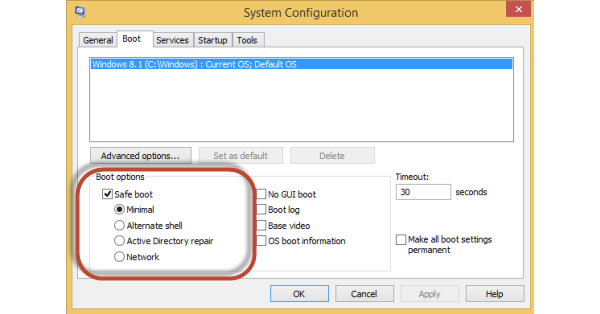
Hold down shortcut Win + R on keyboard to open Run dialog.
Enter msconfig into the box and press Enter key to open System Configuration program.
Choose Boot tab in System Configuration and check the box of Safe boot. There are four options below Safe boot. Minimal will take you to normal safe mode. Alternate shell means Safe Mode with command prompt. Active Directory will restore a server of Domain Controller. And Network option will enable the Automatic Recovery mode with networking. You can select anyone according to your demands.
After settings, tap on OK button and then Restart button.
3. Boot into Safe Mode on Windows 7
The methods that introduced above do not work on Windows 7. If your computer runs Windows 7 and you want to boot into Safe Mode, you have to follow the steps below.
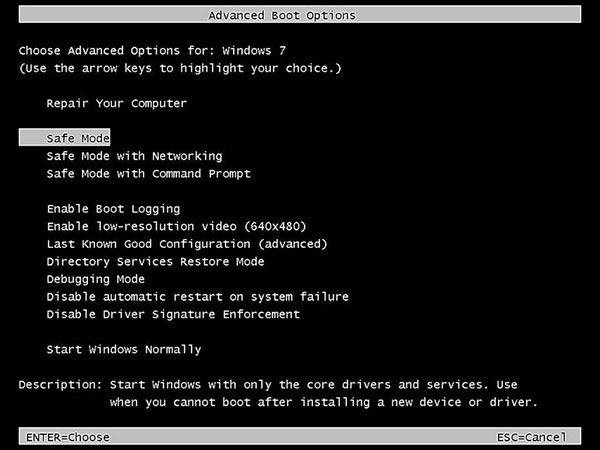
Power on your Windows 7 computer and press F8 key on keyboard before Windows 7 splash screen appears. Then the Advanced Boot Options screen will pop up.
Choose a safe mode in the option list, including Safe Mode, Safe Mode with Networking and Safe Mode with Command Prompt. If your mouse disables, you should use your keyboard. If you select Safe Mode, Windows 7 will load minimum processes that are necessary to start the operating system. The second option will load networking functions as well. The last option is similar to the first one; but it will boot the command prompt rather than Windows Explorer.
After selecting, press Enter key. Then the files loaded will appear on the screen. When all the necessary files loaded completely, you will enter Windows 7 Safe Mode.
4. Repair PC in Safe Mode
Safe Mode is absolutely not appropriate for PowerPoint presentation. The purpose is to fix your computer.

Detect malware. If you suspect that your computer is infected by virus or malware, you'd better to use antivirus application to scan your computer under the Automatic Recovery mode. That is because many viruses will run in background and antivirus cannot remove them in normal mode.
Uninstall software safely. Sometimes, users may install software that conflict with operating system or hardware. That will cause blue screen or crash. The only way to enter the computer and uninstall the program is Safe Mode.
Update hardware drivers. If the hard drivers cause system crashing or other problems, you can boot into the mode and update the unstable hardware drivers. These unstable hard drivers will not affect your computer under Safe Mode.
Diagnose hardware issue. If your computer is fine under the mode but not work well in normal mode, it is more likely to be a software problem. However, if the computer becomes unstable in both Safe Mode and normal mode, you should check your hardware.
5. Manage password effectively
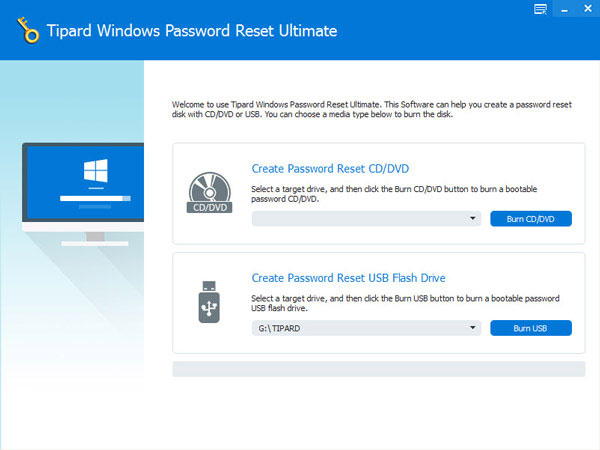
Although Windows Safe Mode is a powerful tool to fix PC, it is not the best to solve all problems for Windows users. If you forget admin user's password, you cannot boot into Safe Mode. So you need a powerful tool to help you manage and reset password of your PC, like Tipard Windows Password Reset. This program is compatible with all Windows systems, including Windows 10. And it is an easy-to-use program.
How to make a bootable disk
Open Windows Password Reset and insert a USB drive or DVD/CD in to your computer. Windows Password Reset has the ability to create a bootable USB drive or a bootable DVD/CD.
If you plug a USB drive into your computer, you can tap on Burn USB button on interface. If you want to make a bootable DVD, you should click on Burn CD/DVD button.
Then the process bar on the bottom will show you the status in real time.
After burned, click on OK and save the bootable disc.
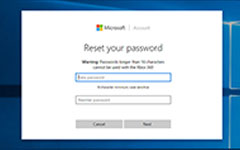
How to reset password
Whenever you cannot remember Windows login password, you can use your bootable disc in Windows pre-installation environment.
Plug bootable USB drive or insert bootable DVD into your computer. And then select the right options in Boot Menu window.
Choose an account and press Reset Password button in Windows Password Reset interface. You can enter a new password and continue.
After resetting, you should remove the bootable disc and reboot your computer with the new password.
Conclusion
This article has introduced multiple methods to boot into Windows Safe Mode. Although the ways are different on Windows 7 and Window 8, they are not difficult. After several steps, we can enter Safe Mode and repair our computers. So it is an essential way to keep our computer health and running smoothly.
On the other hand, it cannot fix all problems about your computer. When it comes to password, we need a dedicated tool. Tipard Windows Password Reset is a professional Windows password manager. Users could utilize Windows Password Reset to manage and add account or reset password.