
3 Easy Jailbreak Ways to Root Kindle Fire to Android Tablet
Kindle Fire used to the tablet to read eBooks only, if you want to install other apps on Amazon's Kindle Fire device, the basic condition is to root Kindle Fire. Moreover, Kindle Fire device has a wide range of functionality, which can work well to work as Android tablet, with better playability. If you search how to root Amazon Kindle Fire online, you will find many articles explains with many intricate words. I feel headache during reading rooting the Kindle Fire device, and it is hard for me to understand the real meaning behind Kindle Fire rooting. Considering there are similar people who just need to step-by-step rooting guide to unlock Kindle Fire to Android tablet, I collect simplest way of rooting to custom Android as Kindle Fire does.
Part 1: Prepares before Rooting Kindle Fire to Android Tablet
Before you root the Kindle Fire device, there is something important to prepare, or you may fail to root Kindle Fire. Unless you have done everything perfectly can you use Google Play on Kindle Fire, to operate with more choices.

- The Kindle Fire battery need to be 855 charged.
- The USB connection.
- Back up Kindle Fire files into cloud storage before booting your device.
- Update to Kindle Fire 6.3.x (6.3.1 and 6.3.2).
- Download rooting tools (Kindle Drivers, Fire utility/ ADB drivers, Android SDK).
- Turn on some options.
Allow Installation of Application – Settings > More > Device to turn on
Turn on the options of Show hidden files, folders and drivers in Windows system
With all these have done, now you have larger possibility to root a Kindle Fire successfully. So, follow my steps to jailbreak your Kindle Fire and install apps from Google Play.
Part 2: With ADB Drivers to Root Kindle Fire Step by Step
If you are ready to do Kindle Fire root edition, the following steps will help you a lot. I mean your kindle Fire data has been backup, or you are not able to restore within rooted Kindle Fire device.
Enable the ADB option on your Kindle Fire device.
Go to Settings > choose Device > click Enable ADB option.
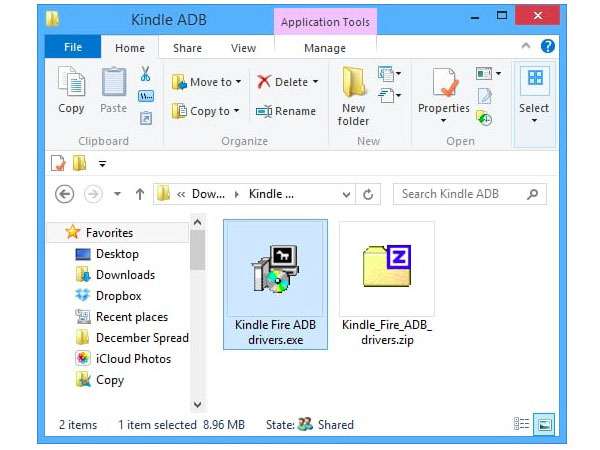
Enable Kindle Fire ADB Drivers on PC.
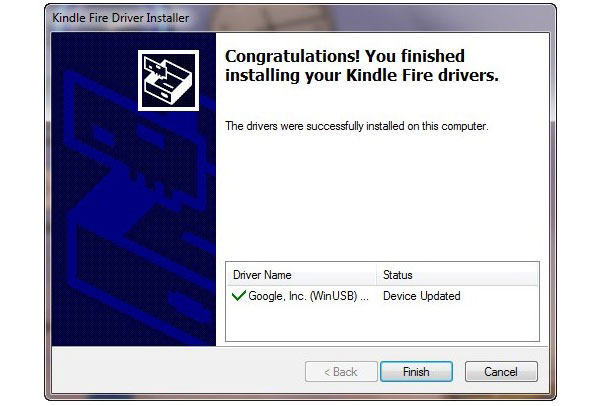
Download Kindle ADB software and extract the zipped folder under the computer disk with large space. Double click the Kindle Fire ADB drivers.exe to install. And agree to reboot your system after the installation finishes.
Find Android Composite ADB Interface.
Connect your Kindle Fire device with the computer together. And then open Windows Device Manager to get Android Composite ADB Interface under the Kindle Fire menu. If you cannot find the interface, you can update immediately.
Download the automated scripted files online.
Unzip the runme.bat file after downloading. Do not worry about operations. Actually, the whole script unzipping process has set the simplest options already, you just need to press few icons to run the script code automatically.
Install the Fire Explorer on your Kindle Fire device.
Now, you can unplug the USB connection between the Kindle Fire and PC. The work of booting Kindle Fire on PC job has finished. You can open your device to check. Remember to install any File Explorer you like.
When you move your finger to scroll down your Kindle Fire device, the Root Explorer option indicates the final process of rooting the Kindle, turn it on, to root a Kindle Fire with ADB drivers successfully.
Part 3: One Click Root – Root Your Amazon Kindle Fire in 4 Steps
If rooting Kindle Fire with ADB drivers seems kind of difficult for you, then One Click Root will help you root Amazon Kindle Fire within several minutes. After you download One Click Root, it is quite easy and safe to root your kindle Fire by few clicks, the rest work can be solved when you click the Root icon. Moreover, you can unroot Android by one click too. Furthermore, One Click Root supports users to install boot apps, ROMs and MODs in simplified way. So enjoy the fun of rooting Amazon Kindle Fire device by one click root service.
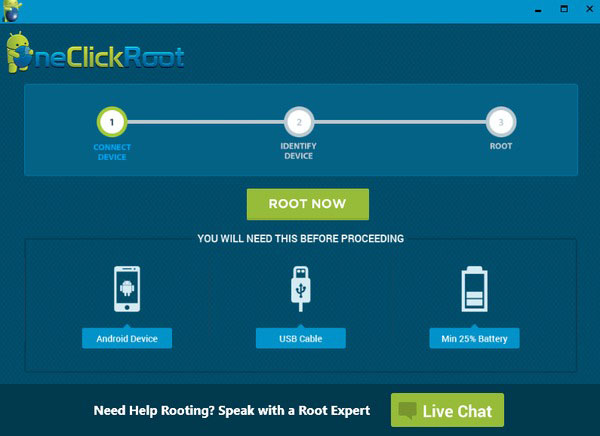
Install and activate One Click Root software on your PC or Mac.
Use USB connection to connect your Kindle Fire with computer.
Open Developer Options, to enable USB debugging.
Choose Root option to leave all Kindle Fire Rooting work run automatically.
In a word, One Click Root is the Android rooting software, to root, backup, restore and unroot Amazon Kindle devices and Android tablets in easy and safe mode.
Part 4: Root Kindle Fire HD by Kindle Fire Utility
Kindle Fire Utility is another rooting tool, to jailbreak Kindle Fire HD and other Amazon Kindle devices. The operating steps to root Kindle Fire HD is similar with the above ADB Drivers rooting. To start with, download Kindle Fire Utility on Windows computer first.
Connect your Kindle with PC, and activate install_drivers.bat file for auto installation.
Choose run.bat file to see ADB status online.
Tap Install Permanent Root with Superuser option to root the Kindle Fire HD device.
Open run_bat file and select Extras and Install Google Play Store in order.
Well, with Google Play installed on your Kindle Fire HD device, there are more tasks you can do more than eBook reading, this may be the biggest Kindle Fire root benefit for most Kindle users.

 How to Delete Books from Your Kindle and Kindle APP – The Comprehensive Kindle Book Deleting Guide
In most people's mind, it is easy to delete books from Kindle. But do you know methods to run Kindle book deletion among different situations, including remove a book permanently, or on Android and iPhone tablets.
 How to Record Your Screen for Windows/Mac/Android/iOS Devices
In order to record your screen for different devices, the article explains the methods to capture video for Windows, Mac, Android and iOS devices.
 How to Record Minecraft Gameplay on PC Easily without Lag
After creating a wonderful world in Minecraft, how to record Minecraft videos on PC to share your masterpiece on YouTube? You can learn two easy ways in this article.
 Free Ways to Convert EPUB to Kindle in 2026 – Balance EPUB with Kindle
Free EPUB to Kindle converters you can get here. No additional frees and no extra operations. All you can get is easy and simple EPUB Kindle file conversion, in free way.