
How to make a collage has become a popular skill for expressing creativity in digital storytelling, memory sharing, or visual presentations. Whether you are blending photos, videos, or both, the process is now more accessible than ever. This guide explores easy methods using top tools like Tipard, Canva, and Kapwing to help you craft collages with style and ease.

Part 1. What is Collage
A collage is an inventive layout that integrates numerous components like images, videos, and graphics into one frame or canvas. A collage can be found both digitally and physically, serving to tell stories, showcase memories, or present concepts in a captivating manner. In the case of digital editing, collages can be tailored and made with the use of various tools, therefore enhancing creativity.
Here are common types of collages:
1. Photo Collage: Combines several pictures into one image, serving social media, scrapbooks, and print designs.
2. Video Collage: Includes one or multiple videos played either simultaneously or sequentially, optionally set to music and transitions.
3. Mixed Media Collage: Integrates text, audio, images, and video graphics and is commonly used in marketing or story projects.
Part 2. How to Make a Video Collage
1. Tipard Video Converter Ultimate
Those wishing to combine videos and images on a single screen will appreciate the built-in features of Tipard Video Converter Ultimate, like a video collage maker. This tool is easy to understand and does not require professional skills, making it a good option for advanced editors and beginners alike.

- Offers a variety of ready-made templates for split-screen layouts.
- Combine videos and photos in one frame with real-time playback.
- Add filters, background music, and effects to your collage.
- Built-in editing tools like crop, trim, rotate, adjust volume, and more.

Step 1 Go to the official website of Tipard and download the installer for Video Converter Ultimate.
Step 2 Start the application and navigate to the top menu, where you will find Collage. Click on it, and you will be taken to the collage creation interface.

Step 3 Look through the stylized templates and pick one that best matches the arrangement of the visual components.
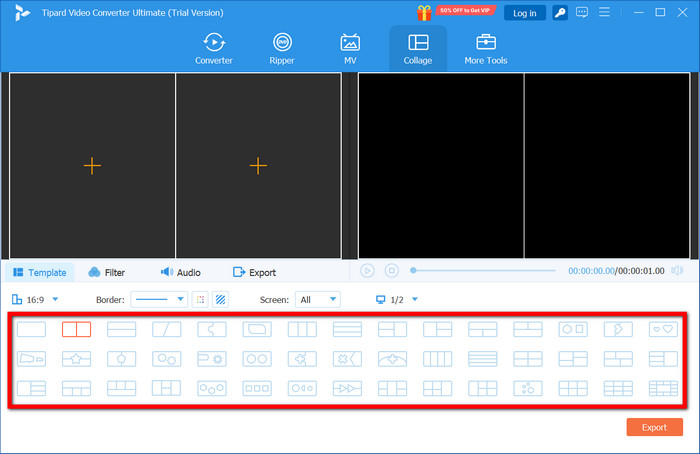
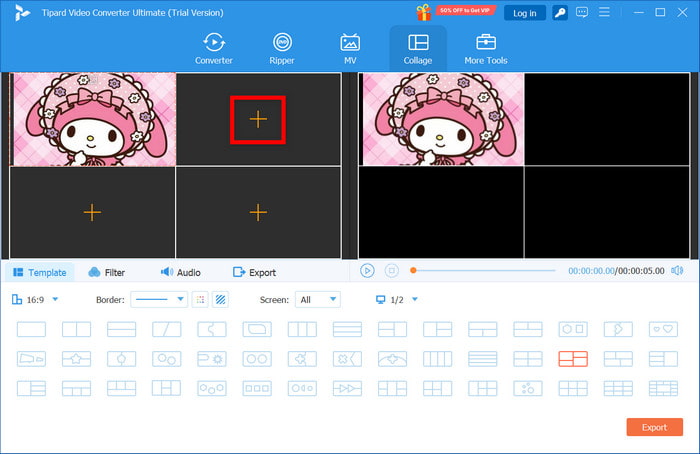
Step 4 Use the + button on each frame of the template to add the requisite video clips or images you want to showcase.
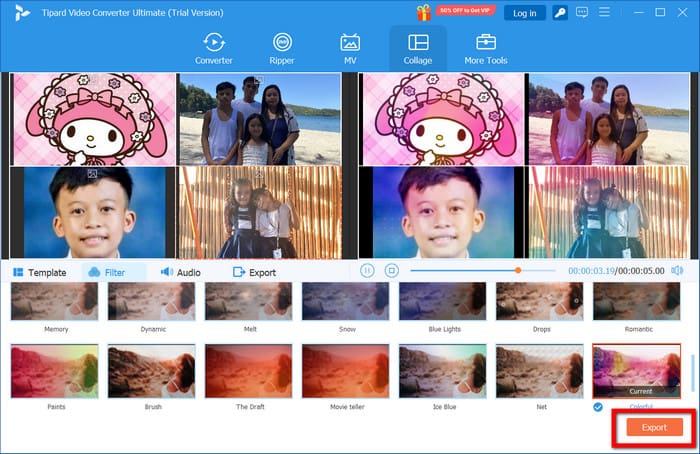
Step 5 Your collage can be further improved with customization options such as filters, music, or brightness and contrast.

Step 6 When the editing is complete, click Export to complete the rendering process.
2. Premiere Pro
Premiere Pro is one of the powerful programs for video editing, as it enables users to add media to Premiere Pro and construct elaborate video collages while maintaining a high level of customization in the arrangement and settings.
Step 1 Initiate Premiere Pro, where the first action must be acquiring a new project by giving it a title and organizing your workspace.
Step 2 Video clips that are intended to be used should be fetched from the media library.
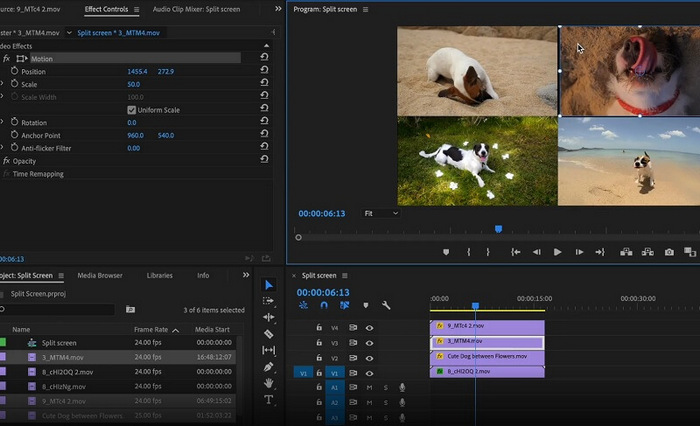
Step 3 Place every video on the timeline, ensuring that each is positioned on a separate video track so that they can be better controlled and layered.
Step 4 Resize, Crop, and Reposition each clip to form a collage on screen using the appropriate controls under Effect Controls.
Step 5 To improve how your collage is presented, use background layers and incorporate transitions as well as audio tracks.
Step 6 After the collage is complete, go to the File section, click on Export and select Media. Adjust the output parameters to your preference and export the video to the desired location.
3. Kapwing
Kapwing is known for being straightforward to use, which is a notable characteristic of browser-based video editing platforms. The collage maker is perfect for simple impulse projects that do not necessitate the download of software, and users can also take advantage of the Kapwing convert video feature to change file formats during editing quickly.

Step 1 Go to Kapwing.com, where you will find the main menu, select the Collage Maker option from the list.
Step 2 From your device, upload your video files or paste a video URL if you are using online sources.
Step 3 Use the intuitive drag-and-drop canvas to position your video clips within your selected layout. Resize and align with precision as necessary.
Step 4 Further customize your video collage with color backgrounds, text notes, and audio tracks to give it a personal touch.
Step 5 To render your video collage, click the Export button.
Step 6 Your finished video is ready for download after rendering is complete.
4. Animoto
Animoto is an intuitive online video collage maker that provides stunning video templates and tools for easy drag-and-drop automation, making video creation accessible for everyone.
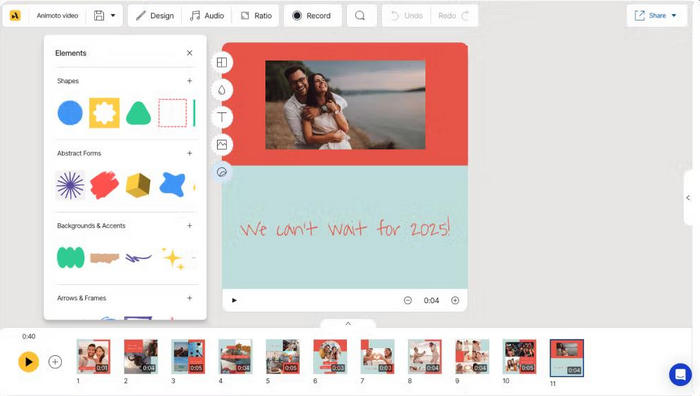
Step 1 Create or log in to your existing account on Animoto.com.
Step 2 Start a new project from scratch or choose a customizable story template to suit your needs.
Step 3 Drag and upload your video clips to the project timeline for orderly arrangement.
Step 4 Your collage is further personalized by editing and adding custom text, selecting transitions, adjusting video styles, and choosing background music.
Step 5 Review your project, make any final tweaks, and then hit export to render your video collage.
Step 6 You can download the final video directly to your device or share it directly from Animoto through social media or via a link.
Part 3. How to Make a Photo Collage
1. Photoshop
For those deeply interested in Photoshop, it is the best app to use because of the accuracy and customization levels it offers when designing photo collages. This program is great for individuals who want to have complete mastery of every single element in their work, including the ability to remove watermarks with Photoshop for a cleaner, professional result.
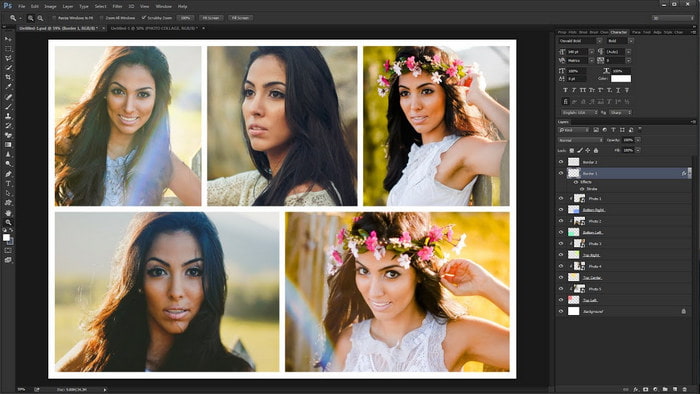
Step 1 Open Photoshop and create a blank canvas with the desired dimensions and resolution. This will be the basis of your college design.
Step 2 Add images that you want to work with in the collage in separate layers. Make sure to use the Move Tool to adjust the placement and size of every image.
Step 3 Use smart objects and layer masks to blend and edit different parts of the image so that they are seamless. Use guides to make sure everything is perfectly aligned.
Step 4 When the layout and design are ready, go to File > Export and you will have the option to save the collage as JPG or PNG, depending on your sharing or printing purposes.
2. Canva
Canva is easier to use compared to many photo editing tools. It is a graphic design solution that is based on the Internet and is meant to assist with the process of making collages with its drag-and-drop features and templates designed to be used by novices.
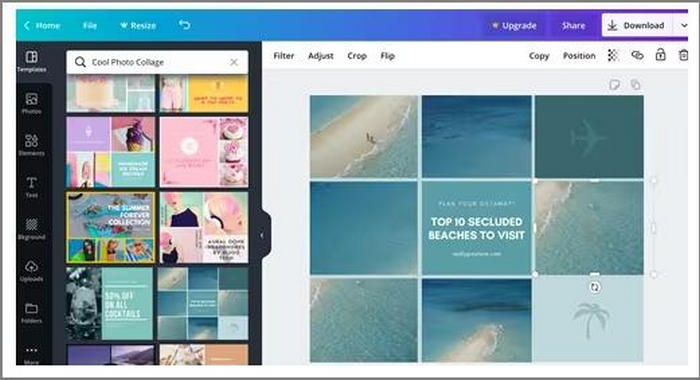
Step 1 Navigate to canva.com, and in the search bar, write Photo Collage so that you can explore various templates.
Step 2 Either choose a template or design your collage by starting with a blank layout.
Step 3 Insert the images into its workspace. Then place them in the collage frames by dragging them.
Step 4 Enhance your design further by adding text, icons, shapes, background colors, or other visual effects to give it more detail.
Step 5 After finishing your collage, click on Download and you will be given options to save the file in JPG, PNG, PDF or other formats of your choice.
3. Fotor
Fotor serves as an easy-to-use online editor and offers an intuitive collage maker through freeform and templates for ease of use, aimed at recreational users.
Step 1 Visit Fotor.com and either click Collage from the homepage or the main features menu navigation.
Step 2 Choose a layout from preset grids or select freestyle for a layout of your choice.
Step 3 With your images ready, use the drag and drop feature to upload and place images into the layout.
Step 4 Set the space between images, frame, roundness, and the background as per your preference.
Step 5 When everything looks aligned to your expectations, simply press Download to obtain the image collage file in your desired format.
Part 4. Can I Mix Photos and Videos?
Indeed, you can integrate both photos and videos into one project, and this feature is supported by most modern editing software. Merging static images and moving clips adds a level of dynamism that enhances the quality of the content being created. If you are working on a slideshow, social media content, or a marketing video, using both formats to convey your message helps you captivate your audience. Video and picture layout editing tools such as Tipard Video Converter Ultimate, Kapwing, and Animoto offer convenient photo and video arrangement editing features that allow you to place them within a single frame or timeline. This increases creativity, adds variety, and improves the polish of the final output.
Conclusion
What is a collage if not an imaginative blend of media and moments all framed within a single border? In the right hands, these tools and simply by following some basic steps, anyone is capable of building engaging photo or video collages that tell stories, stir emotions, or highlight unforgettable memories.
More Reading


About the Author
