
You want to make a time-lapse iPhone. But you are not sure how to start. That is okay; this article is here to help you.
We will show you how to use the Time-Lapse mode on your iPhone. No need to download anything. It is already built into your camera application. You will also learn how to slow down a time-lapse if it looks too fast.
We will keep things simple. Step by step. Just clear guides so you can follow along. Ready? Let us begin!

Part 1. What Is a Time-Lapse
Time-lapse feels like a cool trick. It turns a long video into a short one. Things that take hours, like the sun going down or flowers blooming, look super fast in just a few seconds.
Your camera takes pictures every few seconds. Then, it puts them all together to make a video. So, instead of seeing everything in real time, you see it way faster.
People use time-lapse to show how stuff changes over time. It is great for sunsets, clouds, traffic, or anything that moves slowly but looks cool when it is fast.
Part 2. How to Do Time-Lapse on iPhone
Sometimes, you just want to show something cool but faster. Like clouds moving, cars rushing by, or the sun going down. Your iPhone can do that with time-lapse. It Is already in the camera, and it is super easy to use.
How to do time-lapse on iPhone? Learn all that below!
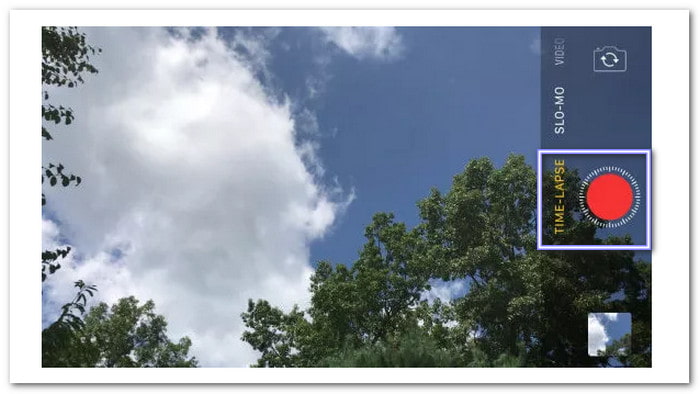
Step 1Open your iPhone's camera application. Swipe across the bottom until you see Time-Lapse. That is the mode you need.
Step 2Pick what you want to record. Tap the screen to lock the focus and light where you want. It helps make your video look clearer.
Step 3Press the big red Record button. You will see a circle moving around it, which means it is filming.
Step 4Let it record for a while. Time-lapse works better the longer you film.
Step 5Press the red Record button again to stop. Your iPhone will save and shrink the video for you. You will find it in your camera roll.
Try using a tripod or placing your phone somewhere steady. A shaky video will not look great.
Part 3. How to Slow Down Time-Lapse on iPhone
Your time-lapse looks cool, but it may be too fast. You want people to see more. The good news is that there is a way to slow it down. So, how do you slow down time-lapse on iPhone? You will need the iMovie application.
It is free, and it works great for stuff like this. You can use it to cut parts of a video, add music, put text, and more. One of its best tools is speed control. That means you can slow down or speed up any video, even a time-lapse.
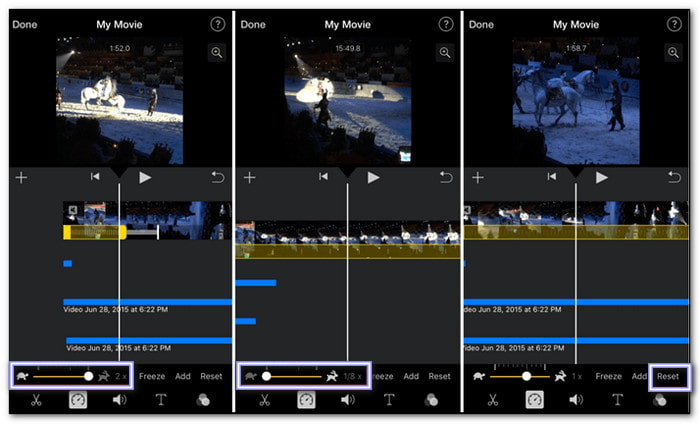
Step 1Open the iMovie application on your iPhone. Tap the + button and pick Movie to start a new project.
Step 2Select the time-lapse video you just made. Tap Create Movie. It will load into your timeline.
Step 3Tap on the video clip once. At the bottom, tap the Speed tool. It looks like a little speedometer. Move the slider to the left; that slows it down.
Step 4Watch the video to make sure it looks okay. If it is too slow or jumpy, try adjusting the slider again.
Step 5When you like how it looks, tap Done. Then, press the Share or Export button to save it to your phone.
iPhone time-lapse videos are already super fast. If you slow them down too much, they might look choppy or weird. Try not to make them too slow unless you really want that effect.
Part 4. Tips for a Wonderful Time-Lapse Video
Now, let us make your time-lapse look awesome. These tips will help you do it better, even if it is your first time:
- Keep your phone still. Use a tripod or lean it on something. If it moves, your video will look messy.
- Pick something that changes slowly. Like clouds, crowds, stars, or people walking in a busy place.
- Make sure your battery is full. Time-lapse takes a while, and your phone needs to stay on.
- Clean your camera lens. If your lens is dirty, your video will look blurry.
- Think about the light. Good lighting makes everything clearer. Daytime or sunset is perfect.
- Be patient. Do not stop recording too soon. Time-lapse needs time to work.
- Try different angles. A high view or a side view can make your video more fun to watch.
There you go! Just follow these tips, and your video will look like a pro made it, even if it is just you and your phone.
Bonus Tip: How to Achieve Time-Lapse Effect on Windows/Mac
Making a time-lapse on your phone is fun. But what if you want to do it on your computer? That is easy, too. You can use Tipard Video Converter Ultimate. It works on Windows and Mac. It is made for beginners, so you do not need to be a pro.
Tipard Video Converter Ultimate gives you lots of speed choices. You can speed up your video a little or a lot. You are in complete control. The quality stays clear even when the video is sped up. You can even preview it first before saving it. That way, you will know it is just how you like it.
Earlier, you learned how to do time-lapse on an iPhone. Now, let us know how to do the same thing on Windows or Mac using Tipard Video Converter Ultimate:
Step 1First and foremost, download and install Tipard Video Converter Ultimate on your Windows or Mac computer.
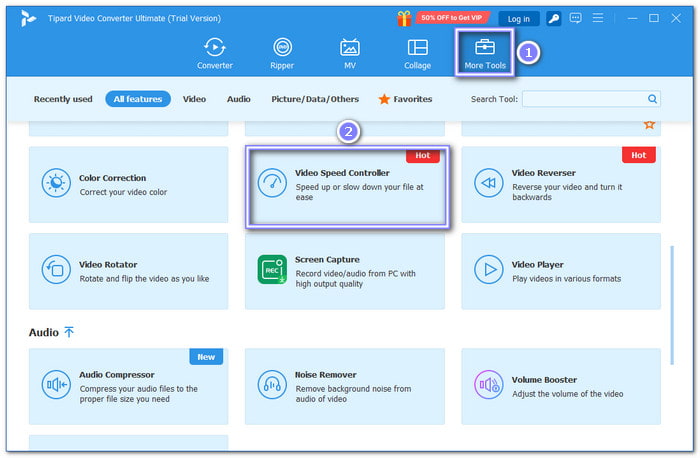
Step 2Open the program, navigate to the More Tools tab, and select Video Speed Controller. Then, click the big Plus button in the center to add the video you want to turn into a time-lapse.
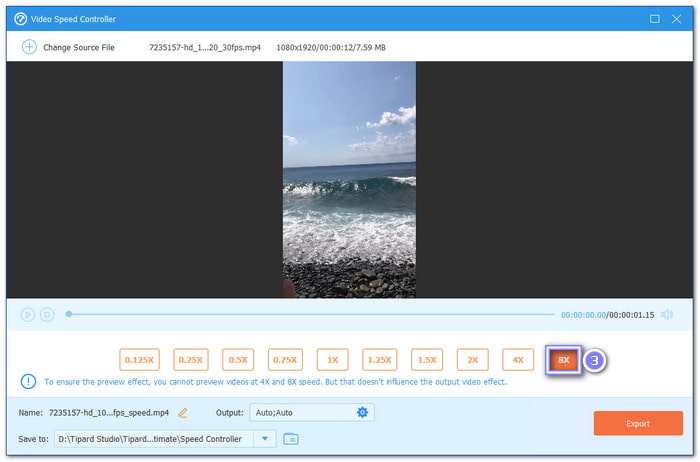
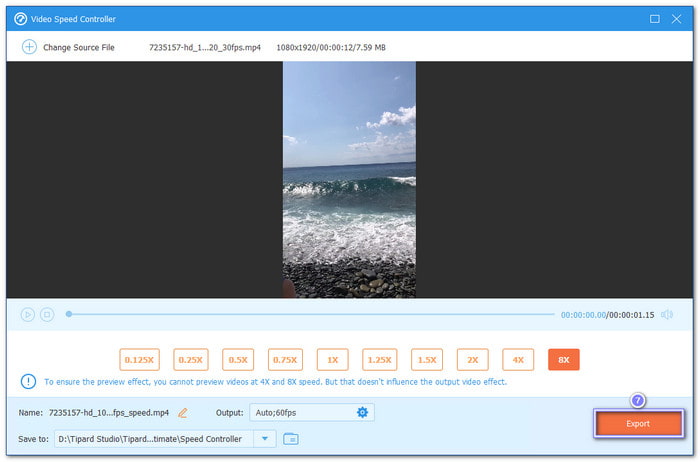
Step 3After your video loads, you will see different speed options. Pick 8× if you want an authentic time-lapse look. That setting speeds up a video like a real-time-lapse from a phone. You can try other speeds, too, but 8× is the best for fast motion.
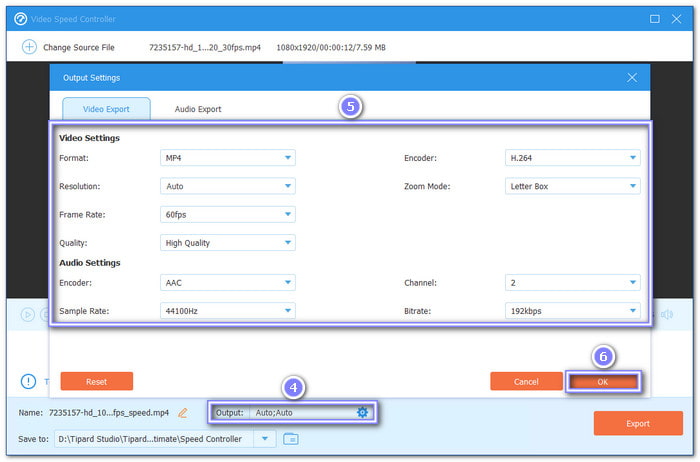
Step 4Hit the Output option before saving. Choose your preferred video format, resolution, frame rate, and quality. If you want a smoother time-lapse, pick a high frame rate like 60fps and the best quality. When done, click OK to lock in your settings.
Step 5Now, click Export to save your time-lapse video. Tipard Video Converter Ultimate will process it and save it to your computer. That is it, you made your own time-lapse!
Conclusion
So that is it; now you know how to make a time-lapse using your iPhone. You also learned how to slow down a time-lapse on an iPhone, too. But what if you want to get that same time-lapse effect on a video saved on your Windows or Mac computer? No worries! Tipard Video Converter Ultimate is here for you. Just one click, and you can speed up your video as much as you want. Try it now and see how good your video can look!
More Reading


About the Author
