
We all know that MOV is a video format specifically developed for Mac's QuickTime Player. Having this in mind, this file format can be incompatible with other platforms or devices, making the video fit for nothing useful. Looking at another perspective, you may extract some important frames in the video by converting it to image formats, like PNG. As long as you have a video-to-image converter, you are good to go. Yet if you are still in search of such a tool, this post carefully selects free, useful, and effective tools to convert MOV to PNG. To cut the chase, kindly check out the list below.

Part 1. The Easiest Way to Convert MOV Frame to PNG
Tipard Video Converter Ultimate is a perfect tool if you are into converting, editing or grabbing specific moments from videos. Right from the get-go, you will immediately feel and experience the ease of use without sacrificing the quality. In other words, it combines usability and functional suitability aspects of a software. Right after importing your video file, you can play it directly inside the program, allowing you to scan through your footage before doing anything. Moreover, it comes with a built-in screenshot tool. Therefore, you can pause at a specific frame and capture your desired video part instantly. The cool thing about this is that it automatically saves your snapshots as high-quality PNG files. The tool is convenient, fast, and accurate. Learn more about this program by following the steps provided below.
Step 1 Whether you are a Windows or Mac user, this program is compatible with both operating systems. That said, get the app by clicking the Free Download button matching the OS your computer is running. Next, initiate the installation once the installer is downloaded. Then, launch it on your computer.
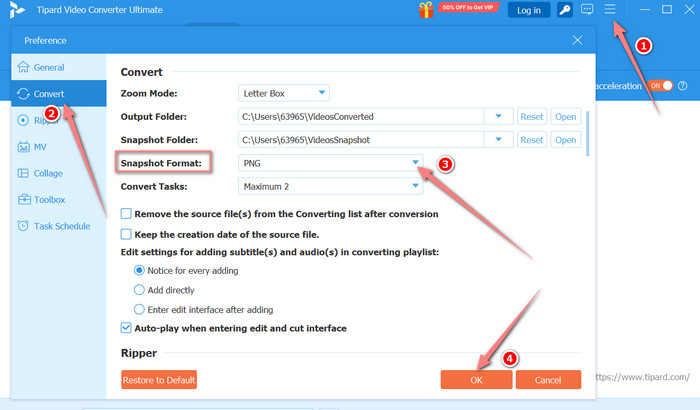
Step 2 After launching the program, click the menu at the top right portion. Then, choose Preference from the available options. Go to the Convert section and change the Snapshot Format to PNG. After that, click the OK button.
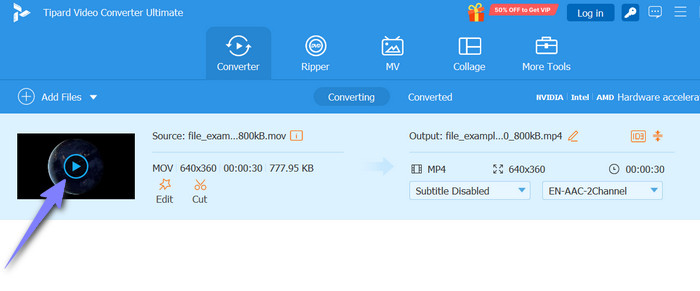
Step 3 Now, hover your mouse over the video thumbnail. As you hover over the video's thumbnail, a play button will appear in the middle of it. Click on the Play button and scan through its frames.
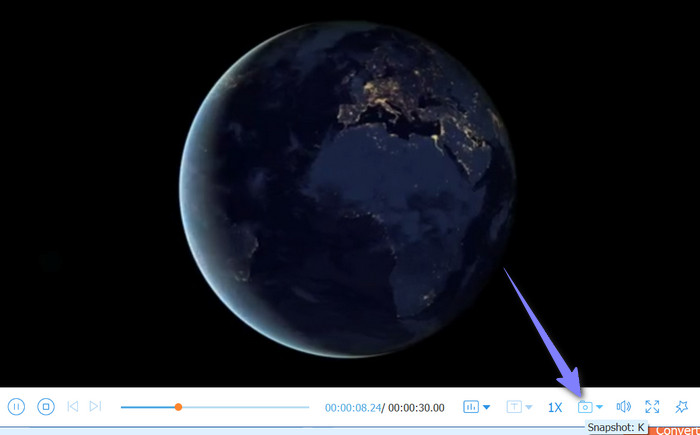
Step 4 Once you have decided which frames to extract, click the Snapshot button in the toolbar below the interface. Get more screenshots by continuously clicking on the button. Every click gives a snapshot animation to indicate that you successfully took a screenshot. Now, click the Snapshot dropdown menu and select the Open Folder option to check the screenshots.
Part 2. How to Convert MOV to PNG with Blender
Blender is a 3D modelling software that is free and open source. Here, you can create 3D models, visual effects, animation, and much more. If you've been using this program, you may access basic tools, including interacting with an object by rotating, scaling, and transforming. Well, apart from creating and editing 3D objects, this tool also serves as a MOV to PNG converter. You read it right. Blender can turn your videos into a set of images. If you wish to learn how to do it, keep reading the instructions below:
Step 1 Open the Blender app on your computer and head over to the top menu. Look for the Plus button beside the Scripting option. From here, select Video Editing > Video Editing.
Step 2 You should see a timeline in the interface. Now, click the Add button from the Timeline menu and select Movie. Then, load your target video.
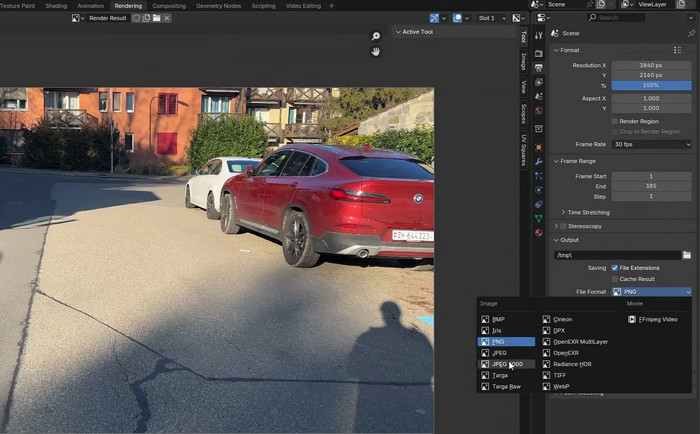
Step 3 On the bottom right-hand side, select the start and end keyframes. Then, on the sidebar menu, select the Output button, set the location and the format to PNG.
Step 4 Finally, head back to the top menu bar and click Render. After that, select the Render Animation option.
Part 3. How to Convert MOV to PNG with FFmpeg
Another free program that is helpful for converting MOV to PNG is FFmpeg. Despite it being a command-line tool, you can accomplish any conversion of video format to the file format you need. Apparently, you will not interact with a graphical, clickable interface using this solution. But it is generous with useful features that you can even repair broken MOV files using commands. Nevertheless, we will guide you on how to use it.
Step 1 For the prerequisite, you need to download FFmpeg and install it on your computer. Once you are done with the installation, you can proceed with the commands.
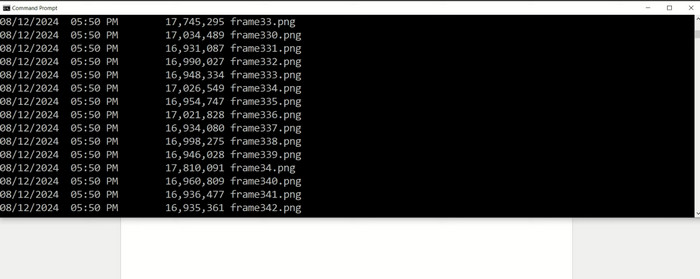
Step 2 On your terminal or command prompt, type in ffmpeg -i video_input.mov output_frame_%04d.png. The -i video_input.mov specifies the name of the video, while the output_frame_%04d.png defines the output image sequence.
Step 3 If you wish to extract a single frame at a specific timestamp, you may type in ffmpeg -ss 00:00:10 -i video_input -vframes 1 single_frame.png. This command seeks to the 10-second mark, and extracts only one frame.
Step 4 Then, FFmpeg will generate a series of PNG images in the same directory where you run the command. If currently, the directory is in the Desktop, all your PNG images will be located in this folder.
Part 4. How to Convert MOV to PNG with Photoshop
With Photoshop, you will have access to a handful of advanced photo editing tools that will let you apply multiple transformations in one continuous operation. Besides that, this program also excels in converting videos to images. It supports MOV to PNG and MOV to GIF conversions. If you wish to learn how this process is done, follow the steps below:
Step 1 First, you must download the program and install it on your computer. Once installed, launch it.
Step 2 Load your MOV file in the program by going to File > Open and locating your MOV file. This time, determine the location where you wish to save the output.
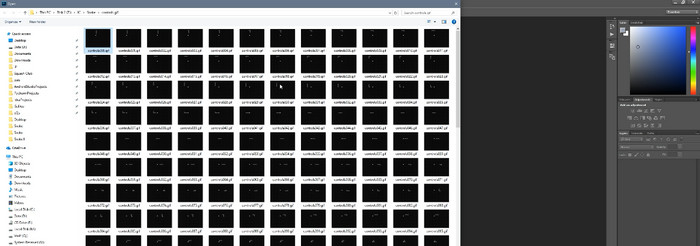
Step 3 Now, go to File > Export > Render Video. This will open the frame and size editing tools you may use for converting videos to images. After that, make a new folder to save your PNG image sequences. Afterward, click Adobe Media Encoder and choose Photoshop Image Sequence.
Step 4 Set the file format to PNG and adjust the other settings that fit your needs, including video frame rate and more. Finally, click the Render button in the top right corner, and the program will start exporting your MOV as a sequence of PNG photos.
Part 5. How to Convert MOV to PNG with DaVinci Resolve
If you are a heavy user of video editors, you must have bumped into DaVinci Resolve at some point. This program offers features you can use to analyze videos and animations frame-by-frame. The steps can be complicated to achieve the extraction of images from videos. Nonetheless, here is a step-by-step guide to help you.
Step 1 Open your DaVinci Resolve application. On the program's timeline, drop and release your MOV file to import it.
Step 2 For custom export, open the render settings and make a folder where you wish to save your sequence of PNG photos. After that, change the format to PNG.
Step 3 Now, click the Render All button on the middle right side of the interface, and it will begin the process of converting the MOV to a PNG sequence.

Conclusion
We just discovered various MOV to PNG converters for different kinds of users. Here you can find useful and free tools to help you transform video files into a sequence of PNG photos. So, ready to get going? Explore these tools further and see which one fits your needs the best.
More Reading


About the Author
