
Top 3 Methods on How to Transfer Photos from Mac to iPhone

To transfer Mac pictures to iPhone is not the hassle task to achieve I have to admit. But when there is the shortcut, why not to have a try? There are many situations for people to move pictures stored on Mac computer to iPhone, like wallpapers, backgrounds, head portraits for social media, easy editing with photo editors installed on iPhone. From these to those, the essential part is paths to import photos from Mac to iPhone. Some people may hold the opinion that iTunes is the good tool to transfer iOS files with. But do not forget the disadvantages iTunes file transferring will bring. Remember? Delete all your previous iPhone files automatically without any notifications.
Method 1: The best way to transfer Mac photos to iPhone
Tipard Mac iPhone Transfer is the versatile iPhone file transfer for Mac users to transfer, manage and backup Apple devices in safe and lossless mode. There are three directions for you move iPhone, iPad and iPod contents to, from iPhone to iPhone, iPhone to Mac and Mac to iPhone. Therefore, the iPhone Transfer Ultimate is the smart file transfer software, to transfer photos from Mac to iPhone without file erasing, which can replace iTunes already.
For people who have the habit the backup import iOS files through iTunes, there is one attractive feature, to backup iPhone photos and other files to iTunes without existing files being erased. Well, safe iPhone photos backup solution than sync with iTunes purely, right? Moreover, iPhone Transfer Ultimate is not only the iPhone file move program, but also the platform for you to edit and manage all iPhone files on Mac, with built-in filters offered.
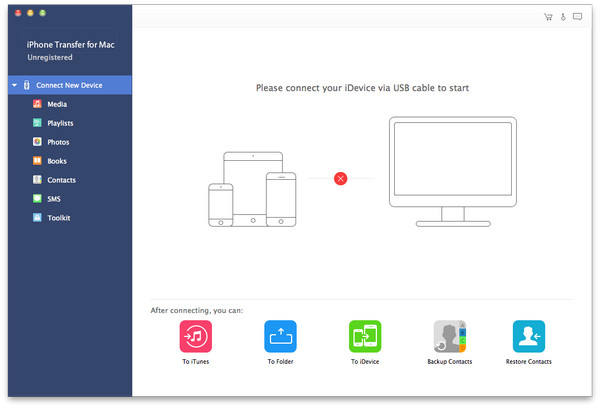
Launch software and connect iPhone
Download and install Tipard Mac iPhone Transfer Ultimate on your Mac, and connect your iPhone/iPad/iPod to Mac via USB cable.
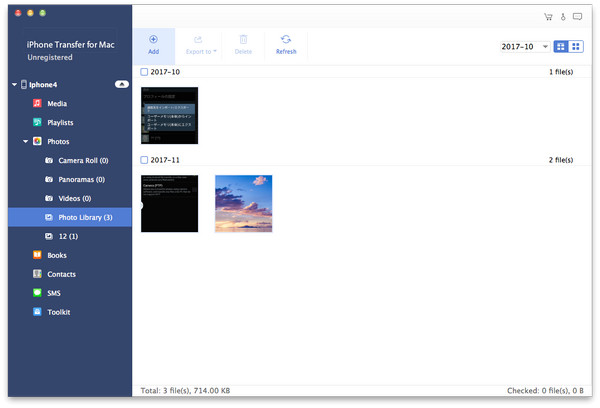
Choose photos category to import files
After iPhone detecting, you will see all iPhone files displayed, with genres sorted out on the left pane. Hit Photos option in the third place, to select which pictures to transfer from Mac to iPhone.

Import photos from Mac to iPhone
Click Add - Add File(s) or Add Folder. If you want to import separate files, click Add File(s) and import files one by one. If you want to import the whole folder, click Add Folder and import it.
Within 3 steps, all your pictures will be added to iPhone from Mac without file size limitations. You can follow similar operations, to transfer iPhone files to another iOS device, or to iPhone as well, after using USB connection to link them together.
Method 2: Import Photos from Mac to iPhone through iCloud Photo Library
iCloud offers 5GB free cloud storage space for users to store photos and videos, among iPhone, iPad, iPod and other Apple devices. Through iCloud Photo Library, you are able to transfer files wireless, and no need to cost any space of your limited iPhone storage room. It is another way for you to transfer photos from Mac to iPhone using iCloud.
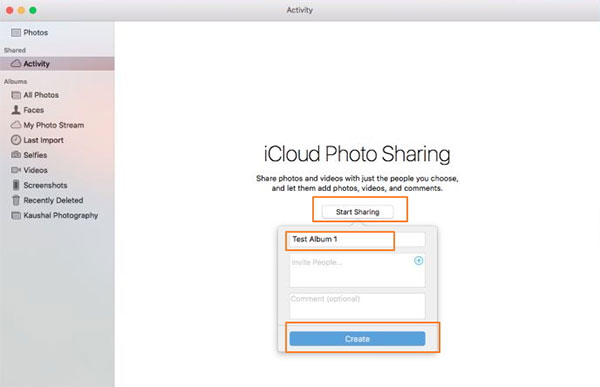
Step 1. Start sharing pictures from Mac to iPhone.
Open iCloud on the System Preferences on Mac, hit Photos button in the second order, and tick both My Photo Stream and iCloud Photo Sharing options. Click Done to move on. Tap Activity on the left pane after opening Photos. Choose Start Sharing under iCloud Photo Sharing menu, to rename your new photo album, hit Create option to continue. You will find the new created photo album appear under Activity, tap Add photos and videos option on the top right corner, to Add all your Mac's pictures. Later, they will exist into the new created album on Mac.
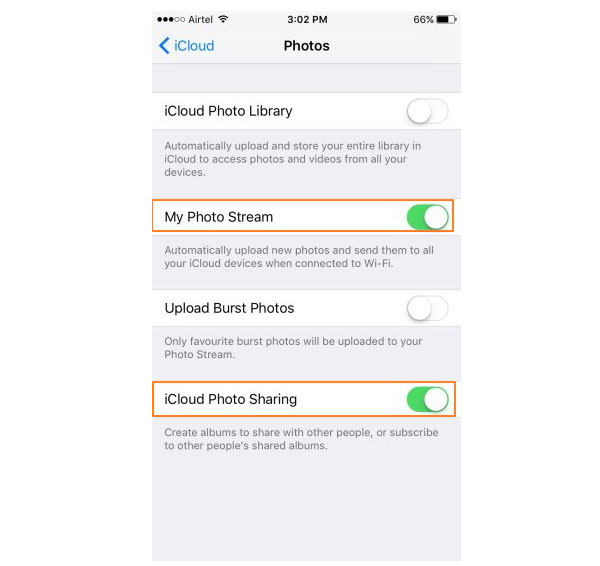
Step 2. Get transferred photos from Mac to iPhone by iCloud.
Now, turn to your iPhone, to open iCloud under Settings menu, enable My Photo Stream and iCloud Photo Sharing options as well. Open Photos application on iPhone, to hit Shared icon on the bottom. Then the synced iCloud photo album created on Mac will displayed on your screen. Open it to copy uploaded images into iPhone photo gallery.
Through Mac to iPhone photo transfer via iCloud method, it will be easy to sync camera toll pictures between several iOS users simultaneously, not including Photo Library pictures at present. Make sure your wireless connection is strong, to save time on nonsense file transferring.
Method 3: Get Photos from Mac to iPhone 7/6/5 though Mail
Sending email from to iPhone is the smart way to transfer small bunches of pictures from Mac to iPhone in easy way. No additional software and totally free method, for few images transferring especially. If you email large amount of pictures, or large size photos, then you need to spend more time on downloading photos to iOS.
Step 1. Attach pictures into the mail to send on Mac.
Open Gmail or other online mail site, sign in with your Mail ID. Later, attach images and hit Send button, to send photos from Mac to iPhone.
Step 2. Download photos from Mac to iPhone.
Enter email account on your iPhone, then you will receive mailed pictures, to download to iPhone into Photos.

The wireless network plays an important role in photo transferring to iPhone too. There is one obvious weakness of mail transferring to iPhone is that, the number od images attached to the mail is limited.
Summary
There are three representative Mac to iPhone photo transferring options, which represents three different levels of photo syncing demands. Tipard iPhone Transfer Ultimate is the tool, for wide ranges of Mac to iPhone photo transferring. iCloud Photo Library only offers camera roll pictures transferring. While email photo sending is another tool, to handle small amount of photos syncing. Choose the suitable iPhone photo transferring method, based on your personal cases.

 How to Transfer Photos from iPhone to Mac
Actually we need to transfer photos for different purposes. Learn more detail about transfer photos from iPhone to Mac efficiently.
 Transfer Photos from Computer to iPhone
Learn methods to transfer photos from computer to iPhone, with this article. Here are top 7 methods to teach you.
 Top 4 Methods to Sync iPhone Photos to iPhone
Manage iPhone photos, to another iOS device in fast and easy ways. There are 4 apps for you to sync photos to iPhone.
 10 Best Free Photo Editors for iOS/Android Devices
If you search for Free Photo Editor that can add funny effects to the photos, the funny apps from the article should be a great help.