
Top 6 Methods on How to Copy Photos from iPhone to PC
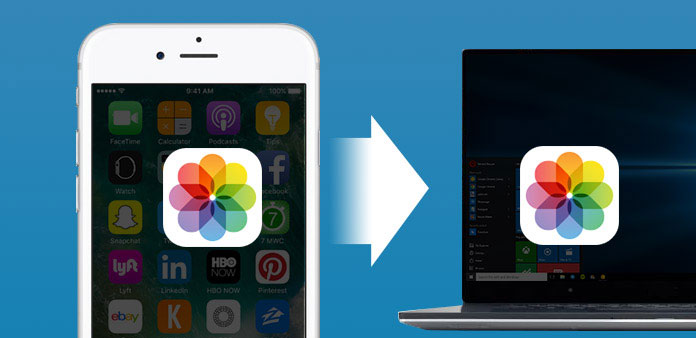
Taking images through iPhone and then transfer them to PC or further editing or collection. It is the common choice most people will do, to copy photos from iPhone to PC. Though transferring images to PC sounds an easy task, there are still many obstructions, which may fail your iPhone to Windows file transmission. And for some new iPhone users, iPhone settings and applications are not familiar to them yet. All in all, I will show you some easy iPhone Camera Roll photos to PC transfer methods, to save images from Camera Roll, Photo Stream, Photo Library and Albums, to manage iPhone photos easily and quickly.
Method 1. Copy photos from iPhone to PC by Tipard iPhone Transfer
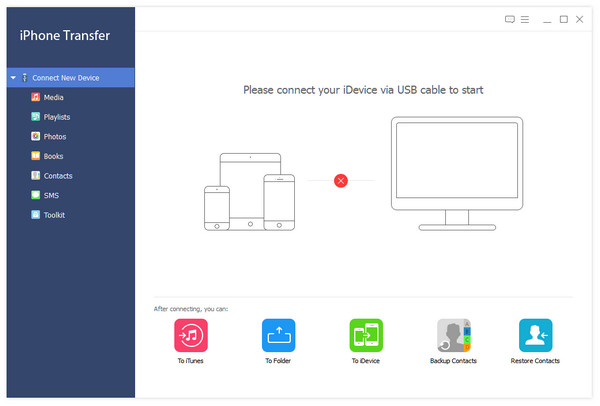
You can import, transfer and copy all iOS data easily by one click, no data loss and no extra plugins need to be installed. Tipard iPhone Transfer is the versatile iPhone data transfer software, with which to copy all iPhone data and files between iOS devices. Thus, you can replace iTunes to move iPhone files safely without previous files being erased.
Tipard iPhone Transfer ultimate is more like a station, to carry iOS data to the terminal Windows computer. Yes, everything contained in Apple devices can be transferred, including photos, music, videos, contacts, messages and etc. Or you can backup iPhone files to iTunes, with current iOS data kept. It is one of the biggest advantages of the iPhone Data Ultimate. As a result, if you use Tipard iPhone Transfer Ultimate to copy photos from iPhone to PC computer, no data loss and editable filters to manage with here.
How to Import Photos from iPhone to Windows Computer/ iTunes Library
Connect iPhone to PC.
Use USB cable to connect iPhone with the computer, and locate Tipard iPhone Transfer Ultimate software.
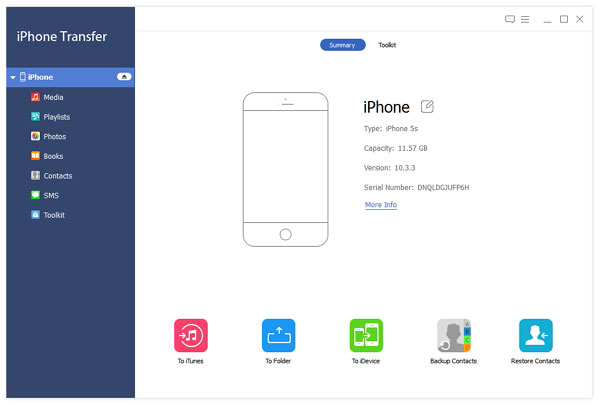
Select iPhone images to transfer with.
Turn to "Photos" menu, after all your iPhone files being detected, and then you will see all iPhone albums and pictures on the right pane.
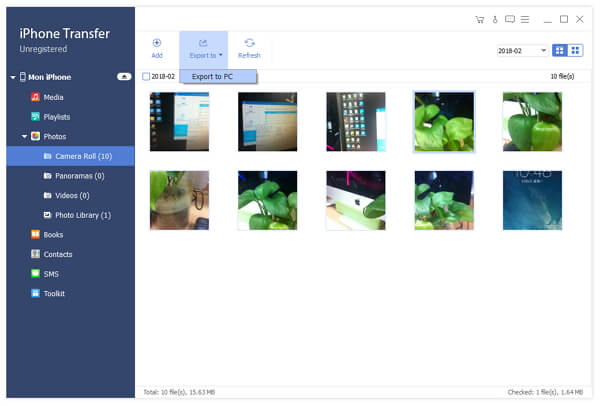
Copy photos from iPhone to PC/ iTunes Library.
There are two choices under "Export to" menu, which are "Export to PC" and "Export to iTunes Library" buttons. Choose the location and send iPhone pictures to.
This is the process to import iOS photos to computer. Moreover, it also supports computer to iPhone data transfer plus iOS one to another files inputting and outputting. Just come and try how powerful the iOS transfer is.
Method 2. Transfer photos from iPhone to Windows 7/8/10 with iTunes
iTunes is the official Apple data transfer software, to backup and copy Apple devices data. You can sync Camera Roll photos from iPhone to PC for free, but make sure iTunes will erase your other iPhone data by the way. Think twice before copying iPhone pictures with iTunes.
Step 1: Connect iPhone to PC with USB cable.
After connection, iTunes will detect your iPhone automatically. Click your iPhone device icon on the toolbar, to display all iPhone genres and data.
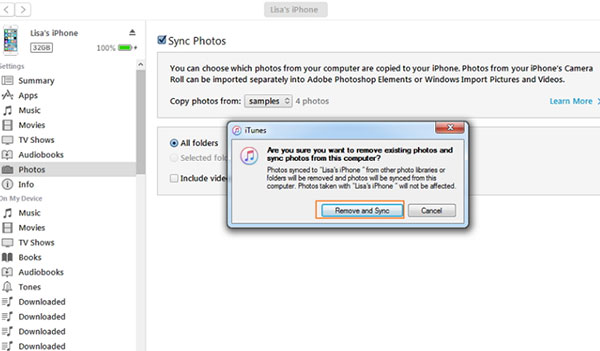
Step 2: Sync pictures from iPhone to Windows computer.
Choose "Photos" menu on the left pane, and tick "Sync Photos" option, to set the iPhone destination folder on PC. You can tap "Choose folder" from the "Copy photos from" drop-down list. Later, hit "Sync" option, to transfer iPhone pictures to PC.
Step 3: Remove and Sync iTunes images on PC.
The pop up window will announce you iTunes will remove existing photos and sync new ones to replace, hit "Remove and Sync" to option to confirm the final check. If you regret to delete previous iPhone pictures, hit Cancel option to return.
Note: Your iTunes need to be updated to latest version, or you will fail to copy photos from iPhone to PC using iTunes.
Method 3. Import photos from iPhone to Windows PC with AutoPlay
AutoPlay is the Windows only transfer software, to copy and move Camera Roll photos from iPhone to Windows computer, no Photo Stream and Photo Library included. For people who just need to copy photos to PC from iPhone Camera Roll, it may be a good choice.
1. Get Copies from iPhone 7 to Windows
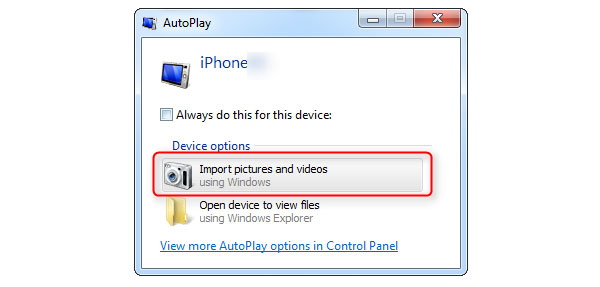
Step 1: Connect iPhone to PC.
Choose "Import Pictures and videos using Window" after the AutoPlay pop up window appears.
Step 2: Import iPhone pictures to PC of certain folder.
Hit the Import Setting link, and change the designation folder, to receive synced photos to Windows computer, by clicking "Import to" button. At last, you can add tags to those imported iPhone photos to sort out, and tap "Import" option to receive Camera Roll pictures from iPhone to Windows.
2. Sync iPhone Images with to PC with Windows 8
Step 1: iPhone with PC USB connection.
Step 2: Import iPhone pictures.
Open The PC and right click your iPhone icon, to choose Import pictures and videos button.
Step 3: Transfer pictures from iPhone to PC without iTunes.
Click Review, organize, and group items to import button for the first time iPhone transfer. Or to hit Import all new items now option, to prevent duplicates transfer on PC.
Step 4: Complete iPhone transfer details.
Hit More Options to iPhone images transfer destination. Choose OK, Next and select the accurate picture groups to finish.
3. Import Pictures from iPhone to PC by Windows 10 (Camera Roll images only)
Step 1: Link your iPhone to PC with USB cable.
Step 2: Run Photos app and Import iPhone pictures.
Step 3: Select images import to PC, and hit Continue to receive copied iPhone photos.
If you fail to copy photos from iPhone to PC with AutoPlay, then replace with Windows Explorer, to transfer iOS images, or Windows Live Photo Gallery can also do the similar iPhone photo importing jobs.
Method 4. Email iPhone Photos to PC
Make sure your Internet connection is fast, and do not send photos from iPhone to PC in large amount per time. Well, if you name the title about photo themes, to distinguish from other common emails, it will be much easier to find them, to saving a lot of time.
Open your Gmail, Hotmail, Yahoo or other online email-sending page, and then attach iPhone photos, by choosing the icon on the right side of camera. Hit Send button on iPhone, while receive and downloading photos on PC from iPhone.

Method 5. Using Online Cloud Storage to Transfer iPhone Pictures to Windows
Online cloud storage ranges widely, including Dropbox, OneDrive, and others. You can backup iPhone photos to cloud storage program, and then download images on Windows computers to get copied photos. Send through the applications on iPhone device, and then receive with the online cloud storage page through the desktop browser.

Method 6. Apply iCloud Drive to Copy Photos from iPhone to PC
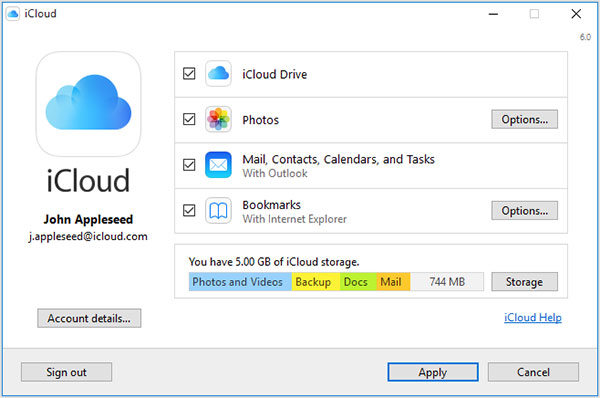
Well, as iCloud has been familiar with all Apple users, it will also easy to transfer iOS photos to PC and Mac computers. To start with, you need to turn on iCloud Drive on PC of iCloud Preferences window first. And make sure your iPhone version is iOS 8. Open iCloud drive window on your iPhone, and then collect photos need to send into one folder, send to PC through iCloud. And then you are able to copy photos from iPhone to PC directly.
Conclusion
Get easy ways to sync albums, pictures and many other iPhone files in the above similar methods. Actually Airdrop and iCloud are also the iPhone Transfer for you to send images to PC from iPhone. If you have anything hard to understand, feel free to contact us.

 Sync iPhone to New Computer without Erasing
How to sync iPhone to new computer without data erasing? The article provides top ways for you to solve the problem.
 Transfer Photos from Computer to iPhone
Learn methods to transfer photos from computer to iPhone, with this article. Here are top 7 methods to teach you.
 Top 4 Methods to Sync iPhone Photos to iPhone
Manage iPhone photos, to another iOS device in fast and easy ways. There are 4 apps for you to sync photos to iPhone.
 Top 3 Methods to Transfer Mac Photos to iPhone
No matter how many pictures you need to sync with, there is always your best method to transfer photos from Mac to iPhone.
Top 6 Methods on How to Copy Photos from iPhone to PC