
Top 3 Methods on How to Delete iCloud Email
When you get a new iPhone, iPad or iMac, you should register an Apple ID to access to the full features of the iDevice. The Apple ID automatically translates to an iCloud email address. If you are not familiar with iCloud email, you should be confused with the features of iCloud email, such as "Alias". Just check out about several simple methods for how to delete iCloud email from the article.
Part 1: How to Delete iCloud Email Address on iPhone
You cannot simply delete an iCloud email account from Apple server simply, because Apple does not provide for this functionality. However, you can delete the Apple ID associated with a certain iCloud email instead by the following steps. Before you do this, you'd better backup content of your iPhone.
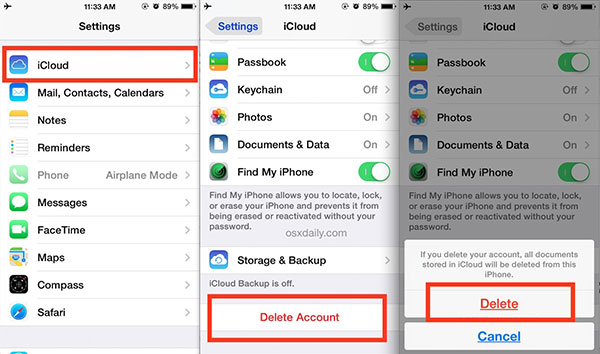
Step 1: Go the "Settings app" and find "iCloud". And then tap on the "iCloud" option. When prompted for a password, enter any random number. And then tap on "Done."
Step 2: If you enter the wrong username and password, iCloud will reject the information. Click on "OK" and then "Cancel" to go back to main iCloud page. After that, tap on Account again, but this time remove the description and then tap on "Done".
Step 3: And then you can access to the main iCloud page without having to enter your password. You can find the "Find my Phone" feature has been turned off automatically. Then scroll down and tap on "Delete". Confirm the delete iCloud email account option that you can do by tapping on "Delete" again.
Part 2: How to delete multiple iCloud Emails
If you have been using the iCloud mail for quite sometime, you should notice iCloud has grown quite a bit since the first release of the iCloud severs came out with the mail option. However, there is nothing that has shown you how to delete multiple iCloud mail from the server on the system. If you also have the problem, here is the solution for you. To permanently delete iCloud emails all in your iCloud swiftly, make sure you follow the right step below.
Step 1: Open a browser and enter the URL "iCloud.com", enter your account and password then click the mail button.
Step 2: Click on Index on the left, choose the iCloud emails your want to delete, then click the trash can icon at the top
If you try to select too many at once you'll have the experiment to see how many you can select to delete at a time. Repeat this for each of your mail folders except Trash. When you are finished, click on the actions icon (trash can icon) on the upper right and select Empty Trash then you will delete the iCloud emails you have chosen.
Part 3: How to Change or Remove iCloud Email Aliases
An email alias is not an own email address, but one that hides the original email address to the receiver. In the beginning, you don't want to give away your private email address to everybody. However, if you get too many emails from a mailing list, you must want to change or delete iCloud emails alias, which is showed as follow.
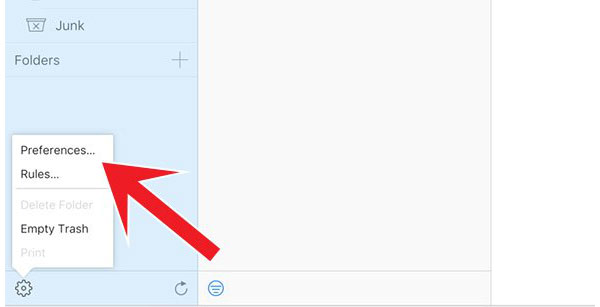
Step 1: While in iCloud mail, open settings by clicking on the gear icon in the sidebar and select "preferences". Then select accounts.
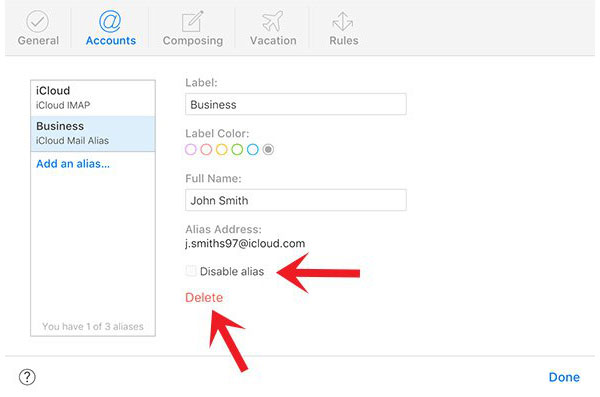
Step 2: Click "Disable alias" and confirm with "Done" at the bottom. If an alias is deactivated, all emails sent to this will go back to the sender. You can activate the disabled alias any time. The amount of alias is still the same.
Step 3: Also, you can Click "Delete" to remove an iCloud email alias. This will not be able to use this alias again. So it cannot be reactivated. The amount of alias will be reduced.
Conclusion
When you backup email to iCloud, you should know the method to delete the iCloud email as well. The article explains 4 methods to get rid of the email. You can find the solution to delete iCloud email account, multiple email as well as the email aliases. What is more, the article also introduces an excellent solution Tipard iPhone Eraser to get rid of all the emails without any track. If you have any query about the topic, you can feel free to share more detail in the comments.

 How to Delete iCloud Backup With Ease
When iCloud backups are beyond the 5GB limitation, you need to delete iCloud backups and save Storages to new backup.
 Top 3 Methods to Delete Songs from iCloud
If you have some unwanted music files from iCloud, the article shows top 3 different methods on how to delete songs from iCloud.
 Top 5 Methods to Delete iCloud Account With Ease
If you are juggled between multiple iCloud accounts, you need to delete iCloud account associated with iOS Device in 5 best methods.
 How to Delete A Yahoo Email Account Easily
This article introduced how to delete a Yahoo email account on different devices and Yahoo will delete all the data.