
How to Convert Flash FLV to Audio

This tutorial is to show you a step-by-step demonstration of converting videos downloaded and enjoying them on your DV, inserting into PPT or edit in windows movie maker or playing on window media player, and so on with the help of Tipard Video Converter Ultimate.
FLV, or Flash Live Video file, is a preferred file format that is designed for web playback, offering high rates of compression to deliver video over the Internet using Adobe Flash Player. FLV content can not be played back directly but must be embedded in an SWF file. You create a "container" SWF file from which to play the FLV file. The most common approach is to use an SWF file that functions as a media player with screen and playback controls. Notable users of the FLV format include YouTube, Google Video, Reuters.com, Yahoo! Video and MySpace.
Let's come to this guide now – convert FLV to audio.
Step 1: Download and install Tipard FLV to Audio Converter.
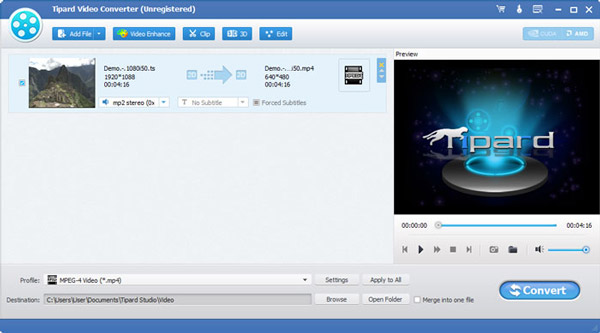
Step 2: Add file to Tipard FLV to Audio Converter interface. There are three ways to put your files on it.
Method One: Click "Add File", it would pop up one window, and select file you want to convert on this window.
Method Two: At the top of the drop menu, click "File", then select "Add File" to import your FLV SWF files.
Method Three: Drag the file to Tipard FLV to Audio Converter interface directly.
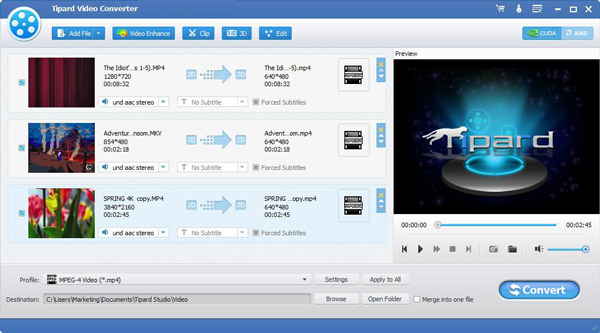
Step 3: Choose profile
Tipard FLV to Audio Converter can extract FLV to audio formats, like MP3, MP2, AAC, AC3, AU, FLAC, AIFF, AMR, WMA, M4A, OGG, WAV, WMA. According to your need select portable output format.

Note:
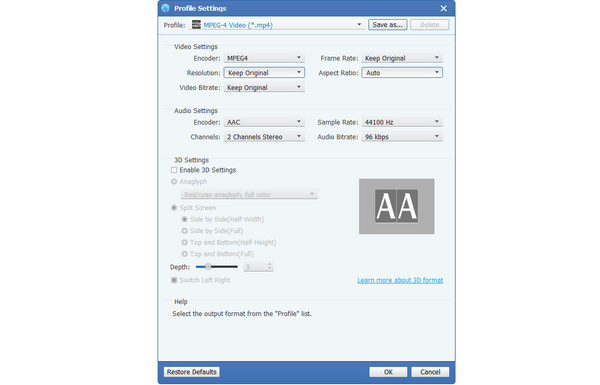
Before you start the conversion, you can define the video and audio settings.
Click the "Settings" button to open the Settings window.
In the Video Settings, you can select Encoder, Frame Rate, Resolution and Video Bitrate to convert your movie. Moreover, you can also directly input your own resolution as the form of "XXX*XXX";
In the Audio Settings, you can select Encoder, Channels, Bitrate and Sample Rate to convert your movie.
Tips:
Tip 1: Trim video
Click "Trim" button on the top of the interface to pop up the video edit trim window.
Tipard QuickTime Video Converter provides you three methods to trim your video length.
Method 1: Enter the start time in the Start Time box and click OK, then enter the end time in the Set End Time box and click OK.
Method 2: Drag the scissors bars under the preview window when you want to trim, then the time will be shown in the Start Time box and End Time box for your reference.
Method 3: Click "Trim From" button when you want to begin your trimming. Click "Trim To" button where you want to stop your trimming.
After you set trim time, the length of the captured clip will be shown in the Select Length box for your reference.
Tip 2: Snapshot:
Click "Snapshot" button on the right bottom of the preview video window and the current picture in the Preview window will be captured and saved.
Click "Folder" button to open the folder where the captured images are saved. As default the captured image will be saved at users' My Documents\Tipard Studio\Snapshot.
Click "Preference" menu, you can reset the snapshot folder and the type of your captured image: JPEG, GIF or BMP formats.
Tip 3: Preferences
Click "Preferences" menu to adjust the settings related to conversion
It includes the output folder, snapshot folder, image type, conversion done, CPU usage.
Step 4: Convert
After all the steps above are done, click the right button on the interface to start to convert video to QuickTime.

 Top 6 Methods to Convert FLV to MP4 on Mac
Have no idea how to watch FLV videos on Mac? Get top 5 FLV to MP4 freeware to convert FLV to MP4 on Mac for free.
 How to Convert GIF to MP4 with Top 15 Methods
What should be the best method to convert GIF to MP4 files? Check out the best 15 solutions from the article now.
 Top 20 MP4 to MP3 Converter Software
Want to have easy access to convert MP4 video to MP3 audio easily? The following article suggests 20 Converters.
 Top 10 MOV to MP4 Converter for Windows and Mac
What should be the best video converter to turn MOV into MP4? Check out the 10 best MOV to MP4 converters you should know.