
Best Solutions to Put Videos on Apple TV
How to convert videos files to Apple TV with Video Converter? Read this article and find all the answers.
1. How to install this Apple TV video converter for you to convert.
Step 1. Download Tipard Apple TV Video Converter installation file.
Step 2. Double click the downloaded installation file to start installation.
Step 3. Follow the instructions to finish the installation.
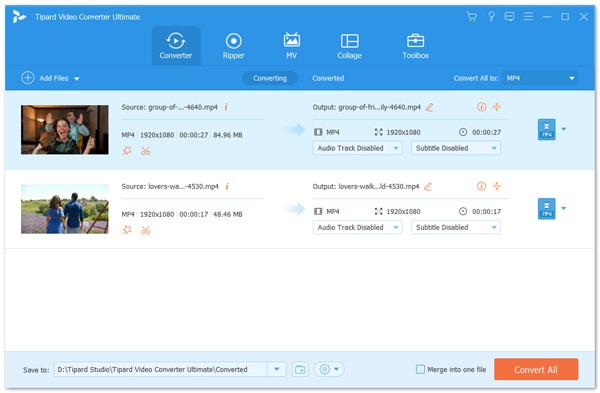
After your install the Apple TV Video Converter software, you will see the following sceenshot.
2.How to import video files.
Click "Add Files" or File menu to load video and audio files and select the file format. You also can drag the files to the interface directly.
3.How to set the output settings
After you select the files you want to convert, you can set the output settings for the conversion under preview window and the audio content list.
Profile: Select the output format.
Settings: Click "Settings" to open the Settings window.
In the Video Settings, you can select Encoder, Frame Rate, Resolution and Video Bitrate to convert your movie.
In the Audio Settings, you can select Encoder, Channels, Bitrate and Sample Rate to convert your movie.

4.How to get any time-length episode from your video files.
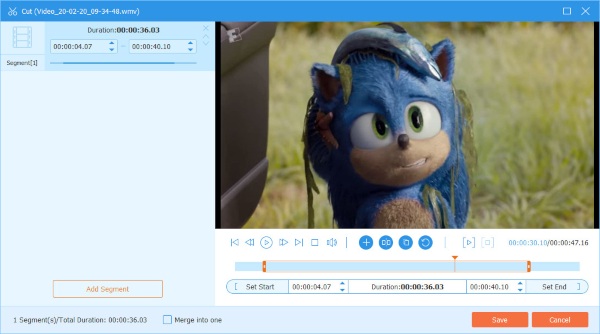
Tipard Apple TV Video Converter allows you to cut your movie, so you can capture your favorite clips from your movie.
Click "Cut" to open the Trim window. Tipard MP4 Video Converter provides you three methods to trim your video length.
Method 1: Enter the start time in the Start Time box and click OK, then enter the end time in the Set End Time box and click OK.
Method 2: Drag the scissors bars under the preview window when you want to trim, then the time will be shown in the Start Time box and End Time box for your reference.
Method 3: Click "Cut From" button when you want to begin your trimming.
After you set trim time, the length of the captured clip will be shown in the Select Length box for your reference.
5.How to crop your movie play region
Tipard Apple TV Video Converter allows you to remove the black edges around your movie video and customize the size of video play region. There are three methods available to crop your video:
Method 1: Crop by selecting a crop mode
Select a crop mode in the Crop Mode drop-down list and click OK to save the crop. There are six pre-set crop modes for your choice: No Crop, Cut off Top and Bottom black edges, Cut off Top black edge, Cut off Bottom black edge, Cut off Left and Right black edges, Cut off All black edges.
Method 2: Crop by adjusting the crop frame
The crop frame is the yellow line around the movie video. There are eight small adjustment boxes on the crop frame. Each adjustment box allows you to crop the movie video from a different position. To crop your movie video, you can just move your mouse cursor to an adjustment box and drag the crop frame.
Method 3: Crop by setting the crop values
There are four crop values on the lower right part of the crop window: Top, Bottom, Left and Right. You can set each value to crop your movie video, and the crop frame will move accordingly.
You can also set the output aspect ratio from the Zoom Mode according to your need. There are four choices available: Keep Original, Full Screen, 16:9 and 4:3.
Keep Original: Keep the aspect ratio of the crop size.
Full Screen: Stretch your cropped video to fit for the aspect ratio of the resolution setting.
16:9: Stretch your cropped video to fit for the aspect ratio of 16:9.
4:3: Stretch your cropped video to fit for the aspect ratio of 4:3.
Note: After you crop your video and set the zoom mode, the result can be previewed in the Preview window of the program main interface.
6. How to merge your selected contents into one file.
If you want to join your selected chapters or titles into one file you can check the "Merge into one file" option. As default the merged file is named after the first selected file (either a title or a chapter).
7.How to capture your favorite pictures when you preview
Click "Snapshot" button and the current picture in the Preview window will be captured and saved.
Click "Folder" button to open the folder where the captured images are saved. As default the captured image will be saved at users' My Documents\Tipard Studio\Snapshot.
Click "Preference" menu, you can reset the snapshot folder and the type of your captured image: JPEG, GIF or BMP formats.
Tip: Tipard Apple TV Video Converter upgraded the effect function, it is avialable to set deinterlacing function, which can convert interlaced video to the progressive video, this function can optimize the video effect. And added more powerful encoders and decoders.
8.How to start the conversion
Before you start conversion, click "Preference" menu to adjust the settings related to conversion.
After Converting Done: You can choose to "Shut Down" your computer or "No Action" after the conversion.
CPU Usage: You can choose the max CPU Usage for your computer: 50%, 60%, 70%, 80%, 90%, 100%.
After you finish the pre-settings, you can just click "Start" button to start.

 Top 10 Free MP4 to WMV Converter Apps
Looking for the best MP4 to WMV converter software? You can learn about 10 best WMV converter applications for Windows PCs, Mac computers and online.
 Top 10 MP4 to MOV Converter Software for You
This post tells you top 10 MP4 to MOV converters. With them you can convert MP4 to MOV on your computer or online without installing any software.
 Top 10 MOV to MP4 Converter for Windows and Mac
What should be the best video converter to turn MOV into MP4? Check out the 10 best MOV to MP4 converters you should know.
 Get into or Out of iPhone Recovery Mode
Fix iPhone recovery mode here. With the detail guide of this article, you can success to enter or exit recover mode easily.