
Did your Adobe Media Encoder get stuck halfway while you were encoding? That's no surprise, as everyone experiences the same issue. It can be quite frustrating, especially when exporting or rendering large video files and complex projects. The issue arises from various reasons, including insufficient system resources and incorrect export settings. The good news is that this issue can be resolved. There is no need for technical skills, but diligent research is essential. Luckily, you've come across the solution for this kind of need. Without further ado, explore the best troubleshooting steps to resolve Media Encoder when it gets stuck during encoding or fails to export.

Part 1. Why Adobe Media Encoder Gets Stuck
Although Adobe Media Encoder is a powerful video encoding tool, it occasionally freezes, hangs, or gets stuck during exports. If you are also experiencing this occasionally or it bothers you frequently, there are reasons why this occurs. Understanding the root causes will help you troubleshoot and prevent these frustrating interruptions.
1. Bugs and Software Integration Problems
Adobe Media Encoder is a component of the Adobe Creative Cloud suite, and conflicts, integration issues, version mismatches, or bugs may cause freezing. It is possible that running apps are causing interference that conflicts with AME processes. Some apps include antivirus software, cleanup tools, and more. Meanwhile, running an old version of AME or an unsupported operating system may lead to instability.
2. Misconfigured Export Settings
If you use mismatched settings and unsuitable presets, AME will also freeze and stop working. One example is exporting 60fps video in a 30fps timeline without proper adjustment. Another is unsupported codecs. Third-party codecs, such as H.265 or HEVC, may not be fully compatible with AME. You may also try converting HEVC to MP4 for seamless encoding when encountering software hangs.
3. Corrupted Media Files
Corrupt source files can result in damaged video clips, particularly those from screen recordings and cameras. These files could cause AME to get stuck. For video formats like WebM with alpha transparency, it could hang if not properly configured. At last, AME is having trouble playing smartphone videos that use VFR.
4. Limited System Resources
Since Adobe Media Encoder is a resource-intensive application, it may freeze if your computer does not meet the minimum requirements or if multiple applications are running in the background. Especially when encoding high-resolution videos, such as 4K, 8K, or HDR, it requires significant memory. For those unfamiliar with 4K resolution, this dramatically increases system demands. On the other hand, GPU bottlenecks are a contributing factor, as some effects and formats rely on GPU acceleration for their implementation. Therefore, it will cause hangs if your Mac's GPU is underpowered or older (like those Intel-based).
Part 2. How to Fix Adobe Media Encoder Stuck
If your Adobe Media Encoder is still stuck or constantly freezing on your Mac, do not panic. Here are some proven fixes to help you resolve encoding issues and ensure smooth exports.
Step 1 Restart the Mac and the app
First off, close the Adobe Media Encoder app on your computer. Then, restart your Mac. Once your Mac boots up again, relaunch AME. This process clears temporary irregularities and resets system resources. That is, the Mac Adobe Media Encoder stuck on OS X and other versions of Mac is resolved.
Step 2 Get the latest version of the app and macOS
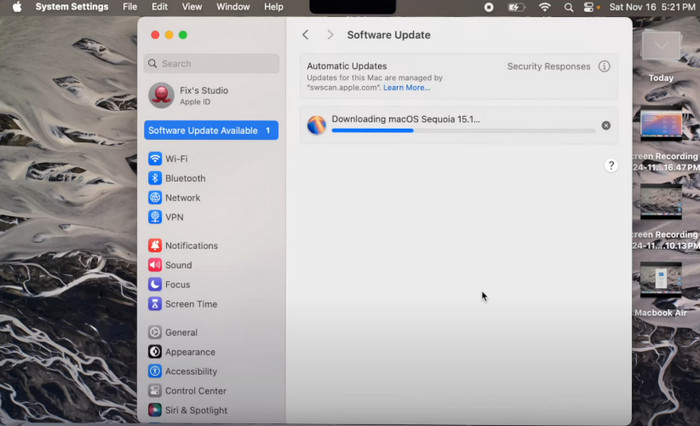
This time, you can update Adobe Media Encoder and your macOS. Go to Creative Cloud Desktop > Updates. From here, install the latest version of Adobe Media Encoder. To update your macOS, go to macOS updates and navigate to Apple Menu > System Settings > Software Update. This process will eliminate any bugs in the integration.
Step 3 Clear cache and reset preferences
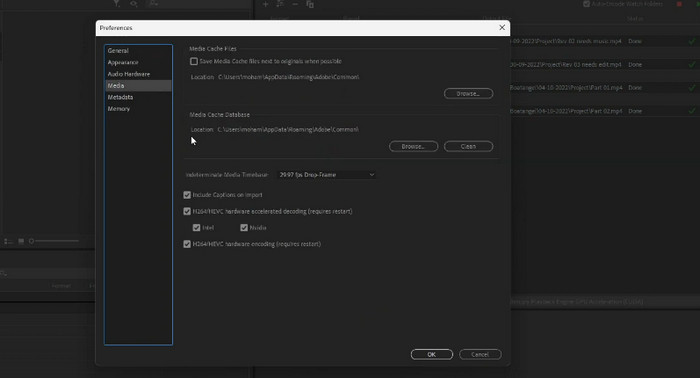
You can also reset preferences and clear the cache of the app. Hold Option + Command upon launching Adobe Media Encoder to reset preferences. Now, navigate to Preferences > Media Cache and hit Clean to delete corrupted cache files.
Step 4 Optimize export settings
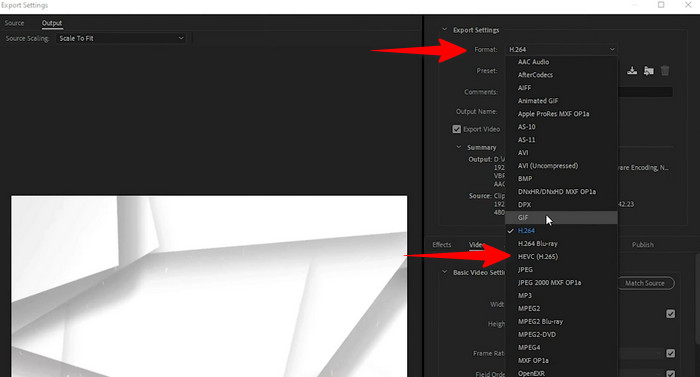
Try reducing the resolution and avoiding unsupported codecs, such as certain HEVC variants. For problematic files, it is best to convert them to MP4 first. If the Media Encoder is stuck at the end, that is the solution to this problem.
Part 3. The Best Way to Encode a Video on Mac and Windows
When Adobe Media Encoder or AME fails to work properly, Tipard Video Converter Ultimate emerges as an excellent alternative for Mac and Windows users. This software supports a wide range of video and audio formats and codecs to ensure compatibility. With this program, you may encounter compatibility issues, as it supports nearly all formats that AME may struggle with. You can convert between formats, including MKV, WebM, MP4, and specialized codecs such as ProRes. Apart from that, the tool can compress large videos without noticeable quality loss for better clarity and sharpness. Beyond conversion, it comes with a versatile suite of editing features. You can perform precise video trimming and frame-accurate cutting. Additionally, users could merge and combine videos seamlessly. There are also features for advanced audio editing, including volume level adjustment and audio normalization, to achieve balance across clips.
Step 1 Get the Program
Download the program by clicking the Free Download located below the description. You may install a Mac or Windows version of the app. Once installed, launch it on your computer.
Step 2 Import a Video File
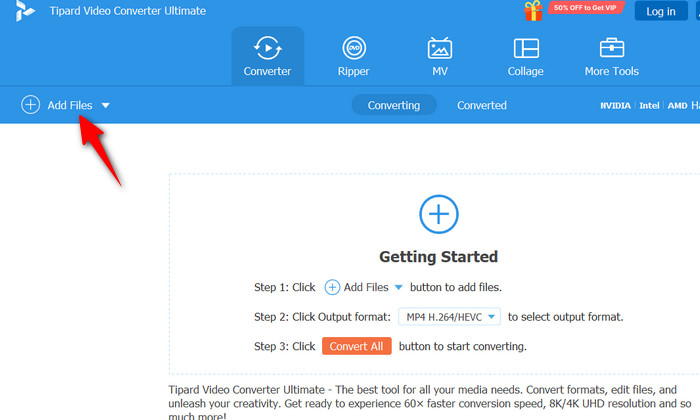
After launching the program, click the Add Files button or drag and drop your desired videos into the interface.
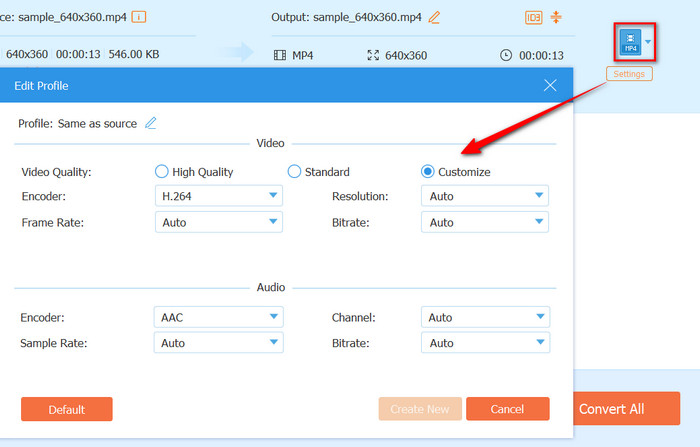
Step 3 Adjust the Export Settings
One of the many advantages you can enjoy from this program is customizing the output settings to your preference. To do it, select a preset profile by ticking the Profile menu. Choose an output format and tick the Settings option under the Profile menu. Then, choose a video format and adjust the codec, resolution, audio, or bitrate.
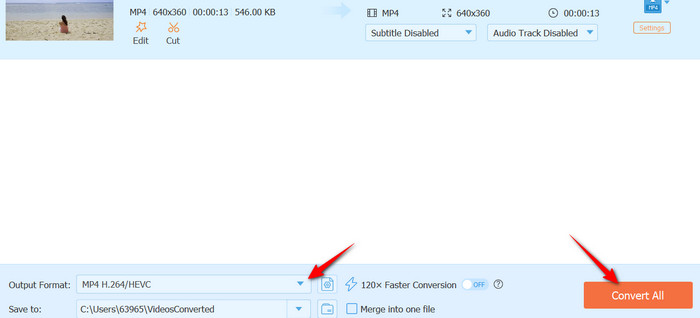
Step 4 Export the video
You can edit the Output Folder to set the location where you wish to save the output video. Next, click the Convert All button at the lower right-hand interface. You have just encoded and exported a video without any Media Encoder render stuck.
Part 4. Other Adobe Media Encoder Issues and Fixes
Sometimes, it does not end with resolving the freezing issues; users of Adobe Media Encoder face other frustrating issues. Here are some typical problems and their fixes:
1. Slow encoding speeds can be a problem. You can fix this problem by turning off background apps or enabling GPU acceleration in your General settings.
2. When the AME app won't open, you can reset preferences while launching the app. If it still fails, try uninstalling and reinstalling Adobe Creative Cloud.
3. There are also instances where the export fails at a rate of 99%. Disk space issues and a corrupt cache often cause this issue. To fix it, ensure your computer has at least 10 GB of free storage space, then clear the cache of AME.
Conclusion
Issues like Adobe Media Encoder getting stuck on connecting projects can be annoying. Fortunately, most issues can be resolved by optimizing settings, clearing caches, and updating software. For persistent issues, try alternatives like Tipard Video Converter Ultimate for crash-free encoding.
More Reading


About the Author
