
CDA files can feel useless on their own because they do not store real audio; they only point to the tracks on your CD. You cannot copy them, and they will not play on phones or music apps. So, why don't you just convert CDA to MP3? MP3 is easy to use, works on all devices, and keeps your songs safe.
If you have decided, please read the following parts below to learn how to change CDA to MP3 step by step.

Part 1. What Is a CDA File
A CDA file is not real music but a tiny shortcut made by Windows when you play an audio CD. Each track on the CD gets its own CDA file, which is only 44 bytes in size. These files hold track information and tell the computer where the music is on the disc. However, they do not store the actual sound. If you move a CDA file without the CD, it will not play. That is why you need to copy or convert the music from the CD to your computer if you want to listen without the disc.
Part 2. How to Convert CDA to MP3 on Windows/Mac
1.Windows Media Player
Windows Media Player offers the most direct way to convert CDA files into MP3. It created the CDA format, so the two work well together. Most Windows computers already have this program installed, so you may not need to download anything. If it is missing, you can still get it for free.
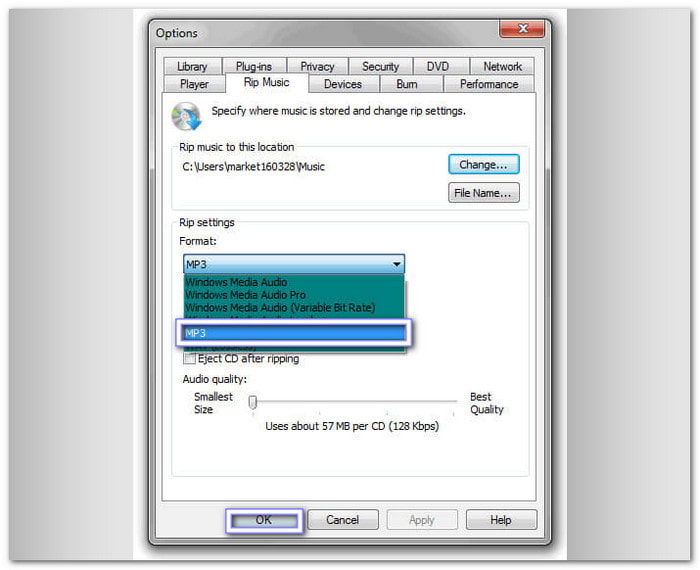
Step 1 Run Windows Media Player on your desktop and click the Organize menu, then choose Options to open the ripping settings.
Step 2 In the settings window, select Rip Music and pick MP3 as your target format. Also, choose the folder where your audio will be saved.
Step 3 Insert your CD into the computer. If you do not have a CD drive, connect an external one.
Step 4 At the top of Windows Media Player, press Rip CD to start copying your music.
Step 5 Please wait until the ripping is done, then check your chosen folder for the saved MP3 files.
2.iTunes
Many people use iTunes for music management, but not everyone knows it can also convert a CDA audio file into an MP3. iTunes lets you choose the encoder, and once you pick MP3, it imports your CD tracks in that format. It is a simple option if you already use iTunes for your music library.
Step 1 Insert the CD into your computer and run iTunes. Make sure the CD shows up in the program.
Step 2 On Windows, click Edit > Preferences. On Mac, click iTunes > Preferences.
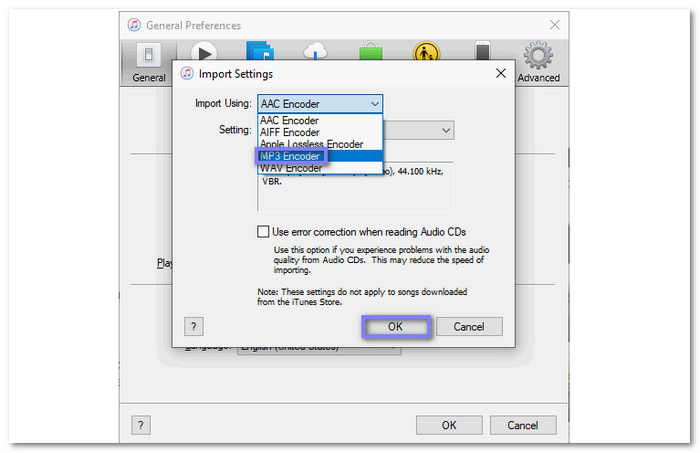
Step 3 Under the General tab, click Import Settings, then set the import option to MP3 Encoder. After that, click OK to save changes.
Step 4 Go back to iTunes and select the CD tracks you want to import.
Step 5 Click Import CD, please wait until the process finishes, and then check your iTunes library for the new MP3 files.
3.VLC Media Player
Some players only play audio, but VLC goes much further. This free, open-source program can read CDs, DVDs, and many file formats. On top of playing media, it also offers a conversion feature that lets you convert a CDA file format to MP3. VLC works on Windows, Mac, and even Linux, so you can use it no matter what computer you own.
Step 1 Launch VLC Media Player and insert your audio CD.
Step 2 rom the top menu, click Media > Convert/Save.
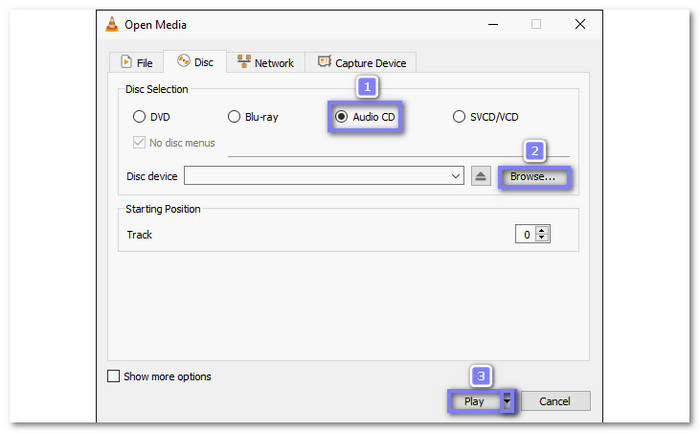
Step 3 Switch to the Disc tab, select Audio CD, and pick the tracks you want to convert.
Step 4 Click Convert/Save, then choose MP3 as your output format.
Step 5 Press Start to begin the conversion, and once it finishes, your MP3 files will be saved on your computer.
4.Format Factory
Some tools can handle many file types, and Format Factory is one of them. This free converter works with audio, video, and images, while also letting you rip CDA to MP3 format. It is ad-supported, but it makes up for that with its range of features. If you want an all-in-one program that converts and rips, Format Factory is a solid pick.
Step 1 Install Format Factory on your computer, then insert your audio CD.
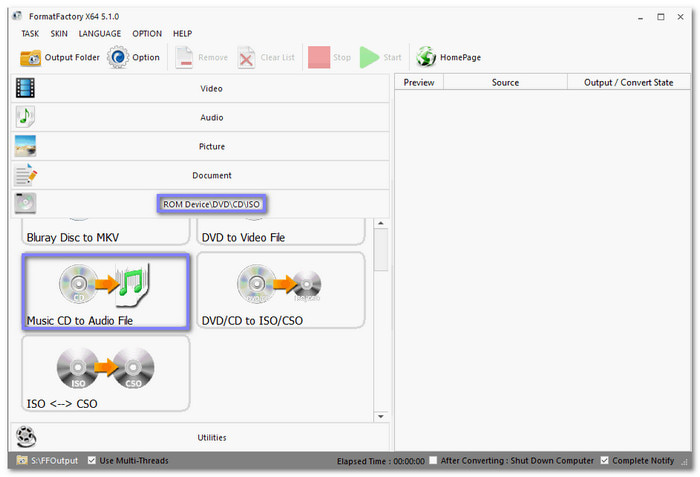
Step 2 Open the program and on the left sidebar, click ROM Device/DVD/CD/ISO.
Step 3 Select Music CD to Audio File, then choose your CD drive from the list.
Step 4 Pick MP3 for the output setting and adjust the quality if you want.
Step 5 Click Convert, please wait for the conversion process to finish, to get your converted audio file.
Part 3. How to Convert CDA Files to MP3 Online
1.Convertio
Convertio supports CDA to MP3, along with many other formats, allowing you to convert OGA to MP3, 3GP, and AMR formats, too. You can even upload files from Google Drive or Dropbox. It allows batch conversion and has a clean interface, but the free version limits uploads to 100 megabytes.
Check the steps below to learn how to change CDA to MP3 format using it:
Step 1 Go to the Convertio website and click Choose Files to upload your CDA files from your device. You can also bring in files from Dropbox or Google Drive.
Step 2 From the output menu, select MP3 as your target format.
Step 3 Hit Convert to start the process. Once finished, click Download and save the MP3 files to your device.

2.Restream
Not all online tools need sign-ups, and Restream proves that. You can drag and drop your CDA file, convert it straight to MP3, and download it for free without creating an account. The site shows your file size, which helps you keep track. It is simple, quick, and also works with AIFF to MP3 conversion.
Rely on the guide below to learn how to turn CDA files into MP3 using Restream:
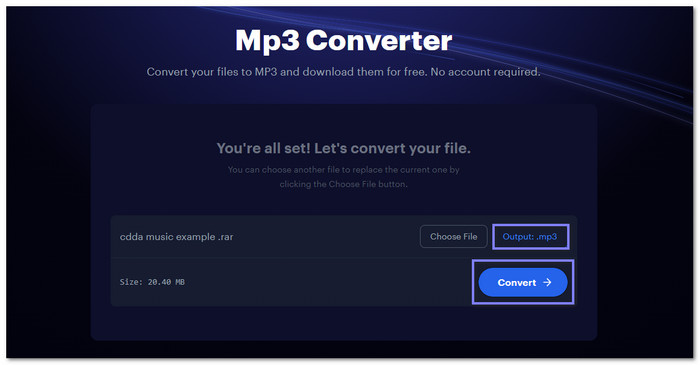
Step 1 Visit the Restream - MP3 Converter website and drag your CDA file into the importing section.
Step 2 The output format is already set to MP3, so you do not need to adjust anything.
Step 3 Press Convert to initiate the process. When the conversion ends, download your MP3 file and store it on your computer or device.
Part 4. How to Record CDA to MP3 Without Quality Loss
In this section, we will teach you how to record CDA to MP3 without quality loss using Tipard Screen Capture. The best part is you get clear sound since it records system audio only, with no background noise. It is easy to use, and you can even set auto stop or task schedule, so you do not need to sit and wait. It also has trim options to cut parts you do not need. Your recordings are saved locally, and you can preview them right after finishing.
Step 1 Download and install Tipard Screen Capture on your computer. There is a version for both Windows and Mac. Once installed, open the program and click on Audio Recorder from the main interface.
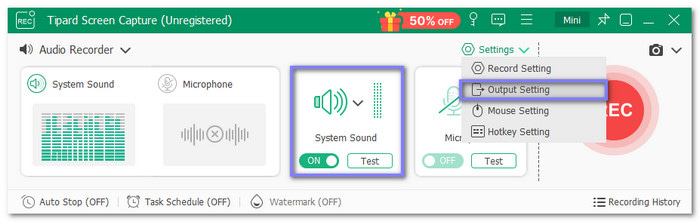
Step 2 Before recording, make sure the System Sound switch is turned on and the Microphone is turned off. This way, it will capture only the CD audio without outside noise. You can also go to Settings > Output Settings to pick a folder for saving files and select MP3 as the output format.
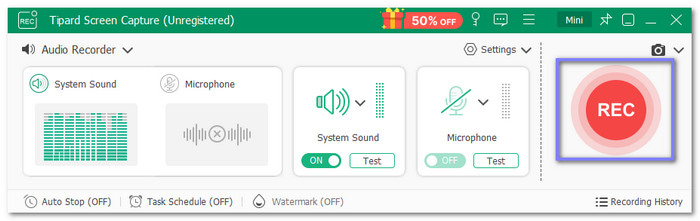
Step 3 Insert your CD into the computer's drive. Start playing the CDA tracks you want to record. Then, click the big REC button in Tipard Screen Capture to begin recording the audio.
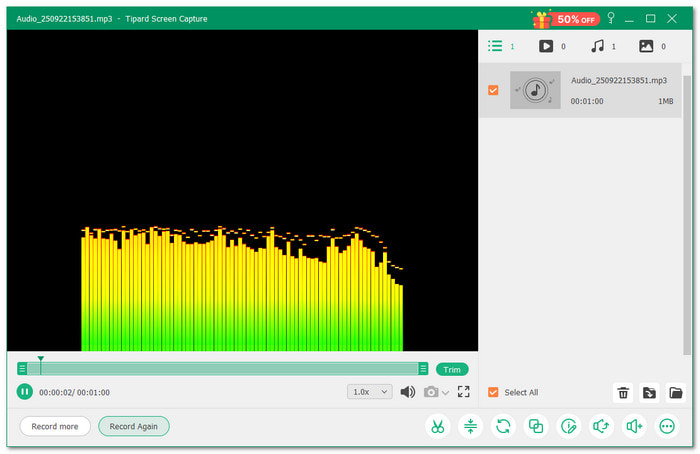
Step 4 Let the CD play through. Once it finishes, stop the recording. The audio file will be saved automatically in the folder you selected earlier. Now, you will have your CDA tracks saved in high-quality MP3 format on your computer.
Conclusion
Discovering how to convert CDA to MP3 is helpful because MP3 files are easier to play, share, and store on any device. With the tools mentioned above, you can do this in simple steps. And if you want the best sound without losing quality, you can rely on Tipard Screen Capture to record CDA to MP3 on your Windows or Mac computer.
More Reading


About the Author
