Step-by-Step Process to Remove Sound from Video Easily
When recording videos, you sometimes cannot avoid noises that you did not know would be heard on your recording. For instance, you are already done recording a video for your project. But when you watch and listen to the video, you hear the bark of your neighbor's dog; that is quite frustrating. In this case, your option will be to record another video.
But you do not need to hassle me when that situation happens again. Because in this post, we will help you remove the audio of your video or to remove the background noise in it. Therefore, read this article comprehensively to learn the complete process of how to remove audio from video with the best audio editing applications.

Part 1. Best Way to Remove Audio from Video
Removing audio from a video can be tricky. But did you know you can remove the audio of a video file by muting it? You do not need professional or unique editing applications to remove the sound of your video. So, in this part, we will show you one of the most used audio editing software that can help you remove the audio from your video.
Tipard Video Converter Ultimate is among the most popular video and audio editing programs you can use on your Windows and Mac devices to remove music from the video. This offline software can help you remove the audio by muting it. Using the Converter feature, you can disable or mute the audio for your video without having a hard time. Additionally, it supports almost all video and audio formats, such as MP4, AVI, MKV, MOV, FLV, AAC, WMA, MP3, and 500+ other formats. You will also be able to upload high-quality files easily because it supports video and audio files with high-quality.
Moreover, it contains tons of advanced editing features for editing videos and audio, including an audio compressor, audio sync, volume booster, video merger, color correction, and more from the toolbox. Many beginners will also not have a hard time using this application because it has an intuitive user interface. Therefore, if you want to remove the audio of your video, follow the steps below.
How to remove audio from video or mute video using Tipard Video Converter Ultimate
Step 1First, download Tipard Video Converter Ultimate by clicking the Download button below. After downloading the app, follow the installation process and launch it on your device.
Step 2And then, on the main interface, go to the Converter panel. On the settings of your video, click the drop-down arrow on the audio channel.
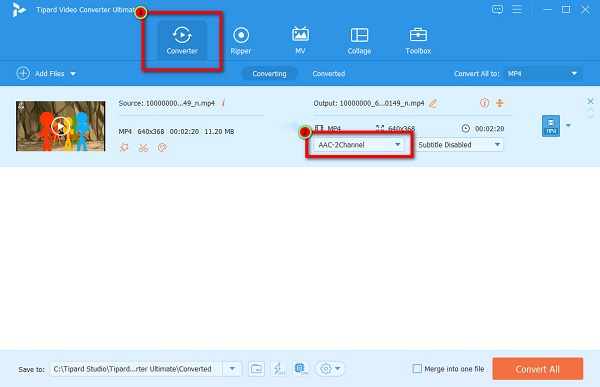
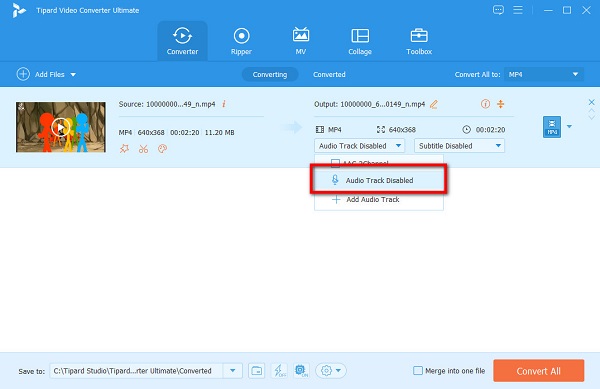
Step 3On the pop-up menu, you will see options for the audio of your video. Select the Audio Track Disabled option to remove the audio of your video.
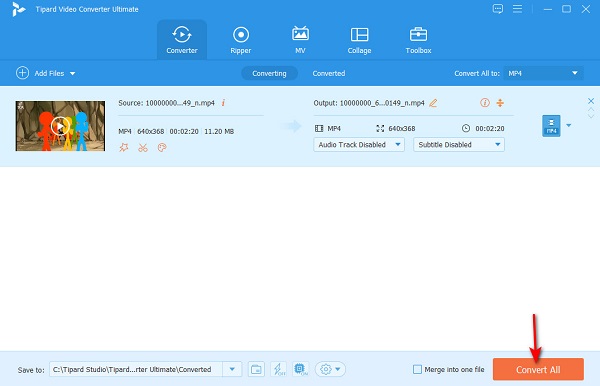
Step 4And finally, click the Convert All button located at the bottom right corner of the interface to process your file. Tipard Video Converter Ultimate will automatically save your output.
Part 2. How to Mute a Video on Macbook
Some applications are available if you are using a Mac device to edit videos. There is a built-in application that you can use for removing the audio of your video file. So, if you want to remove music from video on your Macbook or Mac computer, read this part further.
You may have heard about or seen QuickTime Player on your Mac device. It is a discontinued extensible multimedia framework that allows you to preview video files on your Mac computer. It is the standard media player for Mac and supports the most standard formats for Apple devices, like MKV, MOV, MP4, and more. QuickTime Player is not just limited to streaming video files. You can also transcode, encode, and even mute your video's audio. Moreover, QuickTime Player is relatively easy to use. Even though you do not know about it, you can surely use it to mute sound from your video.
Below, we will show you the steps to remove audio from a video using QuickTime Player. Whether you are using QuickTime 10 or an earlier version of QuickTime, we got you covered.
How to Remove Audio from Video Using QuickTime Player 10
The latest version of the QuickTime Media Player is QuickTime 10. It is free to use and pre-installed on your Mac devices. Without further ado, here are the easy steps to mute audio using QuickTime Player 10.
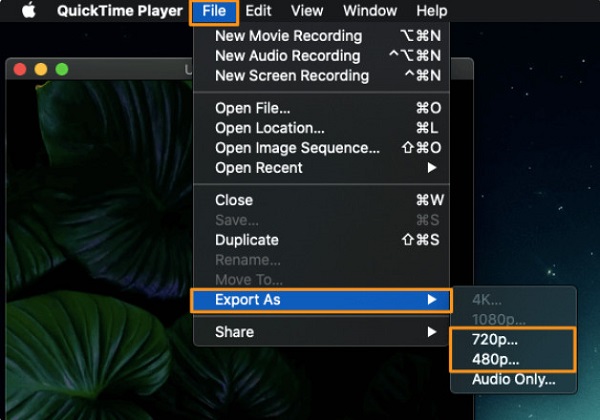
Step 1Open QuickTime Player 10 on your Mac device. Then, import the video you want to mute by going to File > Open File.
Step 2After the video file is uploaded, go to the Edit menu at the interface's top side. And then, click Remove Audio from the pop-up menu.
Step 3Once you click the Remove Audio, QuickTime will automatically remove your video's audio. Now, we will save your output by going to the File menu on the menu bar. Select the Export As button from the resulting drop-down menu.
Step 4Next, type the name you want your video to have using the Export As button, then choose your video's location.
Step 5Lastly, hit the Save button to save your output on your device.
How to Remove Audio from Video Using an Earlier Version of QuickTime
Step 1Launch the QuickTime Player earlier version on your Mac device. Import the video file you want to remove audio with QuickTime by navigating File > Open File.
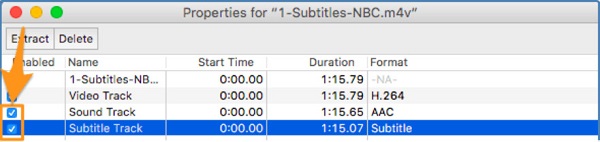
Step 2Next, tick the Window menu from the menu bar at the interface's top section. Click the Show Movie Properties from the resulting drop-down menu.
Step 3And on the following interface, you will see every audio track associated with your video is listed on the Movie Properties window. Locate the audio track you want to remove from your video.
Step 4Untick the checkbox beside the audio track you want to remove in the Enabled section. By doing this process, the audio track from your video file will be removed.
Part 3. Remove Sound from Video Online
If you are among the people who love using online tools for convenience, then we have the answer for you. The good thing about using online applications is that you do not need to download or install anything on your device. All that you need is your browser and a stable internet connection. Also, there are tons of tools that you can access to remove audio from your video online. And in this section, we will show you a good tool to mute your videos online.
How to use Clideo to remove audio from your video
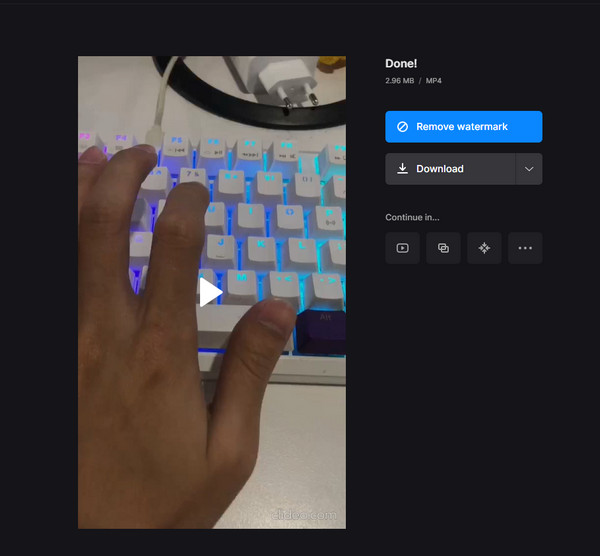
Clideo is listed among the best online tools that you can use to mute the audio for your video. This video muter online is accessible on almost all web browsers, including Google, Firefox, and Safari. Also, it has a simple user interface, making it a user-friendly application. Moreover, removing audio from Clideo is easy. Just upload the video file, then Clideo will automatically remove the audio. Another good thing about Clideo is that it does not have ads that might distract you while removing audio. However, the output that Clideo produces contains a watermark, which you need to remove before uploading it on other platforms.
Step 1To begin, open your browser and search Clideo video muter in the search box. Then on its main user interface, click the Choose Files button.
Step 2Wait for your video to be uploaded, then Clideo will automatically remove or mute your video's audio.
Step 3Finally, you can remove the watermark from your output (which will require you to sign in for an account) or save the output. After clicking the Download button, your output will be saved on your device.
Part 4. How to Delete Audio from Video on Android and iPhone
You do not need professional video editing software to remove the audio from your video. With your Android device, you can mute the sound of your video file, add special effects, personal voiceover, or add different music to it. You can remove or mute your video's audio by installing the best audio remover app for Android.
1. PowerDirector (Android)
PowerDirector is among the most famous video editing apps you can download on your Android device. PowerDirector lets you remove the sound of your video in just a few clicks. It has a clean and easy-to-use interface, which makes it a beginner-friendly application. In addition, PowerDirector has many editing features that you can use for editing your video and audio file. With this app, you can add text to your video, overlay images, and even add special effects.
Furthermore, PowerDirector is free and safe to use, so you do not need to worry about the price of it. Plus, it has an easy exporting and saving process, making it a convenient tool. You can also use the app's audio mixing feature to edit your video's audio. But, to use PowerDirector, you need internet access for your device.
How to delete audio from video from Android using PowerDirector:
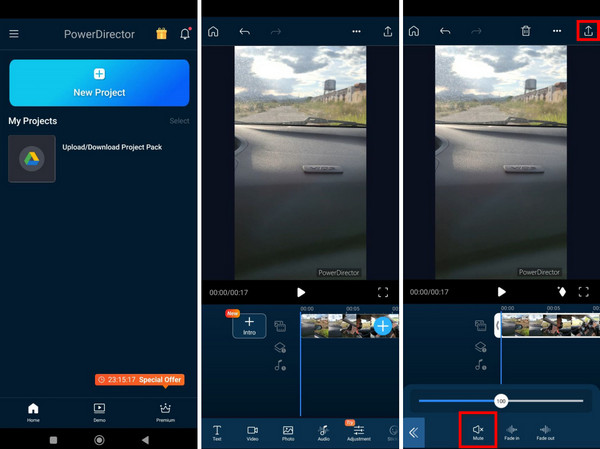
Step 1Install PowerDirector from your PlayStore. After installing the app, open it on your device and tap the New Project option.
Step 2Then, enter the Project Name you want for your output and select the Aspect Ratio for your video.
Step 3Choose the video you want to mute or remove audio, then tap the Next button.
Step 4On the next user interface, tap the video on the Timeline. A list of tools will prompt where you will select the Audio option. Tap Mute to remove the audio of your video.
Step 5Lastly, tap the Export icon button at the top right corner of your screen to remove your video's audio.
2. Photos App (iPhone)
For iPhone devices, you do not need to install any application to remove the sound of your video. With the built-in Photos app of your iPhone, you can edit and mute your video's audio. It is a simple and easy process that anyone can do. So, if your video has a lot of background music, and you resort to removing or muting the audio, then this process is the solution for you. Luckily, the iPhone Photo app has a native feature to remove the sound of your video. The downside of using this process is that you can only remove the video's sound that is supported only by the iPhone.
How to remove sound from iPhone video using the Photos app:
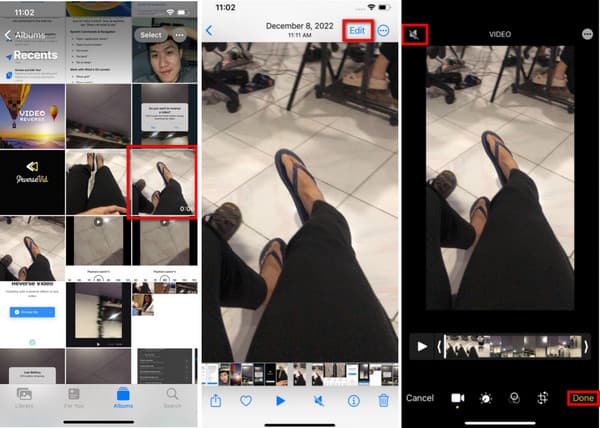
Step 1On your iPhone device, open the Photos app. And then, locate your video and tap on it.
Step 2Right after selecting your video on your Photo app, tap the Edit button at the upper right corner of your screen.
Step 3And on the upper-left corner of your screen, you will see the Sound icon. Tap on it; then your video will be muted.
Step 4Tap the Done button once you are done muting the video. All the changes will be saved, and you can now play your video without the sound.
Part 5. Other Ways to Remove Audio from Video on Desktop
Many people want to remove the audio of their video or delete the audio track from a video they record. This is because of a noisy background or often pauses that have been recorded. That's why many video editors want to remove an audio track.
1. Use FFmpeg
FFmpeg is one of the most used video and audio editing software for computers. This command-line-based software has a different user interface than other editing applications. It is a free, open-source application with libraries and programs to handle videos, audio, and other multimedia files. You can use FFmpeg to transcode, decode, encode, merge, and remove the audio of your video file. Moreover, it is supported by almost all operating systems, like Windows, Linux, and macOS, making it a convenient tool. However, many beginners have difficulty using FFmpeg to remove audio from video because it has a complex user interface. You need in-depth knowledge about this application to be able to edit videos and audio with this application. Nonetheless, FFmpeg allows you to mute or remove your video's audio; therefore, we will show you the steps. In this tutorial, we will show you two ways to remove audio using FFmpeg.
How to use FFmpeg to remove audio from video:
The easiest way to remove or delete audio from a video is to copy the video to another file and discard the audio. This is the most straightforward technique because it does not involve re-encoding the video while you are doing it. Use this command line to remove a single audio file from your video.
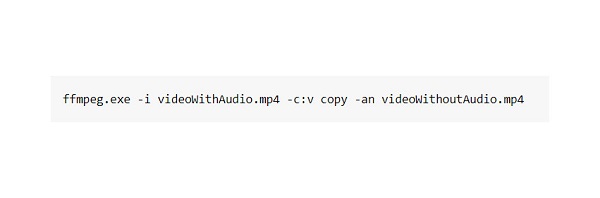
The -c : v copy copies the video track into the new file you set, which is the videoWithoutAudio.mp4
The -an commands the FFmpeg not to copy the audio track from the video.
These commands work effectively if you only have one track from your video file or movie. But what can you use if you have three or four audio tracks on your video? Follow the instructions below to remove a single audio from a video with many audio tracks.
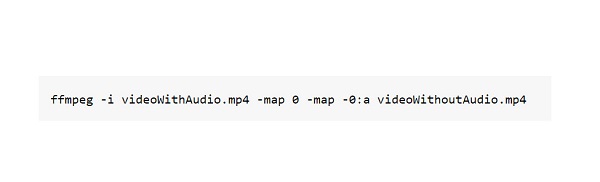
How to remove a specific audio track with FFmpeg:
You can use the map command to remove a certain track from a video with many audio tracks.
The extensive syntax of map command is -map.
input_file_index:stream_type_specifier:stream_index.
You can select the second audio track from your video by typing -map 0:a:1 because the numbering in FFmpeg starts with 0. In our example, your file contains one video track and two audio tracks. You can use -map 0:a:1 to choose the second audio track and copy it to your final output.
-map 0 selects everything from the first input. Therefore, you select everything and de-selecting the audio when you use this command.
If you have five audio tracks and want to select all and leave the first one, then you can use the FFmpeg negative map command. By inputting -map -0:a:0 you are commanding FFmepg to ignore the first audio track and select the other tracks. You can also do negative mapping by using the -an command that we used above.
2. Use Adobe Premiere Pro
If you are searching for a professional background music remover, then we have the software for you. Many professionals use Adobe Premiere Pro to edit their videos. With Adobe Premiere Pro, you can add transitions, and effects, merge videos, add background music to your video, and even remove the sound of your video. What's unique about Adobe Premiere Pro is that it is equipped with many powerful editing tools for video editing enthusiasts and filmmakers. Furthermore, it allows you to enhance and fine-tune your audio and video quality. Adobe Premiere Pro is integrated with other Adobe products, and it allows its users to transfer their work to other platforms. Also, this excellent video editing application lets its user save their outputs in high-quality. Indeed, Adobe Premiere Pro is a standard for video and audio editing.
However, its interface is not easy to use, and it is not free. Follow the simple steps below to know how to use Adobe Premiere Pro to remove audio from video.
How to remove audio from video using Adobe Premiere Pro
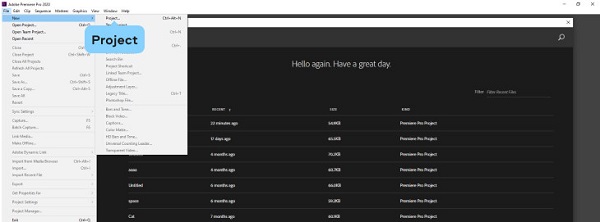
Step 1The first thing that you need to do is download and install Adobe Premiere Pro. After installing the program, open it on your device. Then, on the application's first user interface, click the File button and select the New option to start a new project.
Step 2After, import the video that you want to mute or remove audio. To do this, go to File > Import. Your computer files will appear where you locate your video file and import it.
Step 3Once you have uploaded the video file, you want to mute, hold and drag the video from the Project area going to the Timeline panel. Now, you can edit the video file and remove the audio.
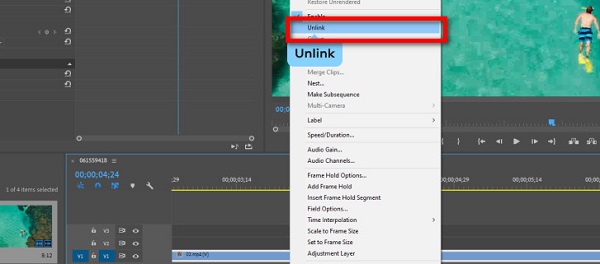
Step 4To remove the audio from your video, there are two ways that you can do it. First, tick the video clip in the Timeline and right-click the video. Click the Unlink button in the new menu that will prompt. This will separate the audio from the video.
Step 5For the next step, we will now delete the audio track. Click the audio and hit the Delete key on your keyboard.
3. Use Windows Movie Maker
Windows Movie Maker is a video editing software where you can mute the audio of your video file. It supports several video and audio formats, like WMV, AVI, WMA, MP3, MP4, WAV, MPG, etc. Windows Movie Maker is designed to function on a Windows laptop or PC. It has a straightforward user interface, which makes it easy to use. The drawback of using Windows Movie Maker is that it is unavailable on Mac devices.
How to mute video sound in Windows Movie Maker:
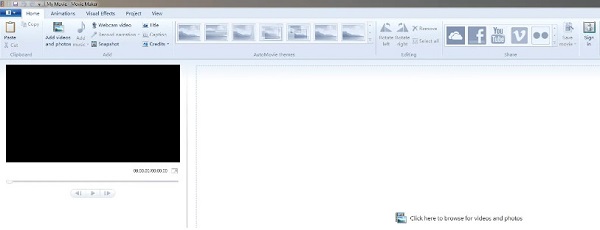
Step 1Import your video file into the Windows Movie Maker interface. Click the Add Videos and Photos icon on the Home tab, then select your video file.
Step 2After uploading your video file, hit the Edit menu to access the video editing tools. If you want to split only a portion of the video, click the Split button.
Step 3Ensure that the clip you want to remove audio is selected. Click the Video Volume icon on the left side of the Edit tab, then move the slider to the left to mute the audio.
Extended Reading:
How to Edit Audio Using the Best Audio Editing Software
How to Use the Best Audio Trimmer Apps to Trim Audio Files
Part 6. FAQs about How to Remove Audio from Video
Can I remove audio from video using VLC?
Yes. Using the VLC media player, you can remove the sound of your video.
Does removing the audio from a video reduce the quality?
No. Removing the background music of a video will decrease the file size of your video. Yet, removing the audio from a video will not affect the quality.
What audio formats does Adobe Premiere Pro support?
Adobe Premiere Pro supports the most standard audio formats, which are MP3 and WAV audio formats.
Conclusion
Phew! That was quite a journey! Now that you know how to remove or mute audio from a video, you can do it excellently on your own. All the applications presented above surely can help you remove audio from video. But if you want a fantastic audio remover tool packed with many advanced editing features and supports numerous audio and video formats, download Tipard Video Converter Ultimate.