How to Stabilize Video in Premiere: Level Up Your Video Editing Skills
Why would you want to learn about Premiere Pro’s video stabilization? Well, in the field of video enhancement, maintaining the steadiness and smoothness of the footage is important to create visually appealing atmosphere. However, even though you use the best tools and camerawork skills, there are still situations when you capture shaky or unstable videos, and this is where the video stabilization function comes into place. This stabilization is a technique for post-production that helps to jittery or rectify shaky videos, giving you a more professional and polished output.
On the other hand, Adobe Premiere Pro is a famous video editing program that offers powerful methods to stabilize shaky videos and enhance your viewing experience with them. Whether you are working with videos recorded on the move or any other shots with instability, Premiere Pro provides stabilization options to bring your video back to a steady state. Thus, allow this article to help you acquire the best ways of Premiere Pro to stabilize shaky video.

Part 1. How to Stabilize Video in Premiere Pro Using Warp
This guide will delve into the Premiere Pro’s simple one-click Warp Stabilizer effect, which involves manual adjustments using the needed points. This stabilization feature is designed to assist you in correcting unstable or shaky videos. It is a popular and easy-to-use option for editing videos, making films, creating content, and improving video quality for those who want to enhance their video quality without extensive adjustments.
Similarly, Adobe Premiere’s Warp Stabilizer analyzes your video’s motion and applies proper adjustments to minimize its jitters, vibrations, and shakes. It works by tracking the selected point movements or even the entire frame, then repositioning or warping its frames to make a smoother motion flow. This process will help you eliminate the distracting movements of the camera and create a pleasant playback.
How to Use the Best Way to Stabilize Footage in Premiere Pro
Step 1Start by launching the newly installed Premiere Pro. Then, click the New Project button to make your new project. After that, upload the video you want to edit by clicking File>Import, then find the video from your Media Browser, right-click it, and click the Import selection.
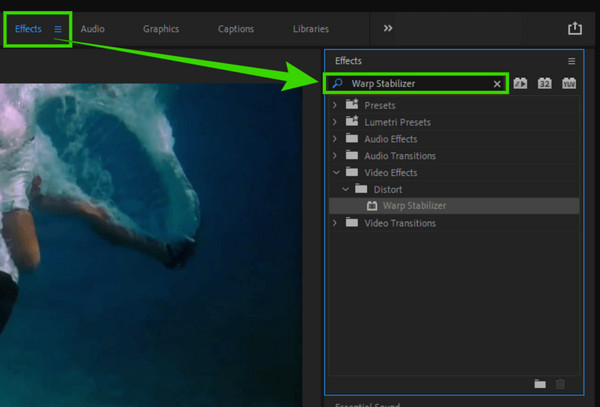
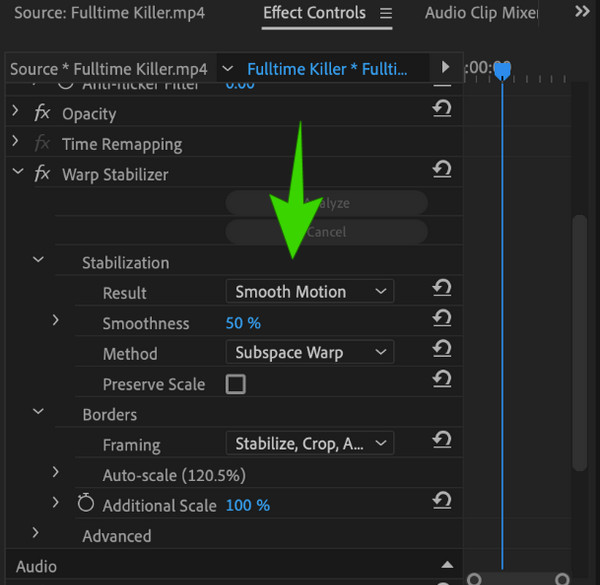
Step 2Now click on the imported video and go to Effects>Distort>Warp Stabilizer. After going to these options, Premiere Pro will begin analyzing your video. Meanwhile, you may proceed to the customization. Adjust the stabilization parameters to enhance the overall video, so click the Result button followed by the No Motion button and select the Smooth Motion option. This will eliminate the shakiness of the actual camera movement of your video file.
Step 3Finally, click the Analyze button to apply the changes. Then, you may check the result and save your edited video after.
Note: Somehow, the compaitble formats of Premiere Pro can be limited and sometimes, you can only import MP4 inot Premiere. So, be sure to check your video format and making it compatible with the ediitng program.
Part 2. How to Stabilize Video Without Warp in Premiere Pro
Many users report that the Warp Stabilizer of Premiere Pro is taking too long to process their output. For this reason, if you think that this function will not suit your needs, then we have a much faster and easier way for you. Use Tipard Video Converter Ultimate, another powerful video editing program that processes video stabilization in just a few clicks. Thanks to the advanced technology infused with its video enhancer utility, where the video stabilizer lies. It is a beneficial tool given the fact that it uses artificial intelligence technology since it will be able to stabilize or reduce the shake while not adjusting anything more. Therefore, it won’t require your expertise to do so, unlike the stabilizer effect on Premiere Pro.
What’s more splendid about the video enhancer/stabilizer of this Tipard Video Converter Ultimate is that it has the ability to remove the noise, upscale the resolution, and optimize the brightness and contrast of your video as well. Not only that, it lets you freely tweak the format, resolution, and segment of your video on exactly the same page, giving you a personal customization of your video output. With this in mind, here are the simple yet detailed steps to stabilize the video using Tipard Video Converter Ultimate.
Step 1Access the Video Enhancer
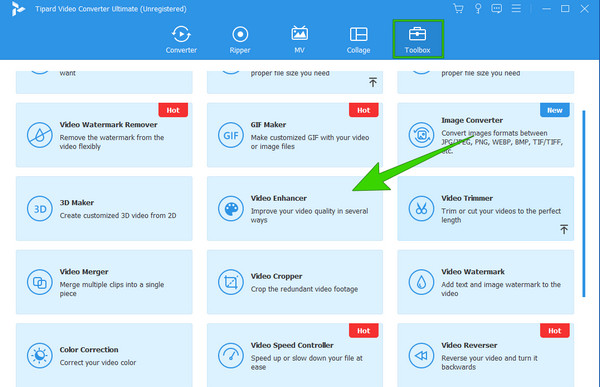
Launch this remarkable video editing program after you acquire it via free download. Once you reach its main interface, click the Toolbox tab menu and search for its Video Enhancer tool.
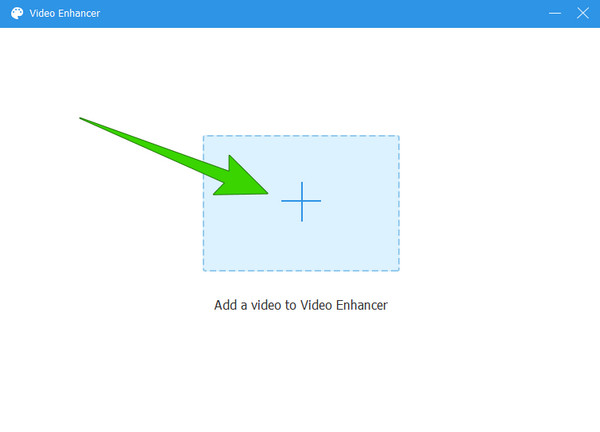
Step 2Upload the Video
After clicking on its Video Enhancer tool, the program will lead you to a new window where the importation of the video happens. Click the Plus button you see at the center of the said window. Now, get the video file from your local storage.
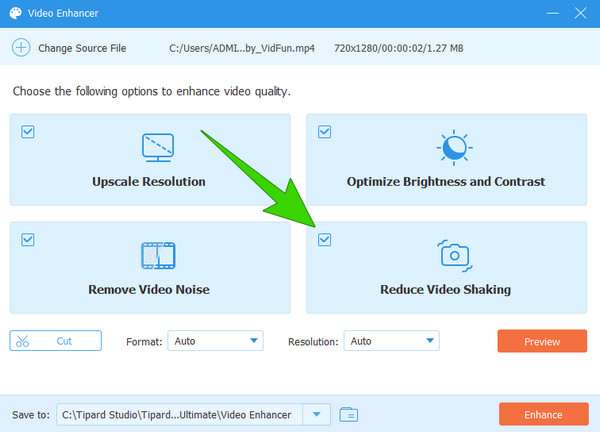
Step 3Stabilize the Video
After that, you will be led to the main window, where you will just need to tick the Reduce Video Shaking option. Also, you can tick the other setting options like Remove Video Noise, Upscale Resolution, and Optimize Brightness and Contrast if you want to apply them too.
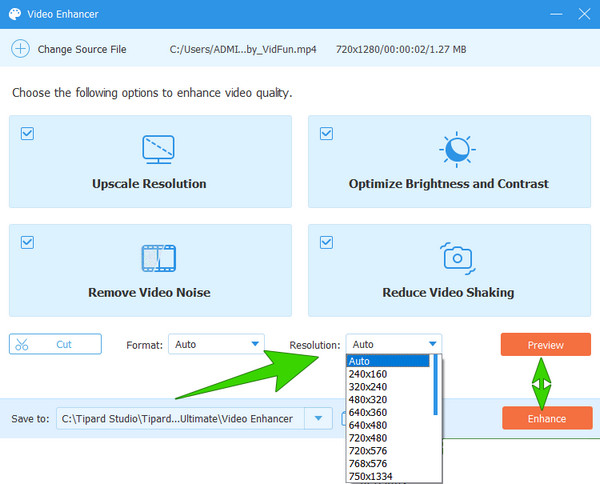
Step 4Additional Setting for Resolution (Optional)
For this additional resolution setting, go to the Resolution section, choose the resolution option you desire, and click it.
Step 5Save and Export the Video
Finally, to save and export the video, click the Enhance button. Otherwise, you double-check the changes first by hitting the Preview button.
Tip: If you find above methods take too much efforts, cropping the video is also a solid and simple solution for shaky video. You can resize the video picture and crop out the shaky part to achieve stablization.
Part 3. FAQs Regarding Video Stabilization
How long will the process of Warp Stabilizer in Premiere Pro take?
The process depends on the duration of the clip you are working on. Therefore, it would help if you cut the clips first.
Why can't Warp Stabilizer and Speed be used on the same clip?
As of this writing, there is still no inherent reason why the two functions cannot be used together.
Why is my slow-motion choppy on Premiere Pro?
The choppy playback in Adobe Premiere, when working with slow-motion footage, is usually caused by different factors such as the resolution, framerate, and other technical aspects of the video.
Is 60 fps good enough for slow motion?
Yes. Sixty fps is considered good enough for creating slow-motion effects.
Can I use After Effects to stabilize videos?
Yes. Adobe After Effects can be used when you need to stabilize your videos. In fact, this program also offers a Warp Stabilizer tool, just like what the Premiere Pro offers.
Conclusion
In conclusion, the only way to stabilize a video in Premiere Pro is with the help of the Warp Stabilizer. Therefore, if you need to use Premiere to remove the shake of your video, then you must master using the Warp. On the other hand, if you are not comfortable using Premiere Pro for this video editing task, then there’s still Tipard Video Converter Ultimate, a much more user-friendly and faster editing tool.