3 Sought-After Techniques to Add Fade Video on a Project Today
One of the most sought-after techniques is the art of fade video because it makes your videos look smooth and polished. Fading helps blend scenes smoothly or softly start and end your videos. This article will show how to fade on different devices, from computers to phones. Learning these tricks can make your videos stand out and impress your viewers. Let's start and learn how to make your videos shine with fades!

Part 1: How to Fade In/Out a Video on Windows/Mac [Easiest & Difficult Ways]
1. Tipard Video Converter Ultimate - Easiest Way to Make a Fade Video
Tipard Video Converter Ultimate offers a straightforward approach to creating fade effects in your videos, making it ideal for beginners and those seeking a hassle-free solution. With its intuitive interface and user-friendly features, Tipard simplifies adding fade effects to your videos.
To fade in or out using Tipard Video Converter Ultimate, simply import your video file, select the desired effect, activate the fade, and let the software handle the rest. Its efficient algorithm ensures smooth transitions without compromising the video quality. For a detailed tutorial, follow the steps below.
Step 1 Download and install the editor on your PC by clicking the appropriate download button. Do the setup promptly and launch it.
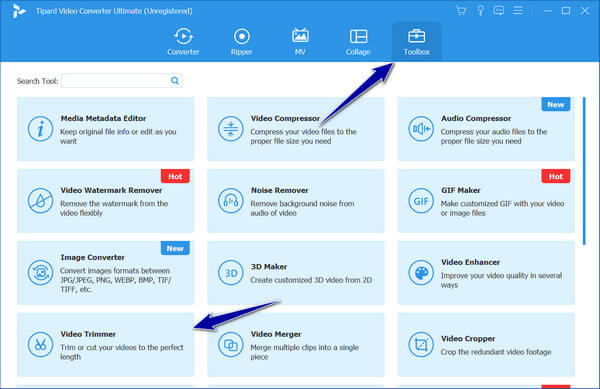
Step 2 Navigate to the Toolbox menu and select the Video Trimmer feature. This will allow you to access options for adding fade-in and fade-out effects to your video.

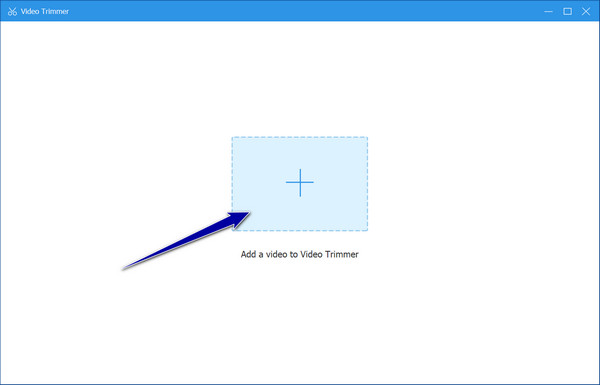
Step 3 Upload the video you wish to edit by clicking the + button within the editing interface.

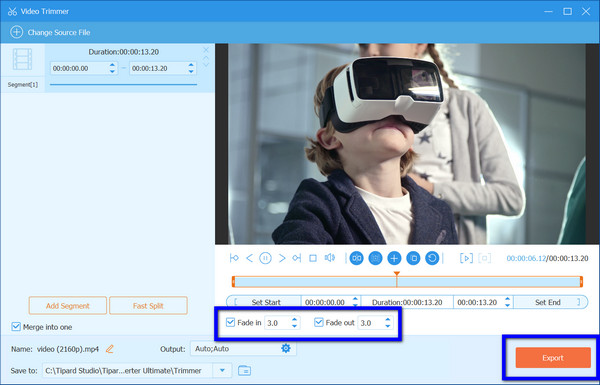
Step 4 Within the Video Trimmer feature, locate and select the Fade In and Fade Out options. Adjust the duration of each effect as desired. Then, tick the Export button to get the final edited version of your video with the added fade-in and fade-out effects.

2. Adobe Premiere Pro
Adobe Premiere Pro's fade-in and fade-out options offer a user-friendly experience with a high level of customization, allowing users to add professional-looking transitions to their videos effortlessly, and it can even improve video quality on Premiere. Its intuitive interface allows users to add fade-in and Premiere Pro beginners and experienced editors to seamlessly access and apply these effects. How do you fade in video with Premiere Pro? Follow these steps to do so.
Step 1 Open Adobe Premiere Pro and navigate to the Effects panel by selecting Window, then Effects. Locate the video or audio transitions within the panel and expand the bin containing the desired transition effect.
Step 2 Drag and drop the preferred transition between the two clips in the timeline where you want the fading effect to occur. Ensure the transition is positioned precisely at the edit point where the clips meet.

Step 3 For single-sided transitions, such as fades, hold down the Ctrl key while dragging the transition to the timeline. Release the mouse when the End at Cut or Start at Cut button appears, depending on whether you want to adjust the transition's end or start, respectively.
Step 4 To adjust the end of the transition at the end of the first clip, use the End at Cut option. Similarly, utilize the Start at Cut option to adjust the transition starts at the beginning of the first clip. This method provides an alternative way to apply a fade effect within Adobe Premiere Pro.

Part 2: How to Fade In/Out a Video on iOS/Android
CapCut is a handy mobile video editing app that lets you edit your videos easily on the go. It offers features like trimming, merging, and adding effects to make your videos look great. One cool feature of CapCut is its ability to add fade-in and fade-out effects smoothly. These effects gradually change the brightness and volume at the beginning and end of your clips, giving your videos a polished finish. CapCut's straightforward interface and powerful editing tools make it a favorite among users who want to create impressive videos from their phones. Learn how to create a fade video with this app by following the steps below.

Step 1 Download the app on your Android or iPhone and launch it. Then, select a video you want to start editing.
Step 2 After uploading the video, go to Effects and select Opening & Closing. Find the Fade In effect and adjust the speed of it by dragging the slider, and it will be placed. Do the same method to add a fade-out effect.
Step 3 Press the upload button to save the final output.
Part 3: FAQs about Fade In and Out Video
What is a fade-in effect in video editing?
A fade-in effect gradually increases the visibility or volume of a video or audio clip from being fully transparent or silent to its full visibility or volume.
Why are fade-in and fade-out effects used in videos?
Fade-in and fade-out effects are commonly used in videos to create smooth transitions between scenes or audio tracks, adding a professional touch to the editing process. They can also help to soften the abrupt beginning or end of clips.
Can fade-in and fade-out effects be customized?
Yes, fade-in and fade-out effects can usually be customized regarding duration, easing type, and other parameters. This allows for precise control over the timing and appearance of the transitions in your videos.
Are fade-in and fade-out effects suitable for all types of videos?
While fade-in and fade-out effects are commonly used in various videos, their suitability depends on the specific style and content. They are particularly effective for narrative storytelling, music videos, and documentary-style content but may only be necessary for some video projects.
How do fade-in and fade-out effects enhance the merged video?
Fade-in and out effects add a professional touch to the merged video by smoothly transitioning between individual clips. The fade-in effect gradually increases the visibility or volume at the start of each segment you edited on a video joiner. In contrast, the fade-out effect gradually decreases at the end, creating seamless transitions and avoiding abrupt cuts.
Conclusion
How do you fade out the video in Premiere Pro? You can copy the steps that we have added in this article. Whether you're a beginner or an experienced editor, incorporating fade effects can add a professional touch, seamlessly blending scenes and creating smooth transitions that captivate viewers. From the straightforward approach of Tipard Video Converter Ultimate to the robust capabilities of Adobe Premiere Pro and the convenience of mobile editing with CapCut, various tools, and methods are available to achieve stunning fade effects. Following the steps outlined in this guide and experimenting with customization options, you can elevate your videos to new heights, impressing your audience and making your content stand out. So, why wait? Start adding fades to your videos today, and watch them shine!


