Where Does OBS Save Recordings: Discovering the OBS’ File Location
The Open Broadcaster Software or OBS Studio is one of the leading live-streaming programs over the internet. It is not only a game streaming site, as many users utilize it because it can also be used for screen recording. Notably, OBS is a pleasurable platform as it has many features that can be used for free. On the same token, the video you worked on with it is not difficult to save on a computer device. However, many users tend to have trouble searching for their saved files. Therefore, the question of "Where does OBS save recordings?" has inclined.
Now, if you are one of those who are unfamiliar with the OBS and its interface, then you are on the right page! In this article, you will discover how to find the recordings and learn how to change the file destination.

Part 1. Where Does OBS Save Your Recordings
There are various file location names OBS uses depending on the system you use. In other words, the OBS record location when you use a Mac computer is different from the location on Windows. Therefore, see the list below to provide you with the information for each platform.
On Mac
For Mac users, OBS saves the recording files inside the Movies directory with a file path name of /Users/(YourUserName)/Movies.
On Windows
For Windows-based computers, the default location for the OBS recording may vary depending on the configuration settings you set. Hence, OBS Studio usually saves in this directory path c:/Users/(YourUserName)/Videos.
On Linux
Meanwhile, Linux OS users can find their recordings in the directory file of /home/(YourUserName)/Videos by default.
Tips: Aside from learning where to find the OBS recordings, you must also have an idea about the supported video formats of OBS. Your recordings will be saved in one of the following formats: MKV, MP4, MOV, and FLV.
Part 2. How to Change The File Destination Where OBS Saves the Recordings
As mentioned above, the default location for your OBS recordings is factored by where you install this program. Correspondingly, you should remember that your file recordings may consume a lot of storage on your computer's hard drive. On the other hand, if you install the OBS Studio in your drive C, your recordings might pile up, which will certainly slow down the performance of your computer. Also, the default file destination is not easy to remember compared to the location you customized. Thus, it would be better to set it to your preferences by following the steps on how to change where OBS saves videos.
Step 1Launch OBS and go to its main UI. Then, hover over to the File tab menu and select the Settings option.
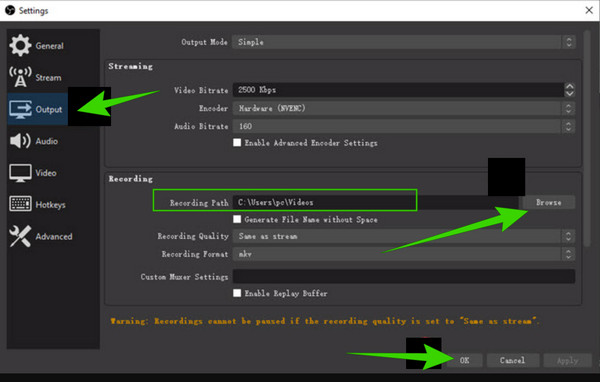
Step 2On a pop-up window, click on the Output option and go to the Recording Path panel. Then, click the Browse button and select the destination folder you want.
Step 3After choosing a folder, hit the OK button.
Part 3. Alternative Way to Record and Edit Videos
Do you want to have an alternative program that will simply and quickly set your destination file while recording a video? Tipard Screen Capture can be your go-to solution to this. It is a remarkable, slick, intuitive program that provides great recording tools you can use even without the internet. This intuitive software is easier to operate and more accessible to various platforms such as Windows and Mac. Furthermore, it can capture and record your whole screen or part of it or just a random active window. Meanwhile, you can customize the input and output audio on the interface. Another good reason to love this program is that it has no limitations on your recording length.
Aside from that, this tool offers shortcut keys or hotkeys on your keyboards. By mastering the hotkeys, you will work like a professional recorder, not to mention the significant attributes shown from its main interface to its output storage, where the advanced tools lie. And by accessing its settings? You will be amazed that this simple program is blasted to various presets for your output, resolution, audio, camera, screenshot, directory, and many more settings you can personally customize. Thus, allow the steps below to be your guide in screen recording.
Step 1Hit the free Download buttons above to get this remarkable screen recorder. Note that you won’t need a high system to do the recordings.
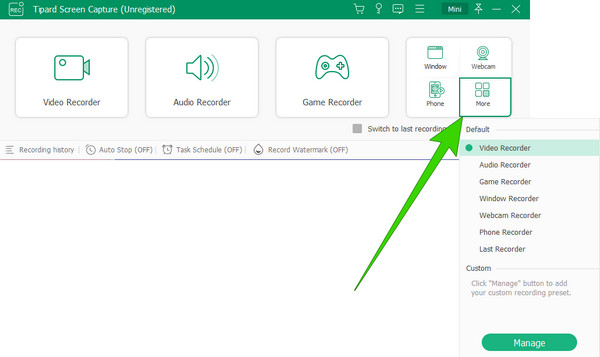
Step 2Fire up the software, and choose a recording tool you want to use. To see more options, click the More button at the tail part of the interface.
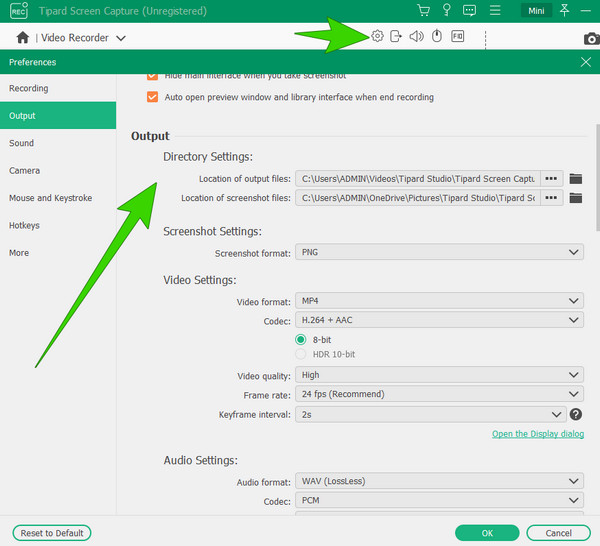
Step 3If you still want to customize the settings, click the Gear button. Then, accordingly, you may customize the following presets: Recording, Sound, Output, Camera, Mouse, Keystroke, Hotkeys, and more. Note that you can find the Directory Settings under the Output section.
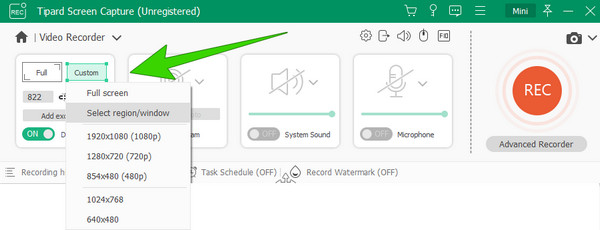
Step 4Suppose you chose the Video Recorder tool. If that’s the case, you can choose the Custom option to adjust the screen frame scale or the Full option if you want to capture your entire screen.
Step 5You can now begin the recording by clicking the REC button when everything is set. A floating window will appear right after that. In this window, you will see other buttons like Pause, Stop, Snapshot, and others to help you during the recording.
Note: Additional editing tools can be found on the succeeding window pages when you click the Stop button. You can trim the video and delete the unwanted frames in your recording..
Part 4. FAQs About OBS and Recording Videos
Does OBS save clips?
Yes. OBS automatically saves your output clips to the designated folder.
Can OBS edit recordings?
Since OBS is a free program, it comes with limitations, including video editing.
How do I save OBS recordings as MP4?
To produce an MP4 output, go to the File>Settings>Output. Then, navigate to the Recording Format selection and choose the MP4.
How do I record and save audio on OBS?
To record using OBS, you must open a new scene and choose your audio from the source. Then, click the start recording button to capture your screen. After that, simply click the Stop button, which will automatically save your recording.
Why is the OBS recording not showing up?
Various reasons cause the OBS to not show up, and these include an invalid recording path, GPU incompatibility, logs, and more.
Conclusion
Now you know where to find your OBS recordings. Remember that the file designation depends on your computer device, as the program has a default directory path for each. On the other hand, we have also promoted a good alternative to OBS if you want to record and at the same time edit the video recording, and that is Tipard Screen Capture.