
How to Convert PDF Files on Mac with PDF File Converter for Mac
PDF File Converter for Mac supports you to convert PDFs into a number of different file format including documents format and image format (Word, Text, Excel, ePub, JPG, PNG, GIF, BMP, etc. Also, you can use the built-in OCR technology to recognize text when converting image-based PDF scans of text documents. All of these features work quite well.
OCR, abbreviation for Optical Character Recognition, is commonly used in the field of mechanical or electronic conversion of scanned images of handwritten, typewritten or printed text into machine-encoded text. Early versions dealt with images of each character and recognized one font at a time. Now "Intelligent" system has been developed with a high degree of recognition accuracy for most fonts. OCR gains vital attention in research filed of pattern recognition, artificial intelligence and computer vision.
Tipard PDF File Converter for Mac is such OCR-based PDF converting software to convert PDF files on Mac. It enables users to dispose PDF conversion to images and various documents, such as Text (*.txt), Microsoft Word (*.doc), Rich Text Format (*.rtf), Microsoft Excel (*.xls), EPUB, HTML, TIFF, JPEG, PNG, GIF, etc. In addition, you can customize PDF page range and adjust image and document settings. With OCR technology, Tipard Mac PDF Converter is capable of reproducing formatted output that closely approximates the original scanned PDF page including images, columns and other non-textual components.
The following is a step-by-step way for you to convert PDF files on Mac with OCR-based Tipard PDF File Converter for Mac.
Step 1: Download and install PDF File Converter software
Step 2: Load PDF files
Step 3: Choose output document/image formats
Step 4: Edit output settings
Step 5: Edit output settings
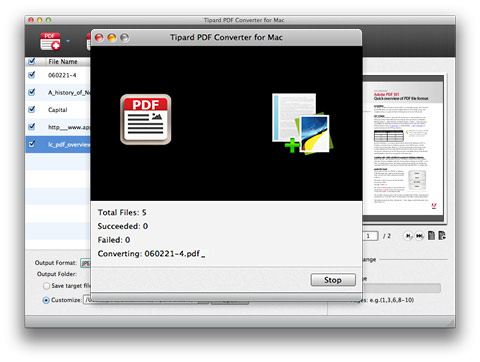
Step 6: Start to Convert PDF file on Mac
Download and install PDF File Converter software
You need to download Tipard PDF File Converter software from Tipard official website. After downloading, you can install this PDF tool based on the instruction.
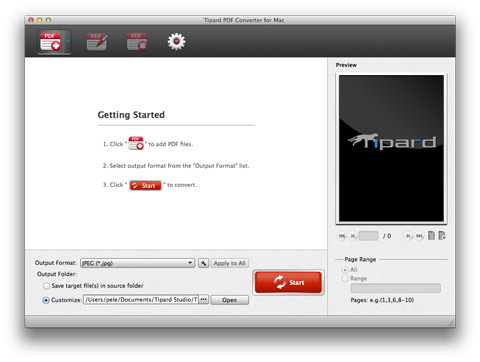
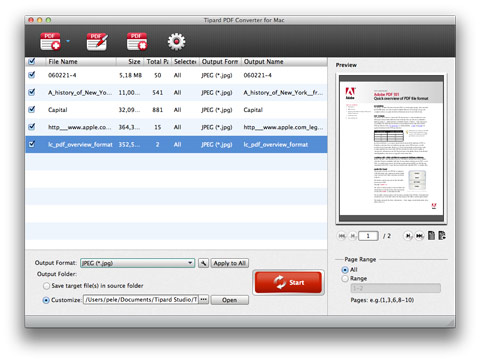
Load PDF files
Load PDF files or folders via "Add File(s)" button or directly drag and drop PDF files to PDF File Converter for Mac main interface.
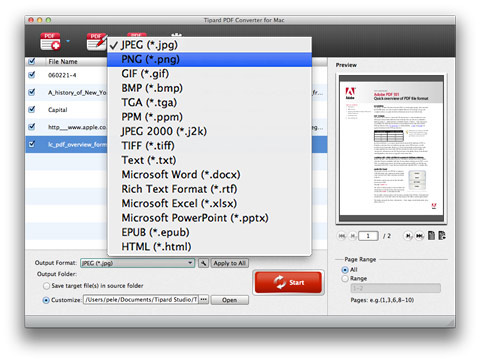
Choose output document/image formats
Click drop-down menu of "Output Format" and select your desired image or document format. This Mac PDF File Conversion software supports you to convert any PDF files including protected one to image formats like JPG, PNG, GIF, BMP, etc and popular text-based document formats like Text, Microsoft Word, Excel, PPT, Rich Text Format even HTML with lightening speed and original quality.
Edit output settings as you like
Click "Edit Advanced Output Settings" buttons to set output settings for output image or documents as you need.
Tips: You can set OCR settings when you convert PDF files to documents.
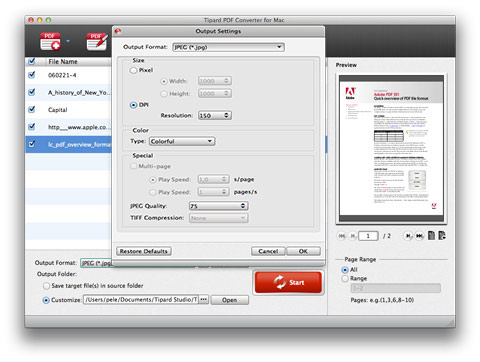
Adjust the general preferences
In the "Preferences" window, you can click "General" option. Here you can specify the destination of the output folder. Here're two options for you: Save target file(s) in source folder and choose the folder you like to save your output format. Also, you can choose how often you update the software.
In the OCR Preferences window, you can choose the conversion mode like Accuracy, Balanced and Speed to meet your different demands. Besides, you're free to choose the output PDF language type.

Start to Convert PDF files on Mac
Click "Convert" button to start to convert PDF to the image or document format you have chosen. This wonderful PDF Converter for Mac is so powerful that it supports batch conversion.

 Best 5 PDF to HTML Converters to Get HTML Webpages from PDF Documents
Try to change PDF documents to HTML5 webpages in easy and fast way, with all your texts, images and other layouts keeps original? Here are your best 5 PDF to HTML converters.
 Top 5 Methods to Convert A Kindle eBook to PDF in Online and Offline Way
There are top 5 Kindle to PDF converters, two of them are online web-based converters, to convert Kindle to PDF free, and the last three are one-step eBook format converters too.
 PDF to Text - Accurately and Reliably Converter PDF to Text
Easily and reliably convert PDF file to Text file format with PDF to Text Converter. Then you can read or edit your converted .txt files on your portable devices anywhere anytime.
 Easily Convert PDF to MOBI by Using Online Converters and Calibre
No paid filters and extra annoying installation, there are best 5 PDF to MOBI converters, to help you change eBook files and transfer to Kindle in free way. Or Professionals can use Calibre to replace.
