
More About Custom Recovery in Android device

Have you ever thought about tinkering with your Android device? If you want to experience your smartphone or tablet much smoother and faster, you should definitely make full use of some customizations such as Custom Recovery and Custom ROMs. Before you move forward and get them on your device, however, you should know exactly what these things are and what they do, right? In this post we're going to be addressing more detail about the application and how to install Android custom recovery.
Part 1. What is Custom Recovery on Android devices
Before we know exactly the definition of custom recovery, we need to learn about Android stock recovery first. All Android devices that you buy come with a recovery environment preinstalled, which called stock recovery. Users can boot to the recovery system by pressing a specific button on their phone or tablet boots or by issuing an ADB command that boots their device to recovery mode. Once you access this stock recovery, it can be used to restore the device to factory default settings, update its operating system, and perform other diagnostic tasks. It's easily for users to access but limited in that it cannot allows you to flash third-party ROMs.
This is the reason why we need a custom recovery. A custom recovery is the recovery that has been developed by third-party developers. Flashing this recovery environment onto your device replaces the default, stock recovery environment with a third-party, customized recovery environment. Compared with the stock recovery, it not only does the same things as stock recovery, but also offers a number of additional features. You can create backups, restore backups, flash ROMs and much more, which the stock recovery cannot do.
What's more, it requires that you install a custom recovery if you want to flash custom ROMs. There are varies of custom recoveries but the most popular applications are ClockWorkMod(CWM) recovery and Team Win Recovery Project (TWRP) recovery. They are quite similar to each other, but some features are different. Both of these two recoveries are excellent and you can choose whichever you like. So next we will walk you through how to install a custom recovery in your smartphone and then get started with flashing ROMs.
Part 2. How to install Custom Recovery on Android devices
Note: First and foremost, make sure your data has been backed up beforehand.
Below is what you will need:
- • Rooted Android Device
- • USB Cable
- • USB Drivers
- • Custom Recovery File
- • Android SDK
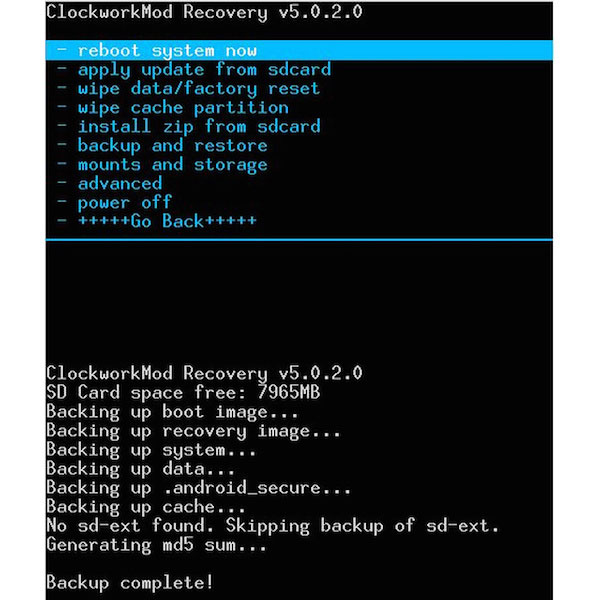
1. Install ClockWorkMod Recovery
For a long time, ClockWorkMod Custom Recovery is the most-used recovery. It can create and restore backups of the whole system. It is easy to operate but its interface is quite boring.
Step 1: Download and install ROM manager for your device from Google play store. It's free. Then launch the apps from you device's main screen.
Step 2: Select the first option "Recovery Setup" on the first screen of the apps. And in the very next screen, tape on the "ClockWorkMod Recovery" option.
Step 3: Next you need to confirm your phone model. You will see a list of phones on your screen and select yours.
Step 4: Tape on the option says "Flash ClockWorkMod Recovery" and leave the rest job to the apps.
Step 5: The apps then download the recovery from the Internet. Hit "Yes" when prompted. Tape on "Reboot into Recovery" on the main screen. Then the system will reboot and soon your Android device boot into the latest ClockworkMod recovery.
Okay, Your device has been successfully equipped with CWM Recovery. Let's see TWRP now.
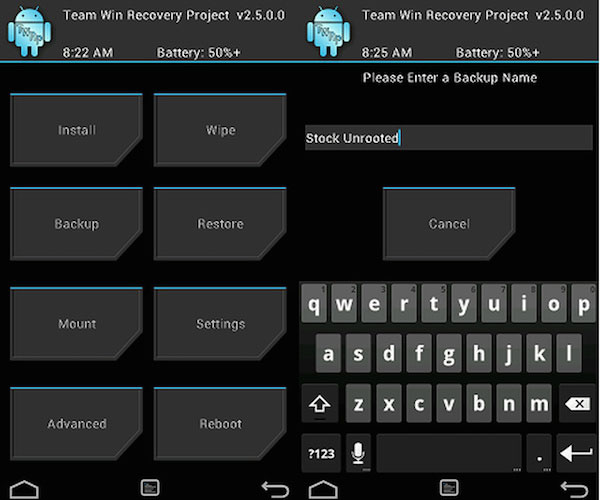
2. Install TWRP Recovery
TWRP Recovery has been increasingly popular these years. It is a non-touch recovery and you don't have to control it by using any buttons on your device. If you're not satisfied with or unable to find the available vision of CWM Recovery, then you can try the TWRP Recovery.
Step 1: Download and install GooManager for your device from Google play store. It's available for free, too.
Step 2: When the app has been installed on your device, launch it from your main menu.
Press the menu button and tape on "Install OpenRecoveryScript".
Step 3: You will then be taken to the screen where the number of your device will be verified. Confirm the model number of your device and hit "Yes". And the app will then download and install the recovery on your device itself.
Step 4: After flashing the recovery, tap on "Reboot recovery" to boot into recovery. Soon your Android device will go into the TWRP Recovery mode.
That's it! Congratulations! You are successful in installing the latest vision of TWRP recovery!
Conclusion
In general, custom recoveries are really excellent instruments, and can be helpful to your device while you have a third-party ROM installed. However, think carefully before you act. Please make sure you will operate the program exactly, as replacing the stock recovery can void the warranty. In fact, most Android users wouldn't even notice any difference between a device with the stock recovery system installed and one with the custom recovery system.
Now that you have already known how to install a custom recovery in your android device such as CWM Recovery and TWRP Recovery, go and find some custom ROM to enjoy the additional features that it brings to your device! We hope this guide above can help you to get a custom recovery installed in your device!

 How to Deal with Android System Recovery Error
When you turn on Android phone, you might be stuck on Android System Recovery. Here is the best way to deal with issue.
 The best way to recover Google account
This article shows you to recover Google account with Google account recovery phone number and email address.
 Choose Suitable Android Recovery Mode
If you have some problems on Android phones, you have to boot Android devices with Android recovery mode.
 10 Best Photo Recovery Apps on Android
Accidentally deleted photos on Android phones? Here are top 10 best Android photos recovery apps to get them back.
