
Top 5 Solutions to Convert Mini DV to DVD

While more and more people use their smartphone to take videos and record wonderful moments, some people still prefer to Mini DV camcorders, such as Panasonic DVR-D150 and Sony DCR-HC30E. It makes sense, when you consider the better image quality of the videos captured by camcorders. However, Mini DV tape is not compatible with digital world. When you want to play family videos on HDTV or DVD player, you need to have Mini DV to DVD conversion first. It is a big challenge to transfer videos from one medium to another to ordinary people. Therefore, we will multiple ways to help you.
Method 1: How to capture Mini DV with WMM
Before transfer Mini DV to PC, connect your camcorder to computer with Firewire connector. If your computer does not support Firewire cable, you can connect Firewire cable to a USB adaptor and plug the USB adaptor into your computer. Turn the camcorder in VCR mode. And now you can capture MiniDV tapes to DVD with WMM as below.
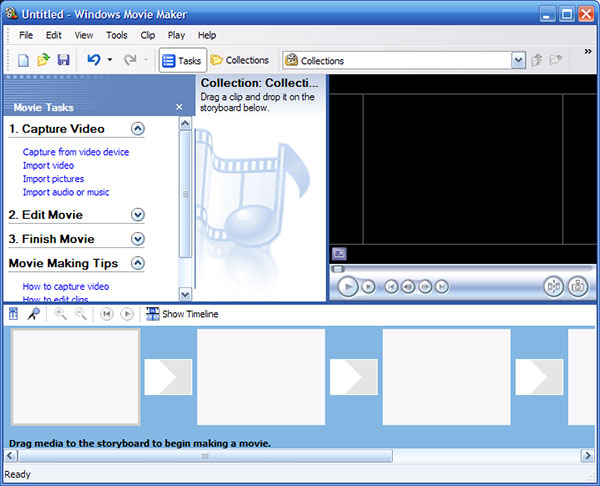
Open Windows Movie Maker. Unfold the Tools menu and choose Options from the list to open options window.
Go to Advanced tab on options window and locate to Video properties section. The camcorders sold in US use the NTSC format and other regions use PAL. Select the video format according to your camcorder. Click on the OK button to save it for converting.
When you back to main screen, choose Capture from video device under the Capture Video task. On the pop-up window, enter a name for the video file and set a location to save it; hit the Next button to continue. On video setting window, choose Digital device format and hit the Next button. Then you can decide to capture parts of the tape or the entire tape on capture method window. Hit the Next button to go to video capture window.
The Start Capture button and Stop Capture button are used to control the start point and end point of the video capture.
Method 2: How to record Mini DV with iMovie
Instead of the Firewire connector used on our old DV cameras, you should use an adapter in order to transfer files from MiniDV to Mac first. And then you can connect the MiniDV camcorder with adapter, install LifeFlix to import the content from the DV into your Mac.
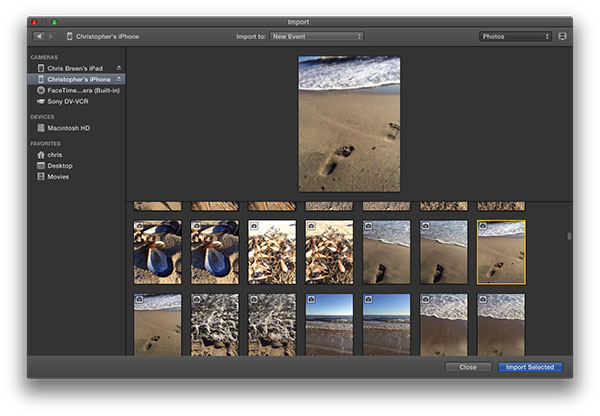
Open iMovie and go to the import screen by clicking on the Import button in the tool bar.
When the import screen appears, choose your camcorder in the Cameras section. Then you can preview the video you want to record by hitting the Play button at the top of the import screen.
Unfold the Import to drop-down menu at the top of the screen, select New Event, pick a name for the event and press the OK button to confirm settings.
Search for the start point of the video tape and click on the Import button to start copying video tape for convert Mini DV to DVD disc on Mac.
You can stop copying by clicking on the Stop Import button at any time. When video record is done, hit the Close button to shut the import screen.
Method 3: Copy DV tapes to DVD with DVD Recorder
If you do have a DVD Recorder, you can use the standard composite or S-video connections on the camcorder and DVD recorder to turn the MiniDV tapes into DVD. Just follow the process to copy the tapes.
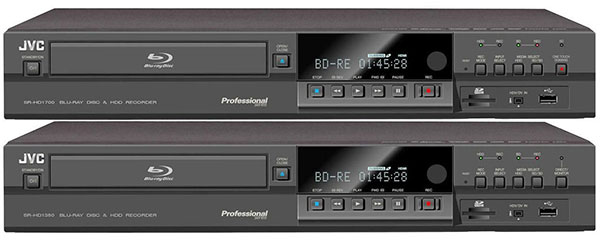
Connect the camcorder together with the DVD recorder. And then switch the DVD recorder from the tuner to its AV inputs to make sure the signal from those inputs to record on DVD.
And then plug in the Audio/Video cables supplied with the camcorder to the AV outputs of camcorder. Switch the DVD recorder to AV-in, Line-in, or Aux in.
Insert the MiniDV tapes into the camcorder and the DVD-R or DVD-RW into the DVD recorder. Make sure the DVD is a recordable one before copying DV tapes to DVD.
Press record on the DVD Recorder before you start the MiniDV. And now the DVD recorder will record content from MiniDV. Once finished, press record stop the DVD recorder and stop on the camcorder.
Method 4: MiniDV to DVD with Tape Transfer Service
If you have no idea about the methods to burn MiniDV tapes to DVD, you can also use the Tape Transfer service instead. As for the service, you only have to ship your tapes to them with about US$10.00 for one tape. And then they can capture the video and send you a DVD or digital files to download. Usually it takes few weeks to receive the DVD discs. Walgreens, Costco, iMemories and Southtree all provides the tape transfer service, you can check the detail before converting.
Method 5: Convert Mini DV to DVD with Tipard DVD Cloner
If you have converted Mini DV to DVD file and want to copy MiniDV content into DVD, you can also try one of the most powerful DVD copy software, Tipard DVD Cloner. It can make perfect 1:1 DVD copy, movie-only copy and even customized copy effortlessly.
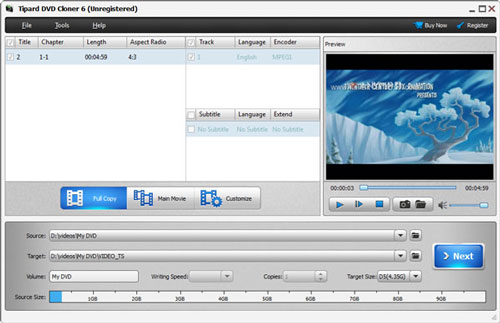
Click the "File" button. Then find the DVD movie that contains the content of the Mini DV you want to copy into another DVD disc.
Select "Target" from DVD disc, DVD folder and ISO file. Then click "NEXT" which provides more options for you to copy DVD.
Click on "Start" and start the duplicate.
Conclusion
Based on the guidance above, you might understand how to convert Mini DV to DVD. We suggested using a PC to copy Mini DV to disc. Firstly, while most people do not have a professional DVD recorder, almost everyone has a computer. It is unnecessary to purchase a DVD recorder at all. Plus, you can transfer Mini DV to PCs at uncompressed video formats, such as AVI. Such video formats could keep the original quality as much as possible. If you do have a DVD recorder, you can also use it directly to turn the Mini DV tapes into DVD files. And you can also use the Tape Transfer service if you only have few MiniDV tapes. If you have any query about the topic, you can feel free to let me know in the comments.

 Top 6 MOV to DVD Converter Software
How to burn MOV to DVD, which let you play MOV files on regular DVD Players? Just check out the top 6 MOV to DVD Converters from the article.
 WinX DVD Copy Pro and 5 Best Alternatives
Just want to copy or backup your large collection of DVDs? Check WinX DVD Copy Pro and 5 alternatives programs from the article.
 How to Copy DVD to USB with The Easiest Way
Is there any way to play DVD on the go without DVD Player? Check out the multiple solutions about how to copy DVD to USB.
 Great Methods to Burn iPhone Video to DVD
What should you do to burn iPhone video to DVD? The article explains methods for saving videos taken by iPhone to DVD.
