
Easiest Way on How to Copy DVD on Mac

When it comes to collect and maintain all the various DVD discs, you may be frustrated and confused about how to deal with these DVDs. What if your precious DVD discs are broken even lost? In what way can you sort and keep all the DVD discs? The answer is copy a DVD to a Mac! This is a great way to protect all the contents of your DVD, which are copy-protected or not against a variety of dilemmas, such as being scratched or lost. However, how to copy a DVD on a Mac without any quality loss? Just check out the best methods to copy DVD to video formats on Mac. There are various detailed steps on how to deal with copying DVD on a Mac, just follow these following methods to learn how.
Part 1: How to copy a protected DVD on a Mac
It should be complicated to copy a DVD on Mac with DRM protection. As for the case, you need some professional software instead. Just check out the best program to solve the issue as below.
Method 1: Copy a DVD on a Mac via Tipard DVD Cloner for Mac
As professional and effective software to copy a DVD on a Mac, Tipard DVD Cloner for Mac will never let you down. In addition to its easy operation, the DVD copier for Mac is accessible and useful to occupy with all platforms, multiple supported inputs and outputs, is quite a useful copying, burning and archiving tool to make DVD copy on a Mac a reality.
Main Features of Tipard DVD Cloner for Mac
- 1. 100% safe: copy DVD-9 to DVD-9, DVD-5 to DVD-5 exactly with zero quality loss.
- 2. High quality of files: compress DVD-9 to DVD-5 still with high quality.
- 3. Various options: burn DVD on Mac from DVD disc, folder, iOS files to DVD.
- 4. Three Copy modes are available to satisfy your needs: Full Copy, Main Movie, customized.
How to copy a protected DVD on a Mac
Download Tipard DVD Cloner for Mac from the official website. And then install the program in your Mac.
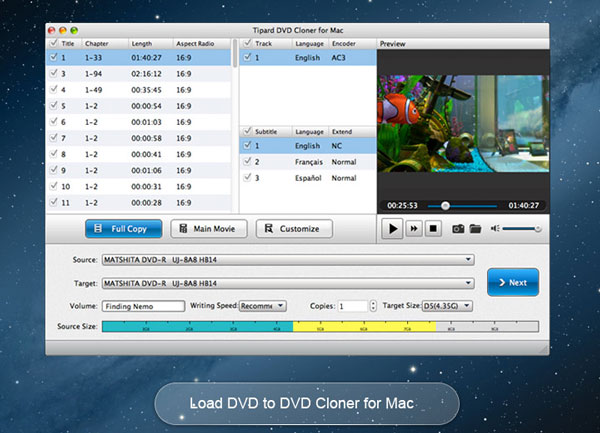
Put in your DVD disc into the DVD drive on your Mac. Click "Load Disc" and "Add File" button on the upper column in order to import files.
Wait for several seconds, there will be a list of titles showed in the screen. DVD Clone for Mac will select the main title automatically.
And then choose the desired output format for copy a DVD to a Mac from the "Output Profile".
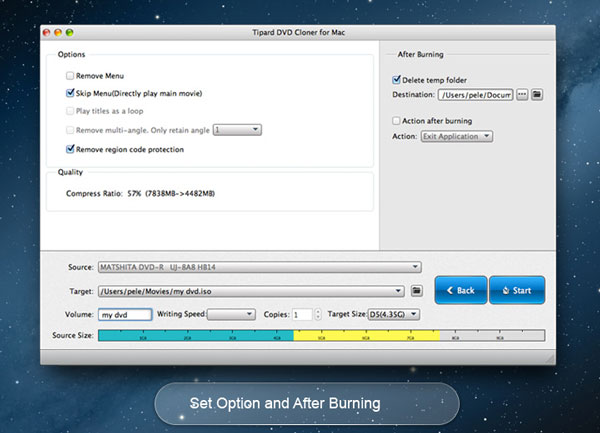
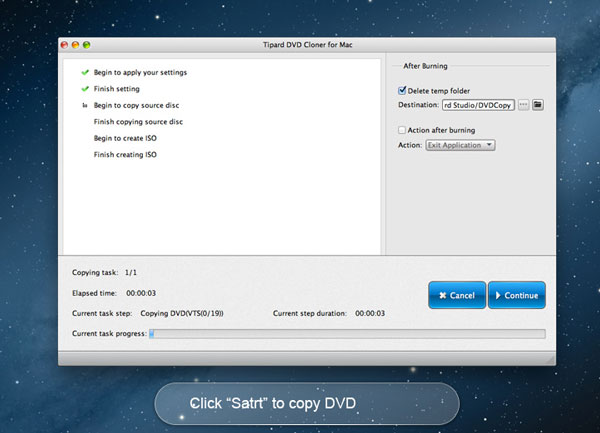
Check all the requests and set your wanted name and destination. Now, all you need to do is just click the "RUN" button to copy DRM-protected DVD to a Mac.
Method 2: Copy a DVD on a Mac via WinX DVD Ripper for Mac
In order to copy a DVD on Mac with ease, WinX DVD Ripper for Mac should be another DVD copier you need to take into consideration. Check out how to extract the DVD content to Mac with more detail as below.
Step 1: Download program and install it on your Mac. Insert your DVD disc into the DVD drive. If your Mac doesn't have a drive for DVD, you can try to connect your Mac with an external optical drive.
Step 2: Launch program, and then click "DVD" button on navigation bar in order to load in your DVD. All you need to do is to wait just a few seconds, and then you will find there is a list of all titles presented in the screen.
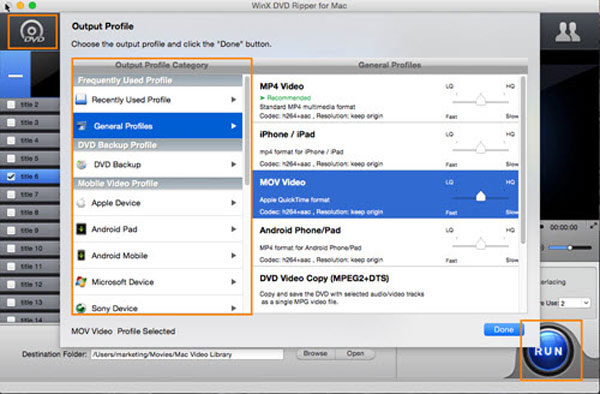
Step 3: The program will copy a DVD on Mac with the main title selected. At the same time, there will be an "Output Profile" page popping up which enable you to choose a format as the output from listed categories, such as "General Profiles", "DVD Backup Profile", "Mobile Video Profile", and "Web Video Profile" and so on.
Step 4: Look through all the requirements and set destination folder. And then you can just click the "RUN" button. The DRM-protected DVD copy process will be continued on your Mac. And then you can easily find the files by copying DVDs on your Mac.
Part 2. How to Copy an Unprotected DVD on a Mac
How to copy unprotected DVD on Mac? You would to know the solution to the problem. Here will show you the easiest way to clone an unprotected DVD on you Mac OS.
Step 1: Insert your DVD to Mac. Then Mac will launch the Apple DVD Player automatically. Just quit the DVD Player. You will see a small disc-like DVD icon is left on the screen.
Step 2: Open "Disk Utility" which can be found in the "Utilities" folder ("Applications" > "Utilities"). Choose your wanted DVD disc on the left column list. Don't be confused when you notice that there are two DVD icons. Choose the actual DVD icon to copy DVD on Mac.
Step 3: Click the "New Image" at the top of the Disk Utility main window.
Step 4: In the "Save As..." window, you can enter a name of your new DVD and choose a destination. Also, you should check if the "Image Format" selection is set to "DVD/CD Master" and meanwhile, the "Encryption" selection is set to "none". Then Click the "Save" button.
Step 5: After the DVD copy process to your destination drive is done, you can go back to Disk Utility. It's not difficult to find your new Disk Image be presented in the left list of the Disk Utility page. Click to eject the original DVD from your Mac.
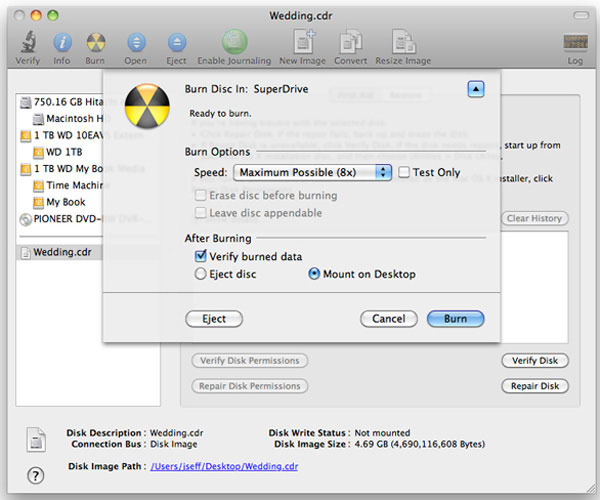
Step 6: Insert a new DVD disc, which is writable into your Mac. Select that new Disk Image from the list in the Disk Utility window. Then click the "Burn" button to go on. The burn speed is selectable and the "Verify Burned Data" is easy for you to check if you want.
Importantly, you should be aware that your destination location has enough space when you copy DVD to Mac.
Conclusion
Obviously, with the help of the methods above, copying a DVD on a Mac is never a hard task, which you can effortlessly perform. Of course, regardless of our computer skills, you can enjoy the DVD movies on Mac now. Hope all the methods offered by this article can satisfy your needs. Besides, you can learn how to copy DVDs on Windows PCs using WinX DVD Copy Pro if needed.

 DVDShrink for Mac to Copy and Compress DVD
DVDShrink is more often been used as DVD Compress software. For Mac users, DVD Cloner can be the best alternative.
 Best 1Click DVD Copy to Clone DVD Disc/Movie
When you need to copy DVD disc, 1Click DVD Copy can produce a quite excellent-quality copy. Learn more details about the program and alternatives.
 How to Copy A DVD on Windows/Mac
Step by step how to copy a DVD on Windows 10/8/7 and Mac. You can learn the best way to copy a DVD to a blank disc.
 Top 3 Methods to Copy A DVD in Windows 7
Having encountered the awkward situations to copy a DVD on Windows 7? The article explains 3 easiest methods.

Home | About | Privacy Policy | Terms of Use | Affiliate | Support | Contact Us
Copyright © 2024 Tipard Studio. All Rights Reserved.
Easiest Way on How to Copy DVD on Mac